

Your morning coffee, that glass of red wine, even your favorite marinara sauce, they all leave their mark on your teeth over time. If you've noticed your smile looking a little dull, you're not alone. Millions of people search for natural teeth whitening methods every year, hoping to brighten their teeth without harsh chemicals or expensive in-office treatments that can run hundreds of dollars per session.
The good news? Several at-home remedies actually hold up to scrutiny. Some use ingredients you already have in your kitchen, while others involve small habit changes that protect your enamel and prevent further staining. The key is knowing which methods are backed by real evidence and which ones are just internet folklore that could damage your teeth.
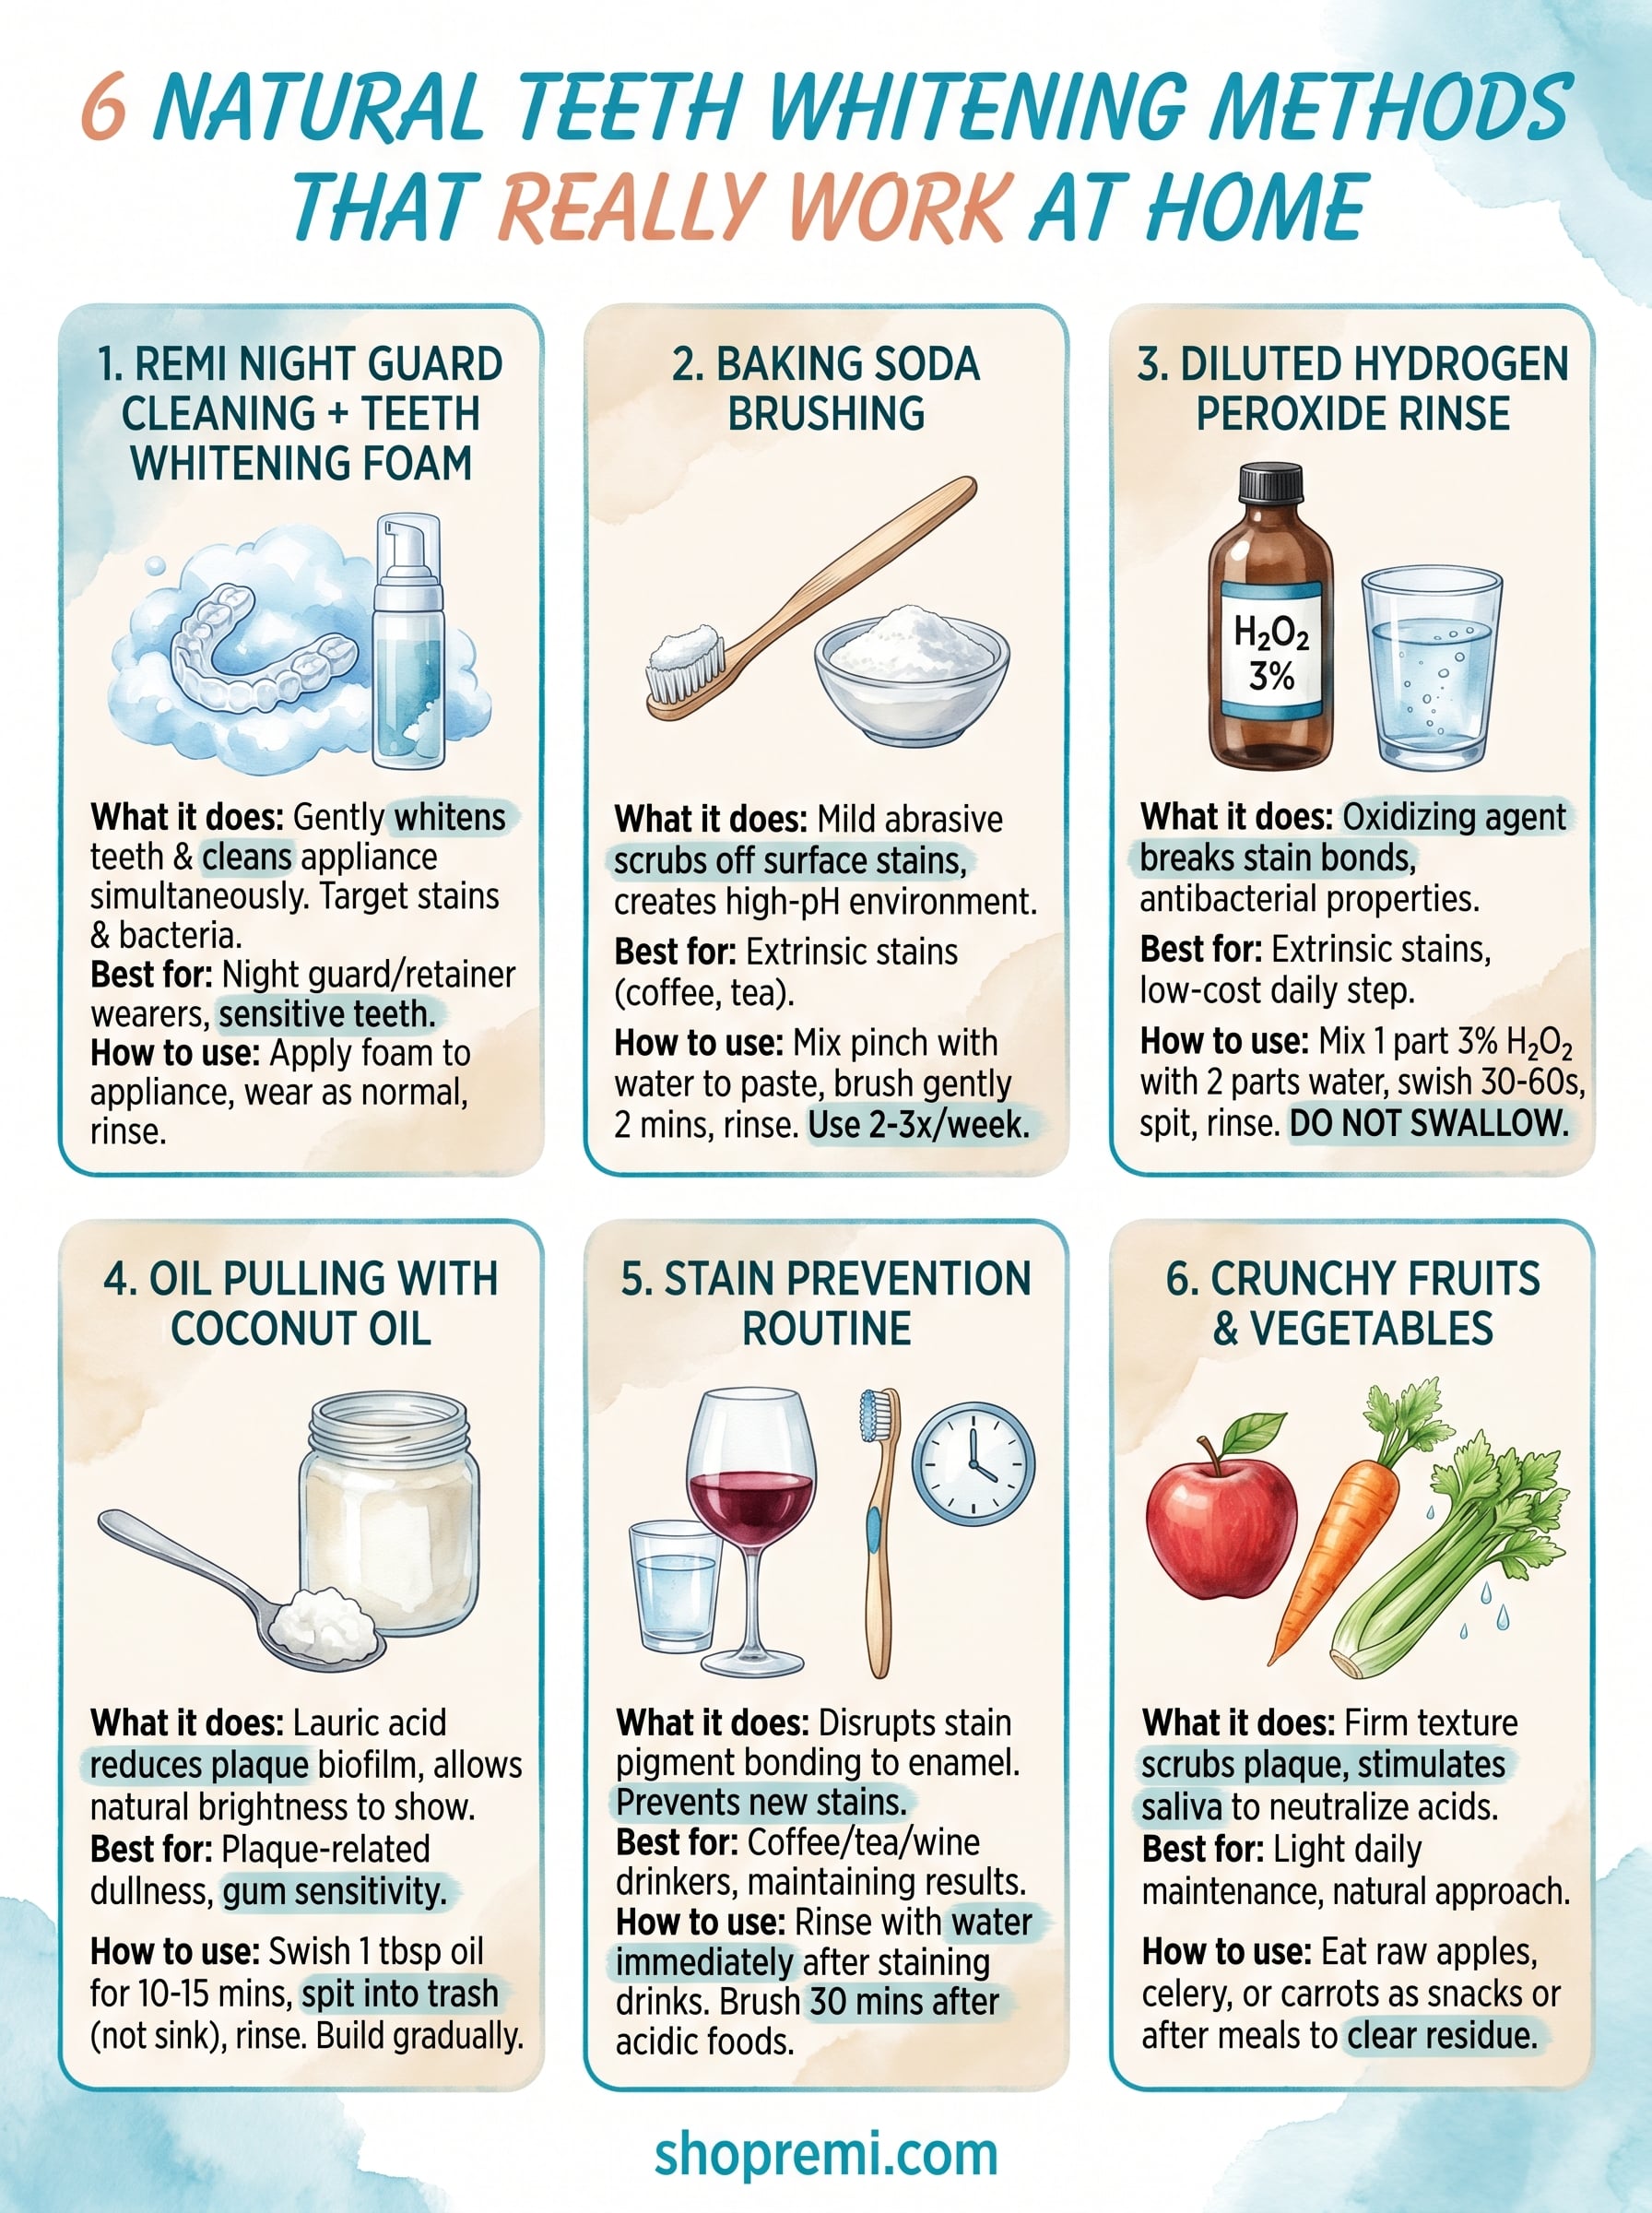
Here at Remi, we spend our days thinking about oral health, from custom night guards that protect your teeth while you sleep to our dual-purpose whitening and cleaning foam designed for everyday use. We worked with our in-house dental team to sort fact from fiction and put together this list of six natural whitening methods that are both safe and effective. Let's get into what actually works.
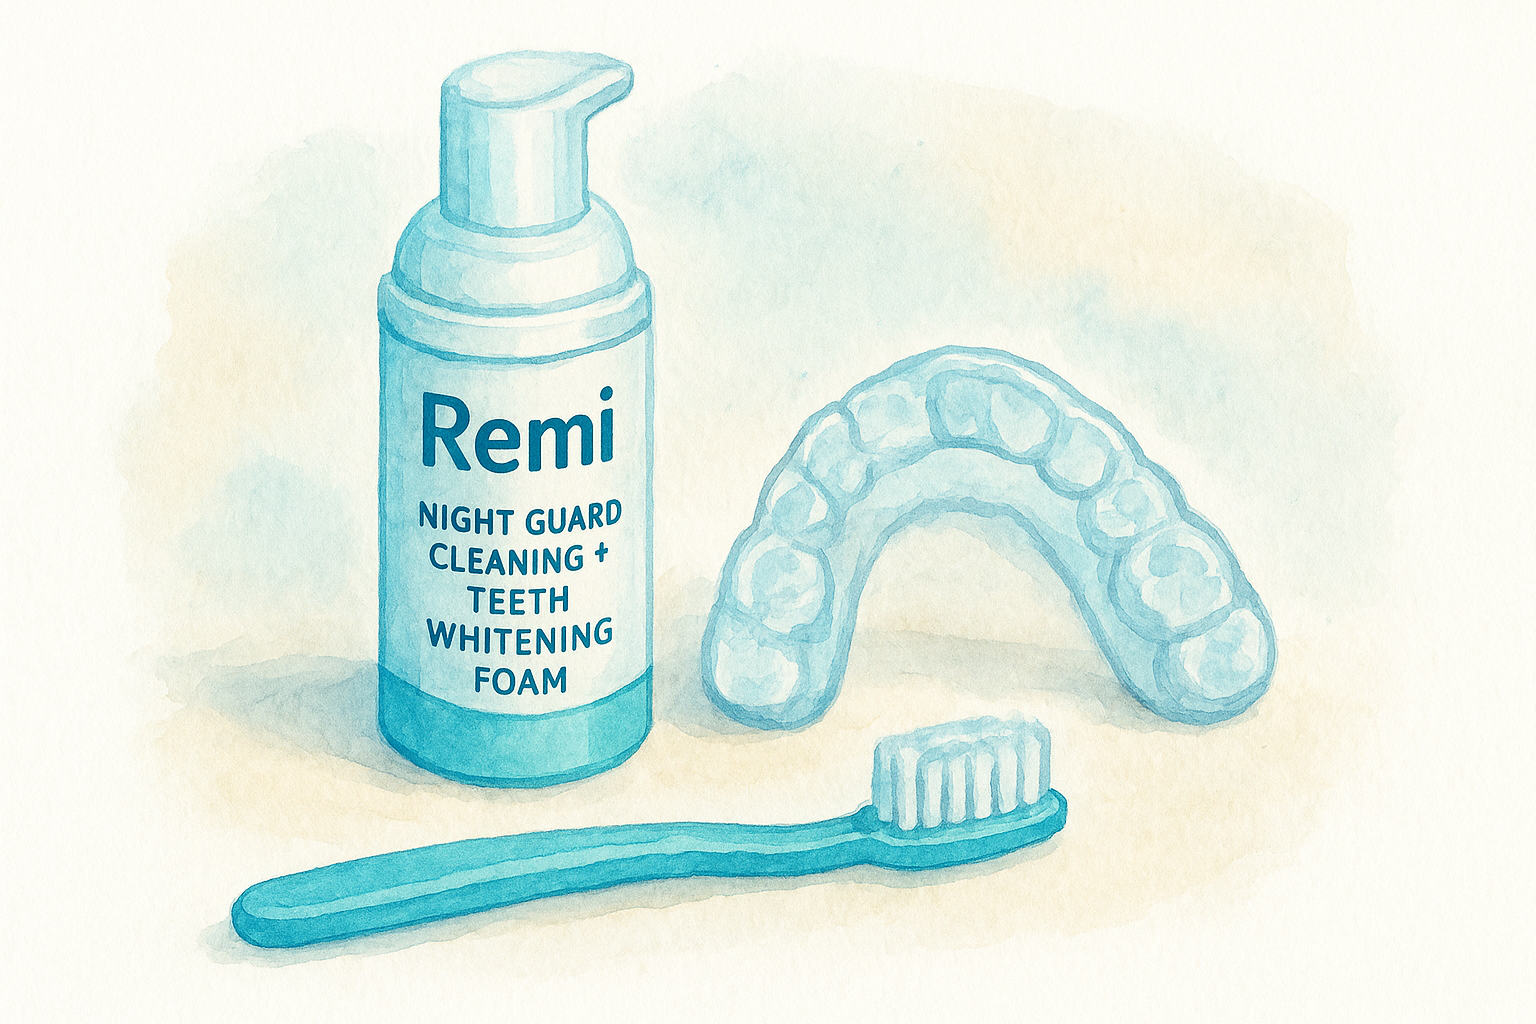
1. Remi Night Guard Cleaning + Teeth Whitening Foam
If you wear a night guard or retainer, you already have a built-in opportunity to whiten your teeth while you clean your appliance. Remi's Night Guard Cleaning + Teeth Whitening Foam turns your existing dental routine into a two-in-one treatment, making it one of the most practical natural teeth whitening methods on this list.
What it does and why it works
The foam combines gentle whitening compounds with cleaning agents that break down bacteria and surface stains on both your appliance and your teeth simultaneously. The foaming action reaches between teeth and along the gumline, where a standard toothbrush often falls short.
Whitening ingredients lift discoloration caused by coffee, tea, and food pigments by targeting stain molecules at the enamel surface. Because the foam sits against your teeth during appliance wear time, it gets extended contact without any extra effort from you.
Best for
This method suits people who already use a night guard or clear retainer and want a low-effort way to add whitening to their routine. It also works well if you have sensitive teeth that react poorly to strips or trays.
- People who grind their teeth and wear a night guard nightly
- Retainer wearers who want to maintain their smile after orthodontic treatment
- Anyone who wants consistent, gradual whitening without sensitivity
How to use it at home
- Apply a small amount of foam to your clean night guard or retainer
- Insert the appliance over your teeth as normal
- Wear for your standard wear time, then remove and rinse both your mouth and appliance thoroughly
You can also apply the foam directly to a toothbrush and brush for one to two minutes as a standalone step.
How soon you'll see results
Most users notice visibly brighter teeth within two to four weeks of daily use. Results build gradually, which is far easier on enamel than fast-acting treatments.
Gradual whitening produces more even results and significantly reduces the sensitivity that often comes with intensive whitening treatments.
Safety notes and common mistakes
Never swallow the foam, and always rinse thoroughly after use. The most common mistake is inconsistency. Skipping days stretches your timeline considerably. Avoid use if you have open sores or active gum inflammation until you check with your dentist.
Typical cost
Professional in-office whitening runs $300 to $800 per session. Remi's foam costs a fraction of that and covers weeks of daily use, making it one of the most cost-effective options available.
2. Baking Soda Brushing for Surface Stains
Baking soda has been used as a tooth-cleaning agent for well over a century, and modern research backs up its reputation. Among the more accessible natural teeth whitening methods, this one stands out because the ingredient costs almost nothing and works quickly on surface-level discoloration.
What it does and why it works
Baking soda, or sodium bicarbonate, is a mild abrasive that physically scrubs stain deposits off your enamel without the aggressive scratching that harsher abrasives cause. It also creates a high-pH environment in your mouth, which discourages bacteria and neutralizes acids that degrade enamel over time.
Studies published in the Journal of the American Dental Association found that toothpastes containing sodium bicarbonate removed significantly more stains than those without it.
Best for
This method works best for extrinsic stains, the kind sitting on the outer surface of enamel from coffee, tea, and tobacco. It will not change the natural color of your teeth or address staining beneath the enamel layer.
How to use it at home
- Mix a small pinch of baking soda with enough water to form a thin paste
- Apply it to your toothbrush and brush gently for two minutes
- Rinse thoroughly and follow with your regular toothpaste
How soon you'll see results
You can expect noticeable brightening within two to four weeks of use two to three times per week.
Safety notes and common mistakes
Limit use to two or three sessions weekly to avoid wearing down enamel over time. Daily brushing with baking soda alone strips protective enamel faster than most people realize.
Typical cost
A standard box of baking soda costs under $1, making this the most budget-friendly option on the list.
3. Diluted Hydrogen Peroxide Rinse
Hydrogen peroxide is one of the most well-researched natural teeth whitening methods available at home. You'll find it as an active ingredient in most commercial whitening products, but using a diluted version as a rinse costs a fraction of the price and requires nothing more than a drugstore bottle.
What it does and why it works
Hydrogen peroxide is an oxidizing agent that breaks down the chemical bonds holding stain molecules to your enamel. Once those bonds break, the stain compounds stop absorbing light the same way, and your teeth look noticeably brighter. It also carries mild antibacterial properties that help reduce plaque-causing bacteria along the gumline.
Best for
This rinse works well on extrinsic stains from coffee, tea, and red wine. It suits people who want a low-cost step beyond baking soda brushing and are comfortable adding a brief daily rinse to their routine.
- Coffee and tea drinkers wanting a quick daily treatment
- People with mild to moderate surface staining
- Those looking for a proven, budget-friendly addition to their existing routine
How to use it at home
Mix one part 3% hydrogen peroxide with two parts water. Swish the solution around your mouth for 30 to 60 seconds, then spit and rinse with plain water before brushing.
How soon you'll see results
You can expect gradual brightening within two to six weeks of consistent daily use. Results vary based on the depth and source of your staining.
Safety notes and common mistakes
Never use concentrations above 3% on your teeth. Higher concentrations irritate gum tissue and trigger lasting sensitivity. Swallowing the rinse is the most common mistake, so always spit and rinse thoroughly.
Using undiluted hydrogen peroxide is one of the fastest ways to cause tooth sensitivity, always dilute it before use.
Typical cost
A bottle of 3% hydrogen peroxide costs under $2 at most pharmacies, making it one of the most affordable whitening options on this list.
4. Oil Pulling with Coconut Oil
Oil pulling is an ancient practice with a simple premise: swish oil around your mouth to pull bacteria and debris away from your teeth and gums. When it comes to natural teeth whitening methods, coconut oil pulling has gained real attention because it addresses one of the root causes of dull-looking teeth.
What it does and why it works
Coconut oil contains lauric acid, a compound with antibacterial properties that breaks down the bacterial film coating your teeth. That film, called plaque, traps pigment from food and drinks and makes your teeth look yellower over time. Reducing it allows your enamel's natural brightness to show through more clearly.
Best for
This method works best for people dealing with plaque-related dullness rather than deep staining. It suits those who want a gentle, additive-free step they can fit into a morning routine.
- People with gum sensitivity who can't tolerate abrasive methods
- Those looking for an entirely natural, additive-free approach
- Anyone wanting to combine gum health support with gradual whitening
How to use it at home
- Take one tablespoon of coconut oil and let it melt in your mouth
- Swish it around for 10 to 15 minutes, pulling it through your teeth
- Spit into a trash can, never the sink, then rinse with water and brush normally
How soon you'll see results
Expect gradual improvement over four to eight weeks of consistent daily practice. Results are subtle but build steadily with regular use.
Oil pulling works best as a complement to brushing and rinsing, not a replacement for either.
Safety notes and common mistakes
Never swallow the oil after pulling since it contains the bacteria and debris you just removed. Spitting into a sink can clog your drain over time as oil solidifies in pipes.
Typical cost
A jar of coconut oil costs $8 to $12 at most grocery stores and lasts for months of daily use.
5. Stain Prevention Routine That Keeps Teeth White
Among all the natural teeth whitening methods available, prevention is the one most people overlook. Stopping stains before they settle into your enamel is far more effective than trying to reverse them later.
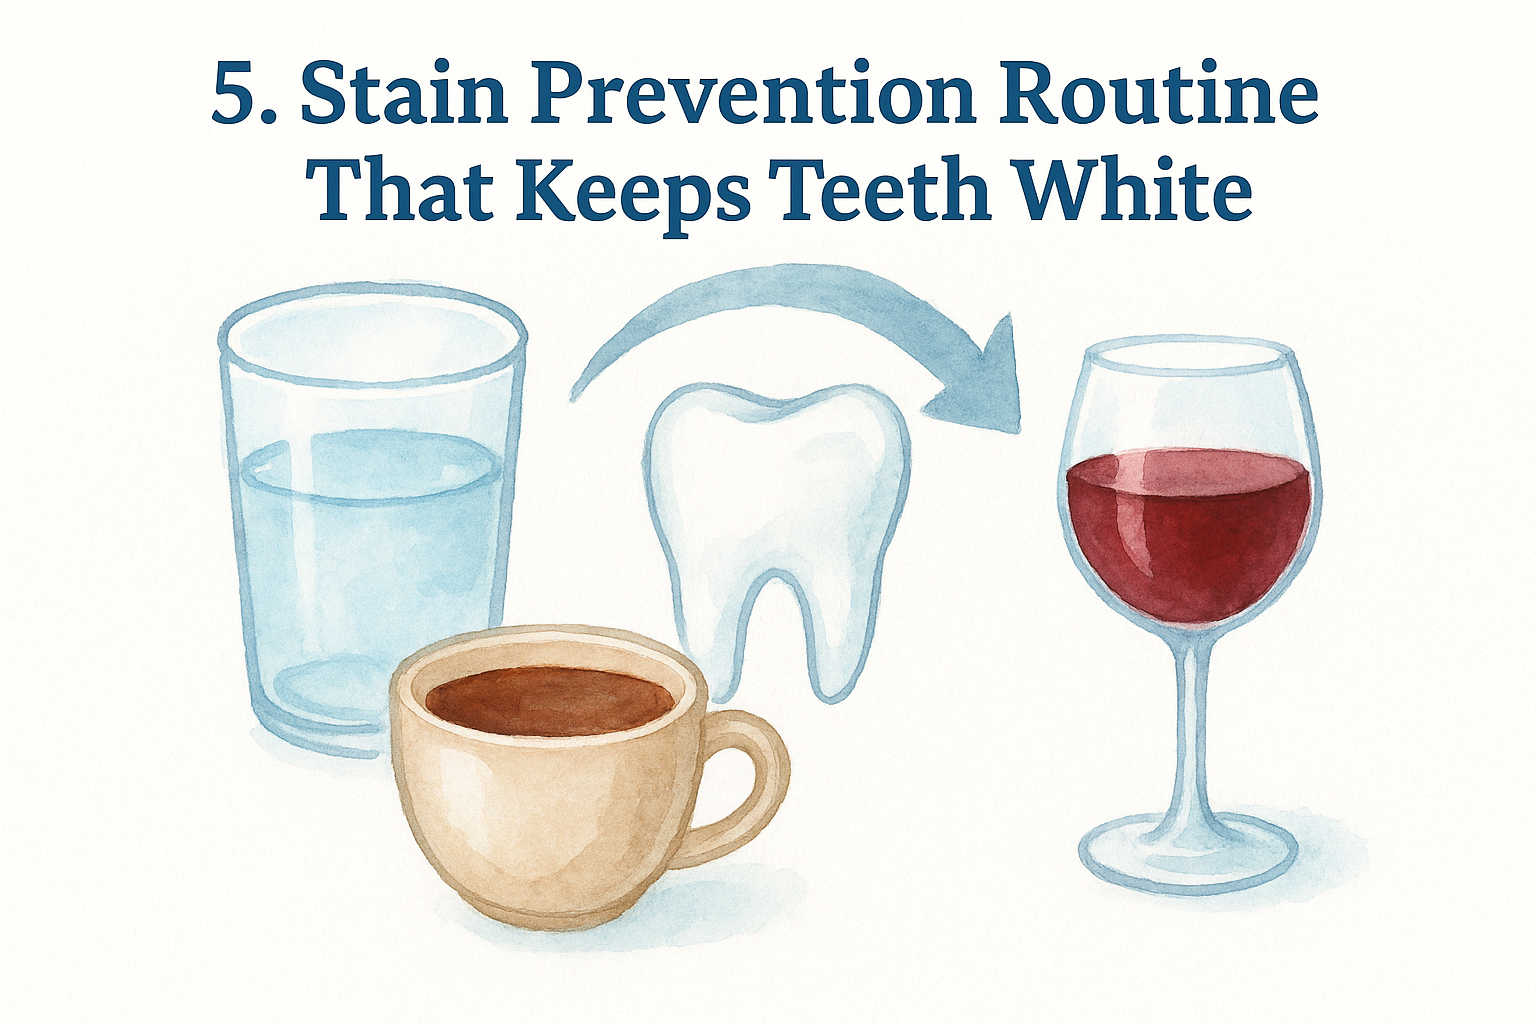
What it does and why it works
Stains form when pigmented compounds from food and drinks bond to the biofilm coating your teeth. A consistent prevention routine disrupts that bonding process before it becomes permanent. Rinsing with water after staining beverages, for example, reduces the contact time those pigments have with your enamel dramatically.
Preventing stains from forming requires far less effort than removing them once they have set into enamel.
Best for
This approach suits anyone who drinks coffee, tea, or red wine regularly and wants to protect existing whitening results. It pairs well with every other method on this list.
How to use it at home
- Rinse your mouth with plain water immediately after coffee, tea, or wine
- Brush 30 minutes after acidic foods to avoid scrubbing softened enamel
- Use a straw for dark beverages when practical to limit enamel contact
How soon you'll see results
You will notice your teeth staying brighter longer within a few weeks of building this habit, particularly if you combine it with another active whitening method.
Safety notes and common mistakes
The biggest mistake is brushing immediately after acidic drinks, which scrubs weakened enamel rather than protecting it.
Typical cost
This routine costs nothing beyond your existing products.
6. Crunchy Fruits and Vegetables for Gentle Polishing
Your grocery cart may already hold some of the simplest natural teeth whitening methods available. Apples, celery, and carrots act as natural scrubbing agents when you chew them, clearing surface debris with every bite.
What it does and why it works
Crunchy produce has a firm texture and high water content that stimulates saliva production while physically scraping loose plaque from your enamel. Saliva neutralizes mouth acids and carries natural cleaning enzymes that help reduce staining compounds before they bond to your teeth.
Best for
This method works best for light daily maintenance rather than reversing deep stains. It suits anyone who wants a food-based approach with no added products.
- People looking to maintain existing whitening results
- Those who want to combine good nutrition with consistent oral care
How to use it at home
Eat raw apples, celery, or carrots as regular snacks or at the end of meals. Finishing a meal with crunchy produce helps clear food residue before it has time to settle on your enamel.
Eating a raw apple after lunch is one of the simplest habits you can build to keep surface stains from accumulating.
How soon you'll see results
Results are gradual and subtle, building over several weeks of consistent daily intake. This method maintains your current level of brightness better than it creates whitening from scratch.
Safety notes and common mistakes
Avoid using acidic fruits like lemons for this purpose since their acid content softens enamel rather than polishing it gently.
Typical cost
Most crunchy produce costs $1 to $3 per bag, and since you're already buying it for nutrition, this is effectively a zero-cost addition to your whitening routine.
Your Next Step
Every natural teeth whitening method on this list works best when you stay consistent. Baking soda and hydrogen peroxide target surface stains quickly, while oil pulling and crunchy produce build gradual improvements over weeks. Combining two or three of these approaches gives you far better results than relying on any single method alone.
The method that gives you the most return for your effort is the one that fits your existing routine. If you already wear a night guard or retainer, you have a built-in whitening opportunity every single night. Adding Remi's foam to your appliance routine requires no extra time and delivers steady brightening with zero sensitivity risk.
Start with what you have today, then build from there. If you want to protect your teeth while you sleep and whiten at the same time, the Remi custom night guard is a practical place to begin.

