

You wear your night guard every night to protect your teeth from grinding, but when you wake up and pull it out, you notice a weird taste or smell. Maybe you rinse it quickly under water and toss it in the case. Or maybe you brush it once in a while when you remember. The truth is most people have no idea how often they should actually clean their night guard, and that confusion leads to bacteria buildup, stains, and an appliance that feels gross in your mouth.
The good news is that keeping your night guard clean does not require complicated routines or expensive products. You need a simple schedule: rinse it every single morning, do a thorough cleaning once a week, and give it a deep clean once a month. This approach prevents bacteria from turning your guard into a breeding ground while extending its lifespan.
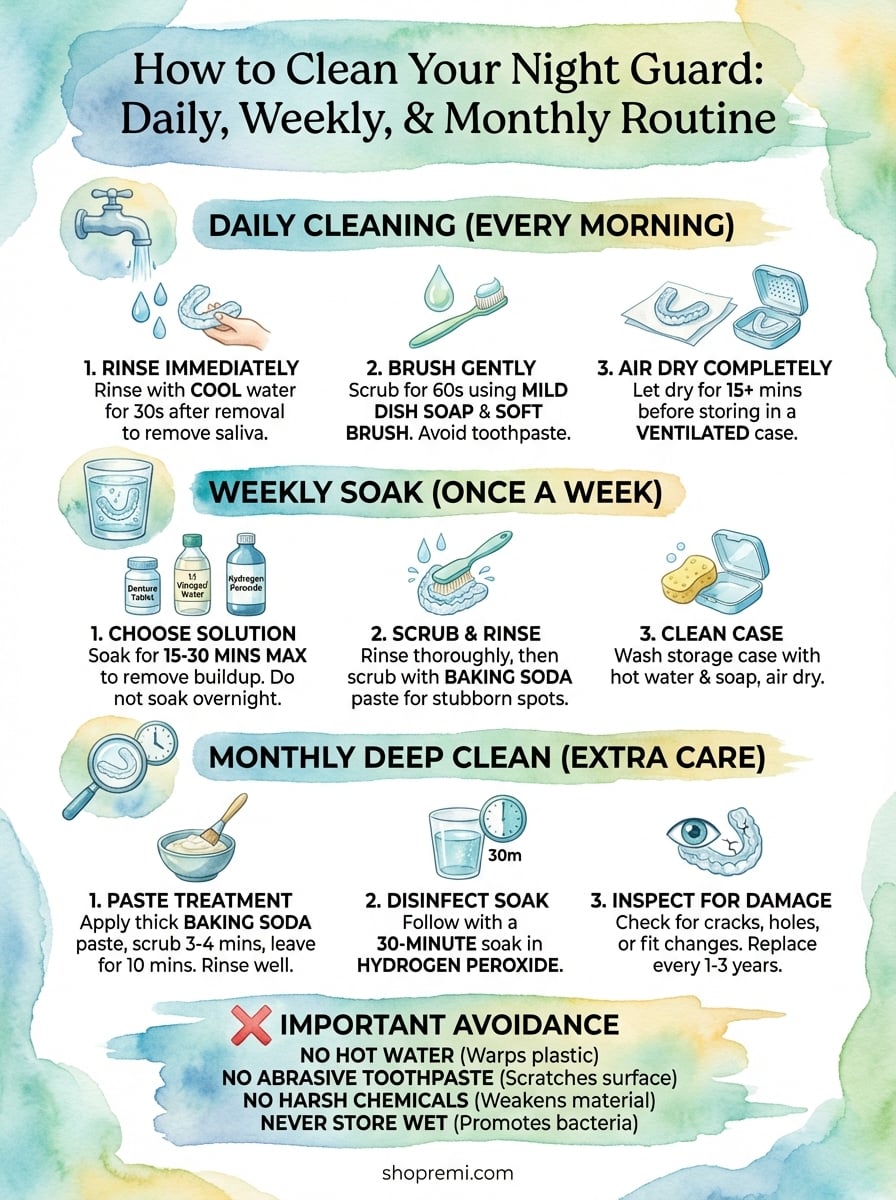
This guide breaks down exactly how often you need to clean your night guard and what to do at each interval. You will learn the daily routine that takes 60 seconds, the weekly deep clean that removes stubborn buildup, the monthly maintenance that keeps your guard in top shape, plus the common mistakes that damage your guard and shorten its life. By the end, you will have a clear cleaning schedule that protects both your night guard and your oral health.
Why a clean night guard matters
Your night guard sits in your mouth for six to eight hours every night, collecting saliva, bacteria, food particles, and plaque. When you skip regular cleaning, you create the perfect environment for harmful microorganisms to multiply. These bacteria do not just make your guard smell bad or taste gross; they can cause gum infections, tooth decay, and bad breath that no amount of morning brushing can fix. The longer you go between cleanings, the harder these deposits become, turning soft plaque into crusty, yellow-brown tartar that sticks to your guard like concrete.
Health risks you face with poor cleaning
A dirty night guard transfers bacteria directly to your teeth and gums every time you insert it. Streptococcus mutans, the primary bacteria responsible for cavities, thrives in the warm, moist environment of an uncleaned guard. You can develop gingivitis (inflamed, bleeding gums) or even periodontitis (advanced gum disease) from repeatedly exposing your mouth to this bacterial buildup. Studies show that oral appliances harbor similar bacteria to those found in contaminated toothbrushes, which means wearing a dirty guard is like brushing your teeth with a month-old toothbrush.
Skipping your cleaning routine turns your protective night guard into a health hazard that defeats its entire purpose.
Your immune system fights these bacteria while you sleep, but constant exposure weakens your mouth's natural defenses. You might notice white patches on your tongue, persistent bad breath that does not go away after brushing, or a strange film coating your teeth when you wake up. These signs indicate that your night guard has become a bacterial breeding ground. People who develop oral infections from dirty guards often need antibiotic treatment to clear the infection, which costs far more than the time it takes to clean your guard properly.
How cleaning extends your guard's life
Regular cleaning prevents your night guard from breaking down prematurely. Bacterial acids and enzymes eat away at the plastic material, creating microscopic cracks that weaken the structure. These tiny fractures expand over time, leading to visible cracks or complete breaks that require expensive replacements. A well-maintained guard lasts one to three years, while neglected guards often fail within six months. Understanding how often clean night guard maintenance should happen saves you money and protects your investment in quality dental protection.
Understand your night guard type
Your cleaning routine depends heavily on what type of night guard you wear. Different materials require different approaches, and using the wrong cleaning method can damage your guard or make it less effective. Store-bought guards, custom-fitted guards, and professional-grade guards all have unique characteristics that affect how you should clean them and how often. Before you establish your cleaning schedule, you need to identify which category your night guard falls into so you can adjust your care routine accordingly.
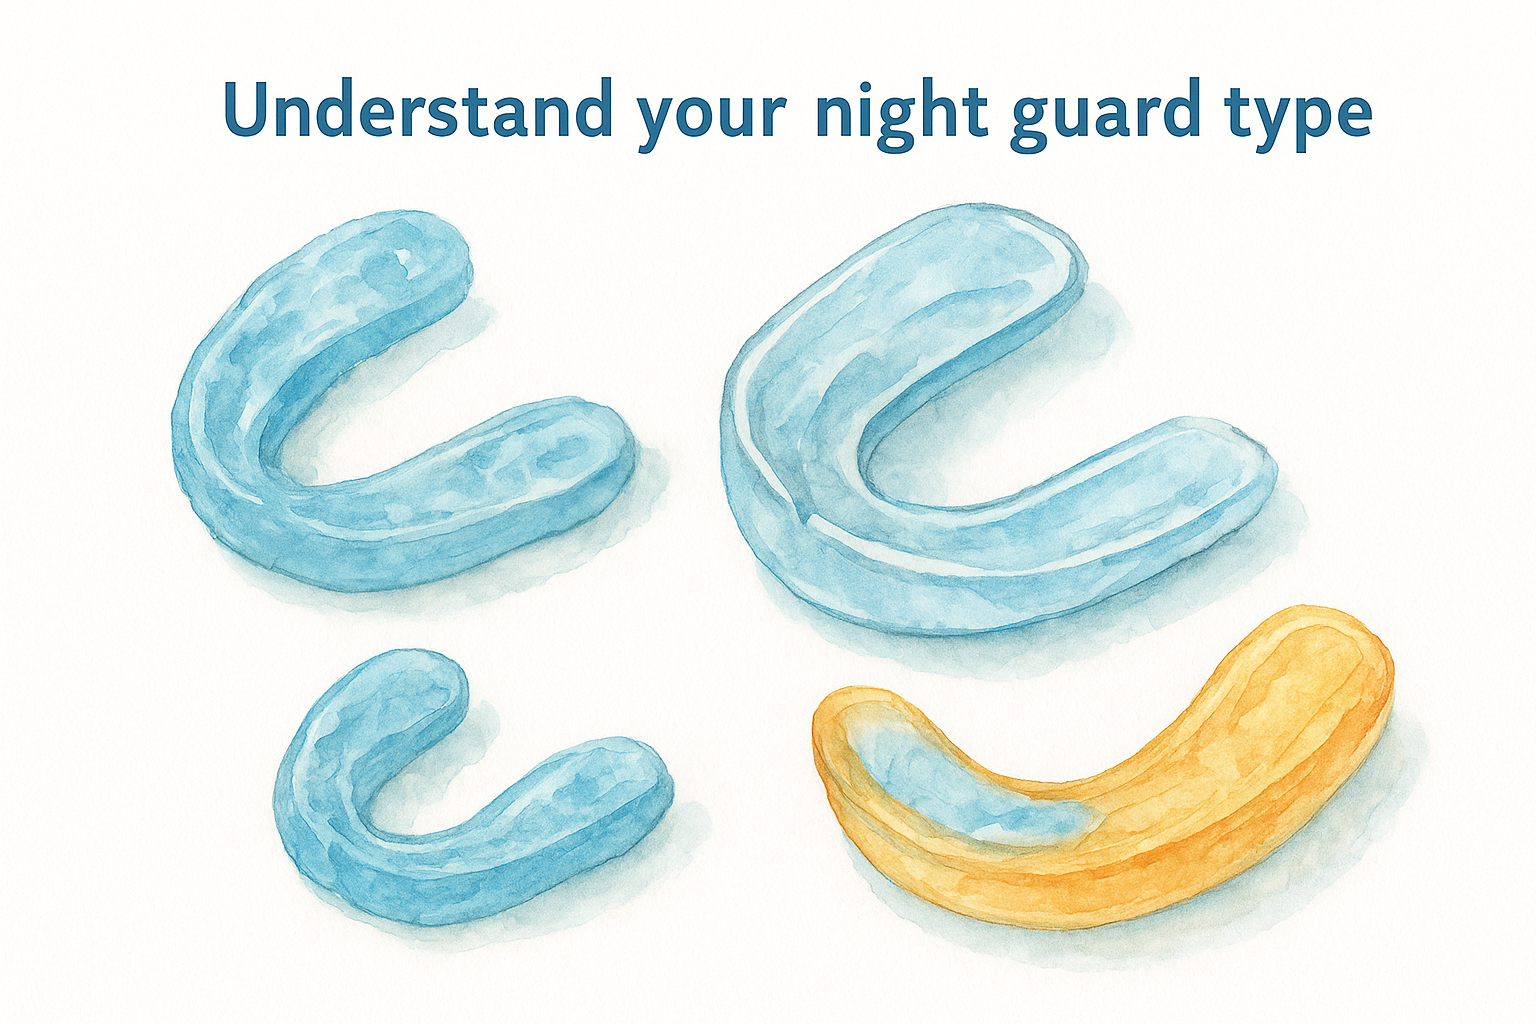
Soft night guards and flexible materials
Soft night guards feel rubbery and flexible when you press on them. These guards typically come from drugstores or online retailers as boil-and-bite options. The material absorbs more moisture and bacteria than harder alternatives, which means you need to clean them every single day without exception. Soft guards show visible staining faster, and the porous surface traps odors that become noticeable within just a few days of irregular cleaning.
The flexible material scratches easily, so you must avoid abrasive cleaners or stiff brushes. Gentle hand soap and a soft-bristled toothbrush work best for daily maintenance. You can soak soft guards in denture cleaner once a week, but limit each soak to 15 minutes maximum because extended exposure breaks down the material. These guards typically last only six months to one year, even with proper care, because the soft material degrades naturally over time.
Hard acrylic guards
Hard acrylic guards feel solid and rigid when you tap them, similar to thick plastic. Dentists create these custom guards from dental-grade acrylic resin, making them the most durable option available. The non-porous surface resists bacterial penetration better than soft materials, but you still need daily cleaning to prevent surface buildup. Hard guards last one to three years when you maintain them properly, making them worth the higher initial investment.
Hard acrylic guards tolerate more aggressive cleaning methods, but you should still avoid harsh chemicals that can cloud or crack the material.
You can scrub these guards with moderate pressure using a toothbrush without worrying about surface damage. Soaking them in a 1:1 mixture of white vinegar and water removes stubborn calcium deposits that form from saliva minerals. Understanding how often clean night guard maintenance needs to happen becomes easier with hard acrylic because you can visually spot buildup against the clear or translucent material. These guards show yellowing when you skip regular deep cleaning, giving you a clear warning sign.
Dual-layer guards
Dual-layer guards combine a soft inner surface that cushions your teeth with a hard outer shell that provides durability. These hybrid designs attempt to offer the comfort of soft guards with the longevity of hard acrylic. The soft inner layer requires the same careful daily cleaning as fully soft guards because it absorbs bacteria and moisture. You need to pay special attention to the junction where the two materials meet because bacteria accumulates in this seam.
Clean the soft inner layer with gentle soap and a soft brush, then clean the hard outer layer with slightly firmer pressure. Weekly soaking works well for dual-layer guards, but check manufacturer instructions because some adhesives dissolve in certain cleaning solutions. These guards typically last one to two years with proper maintenance, falling between soft and hard guards in both durability and care requirements.
Step 1. Clean your night guard daily
Daily cleaning forms the foundation of proper night guard maintenance and takes less than two minutes each morning. You need to clean your guard immediately after removing it from your mouth while bacteria and saliva remain fresh and easy to rinse away. Waiting even a few hours allows deposits to harden and bond to the surface, making removal much more difficult. This quick morning routine prevents the majority of bacterial buildup, odor problems, and staining that plague people who clean their guards inconsistently.
Morning rinse routine
Remove your night guard and rinse it under cool running water for 30 seconds, using your fingers to gently rub all surfaces. Cool or lukewarm water works best because hot water can warp the plastic material and change the fit of your guard. Hold the guard under the faucet and rotate it to ensure water reaches every crevice, especially the grooves that fit against your teeth where bacteria accumulates most heavily.
Rinsing within seconds of removal prevents 80% of bacterial adhesion that occurs when saliva dries on the surface.
Pay special attention to the inner surface that contacts your teeth and gums because this area collects the most saliva and food particles. You will notice that fresh saliva rinses away easily with water pressure alone, but if you see cloudy residue or feel slippery spots, you need to move immediately to brushing. The water rinse serves as your first line of defense, removing loose debris before it has time to calcify into harder deposits.
Brush it properly
Apply a small drop of clear, mild dish soap to a soft-bristled toothbrush designated specifically for your night guard (do not use your regular toothbrush). Gently scrub all surfaces using small circular motions for 60 seconds, covering the inside, outside, and edges. Regular toothpaste contains abrasive particles designed to clean tooth enamel, but these same particles scratch your night guard's surface, creating microscopic grooves where bacteria hides.
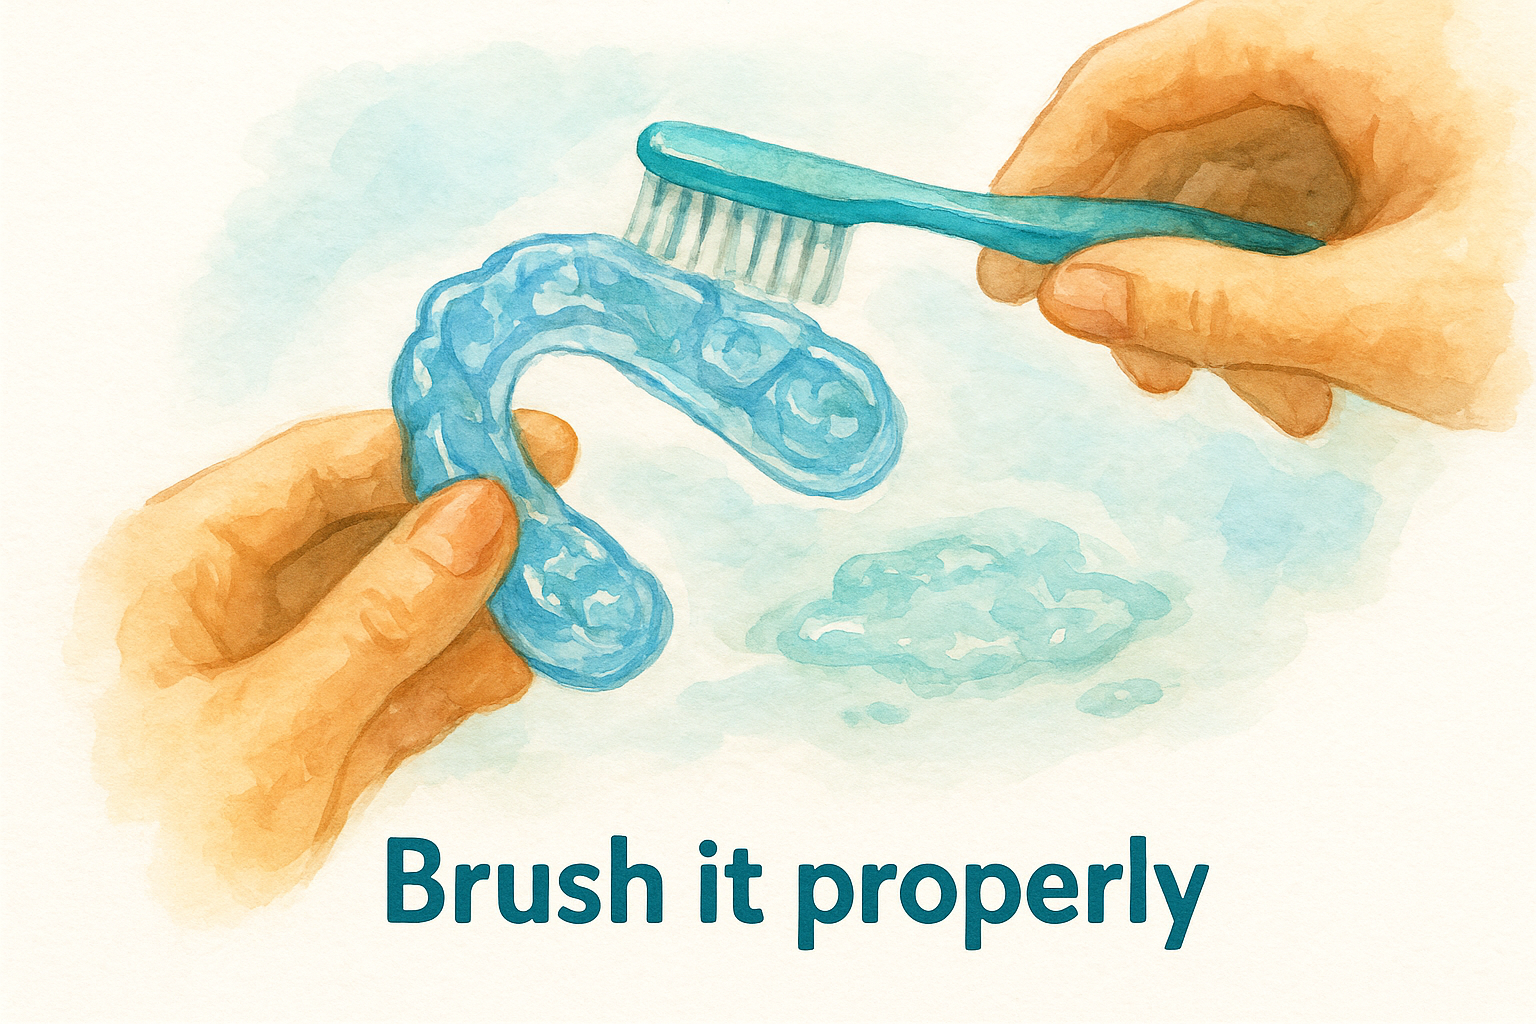
Focus your brushing on these key areas:
- Inner surface grooves where your teeth fit
- Outer surface that faces your lips and cheeks
- Edges and borders where saliva pools
- Bite surface that contacts opposing teeth
Rinse the guard thoroughly under running water for another 30 seconds after brushing to remove all soap residue. Soap left on your guard tastes unpleasant and can irritate your gums during the next use. Hold it up to the light and check for any remaining film or bubbles, then rinse again if needed. Understanding how often clean night guard maintenance should occur becomes automatic when you link this routine to your morning tooth-brushing habit.
Let it dry completely
Shake off excess water and place your night guard on a clean, dry paper towel or cloth for at least 15 minutes. Air drying prevents moisture from getting trapped in your storage case, which creates the perfect breeding ground for mold and bacteria. Never put a wet guard directly into its case because the closed, damp environment accelerates bacterial growth faster than leaving it dirty would.
Store your dried guard in a ventilated case with air holes that allow continuous airflow. Solid cases without ventilation trap humidity and promote bacterial colonies, even after proper cleaning. Keep the case on your bathroom counter or bedside table where you will see it and remember to wear your guard each night. Clean the storage case itself once per week with soap and water, letting it air dry completely before returning your guard to it.
Step 2. Deep clean it each week
Your daily rinse and brush routine handles surface-level cleaning, but bacteria penetrate deeper into the material over time, creating deposits that regular washing cannot remove. Weekly deep cleaning targets these stubborn buildups that accumulate in microscopic pores and grooves where your toothbrush cannot reach. This deeper maintenance removes the cloudy film, stubborn stains, and lingering odors that develop even when you clean your guard every morning. Setting aside 20 minutes once per week for this thorough cleaning prevents the yellowing and hardened plaque that forces premature replacement.
Choose your deep cleaning solution
You have several effective options for weekly soaking, each working differently to break down bacterial deposits. Denture cleaning tablets (like Efferdent or Polident) dissolve in water and create an oxygenating action that lifts stains and kills bacteria. Drop one tablet into a cup of cool water, add your night guard, and let it soak for 15 to 30 minutes following the package directions. These tablets work well but contain bleaching agents that can slightly discolor some materials with repeated use.
White vinegar mixed 1:1 with water creates an acidic solution that dissolves mineral deposits from saliva without harsh chemicals. This natural option costs less than commercial cleaners and works effectively on calcium buildup that makes your guard feel rough or look cloudy. Soak your guard in the vinegar solution for 30 minutes, then rinse thoroughly because the vinegar smell lingers if you skip this step. Knowing how often clean night guard deep soaking should happen (weekly) prevents you from overdoing it with acidic solutions that can eventually weaken some plastics.
Weekly soaking removes 95% of bacterial colonies that daily brushing leaves behind, dramatically reducing your risk of oral infections.
Hydrogen peroxide (3% solution) bleaches away stains and kills bacteria effectively. Fill a small cup with straight hydrogen peroxide from the bottle and submerge your guard for 10 to 15 minutes maximum. This solution works faster than other options but can make some guard materials slightly brittle with frequent use, so stick to once-per-week application only.
Soak your guard properly
Fill a clean glass or ceramic cup with your chosen solution, ensuring the liquid completely covers your night guard with at least half an inch of solution above the highest point. Plastic containers work fine, but avoid metal bowls because some cleaning solutions react with metal surfaces. Place the cup in a safe spot where it will not get knocked over, preferably on a bathroom counter away from the sink edge.
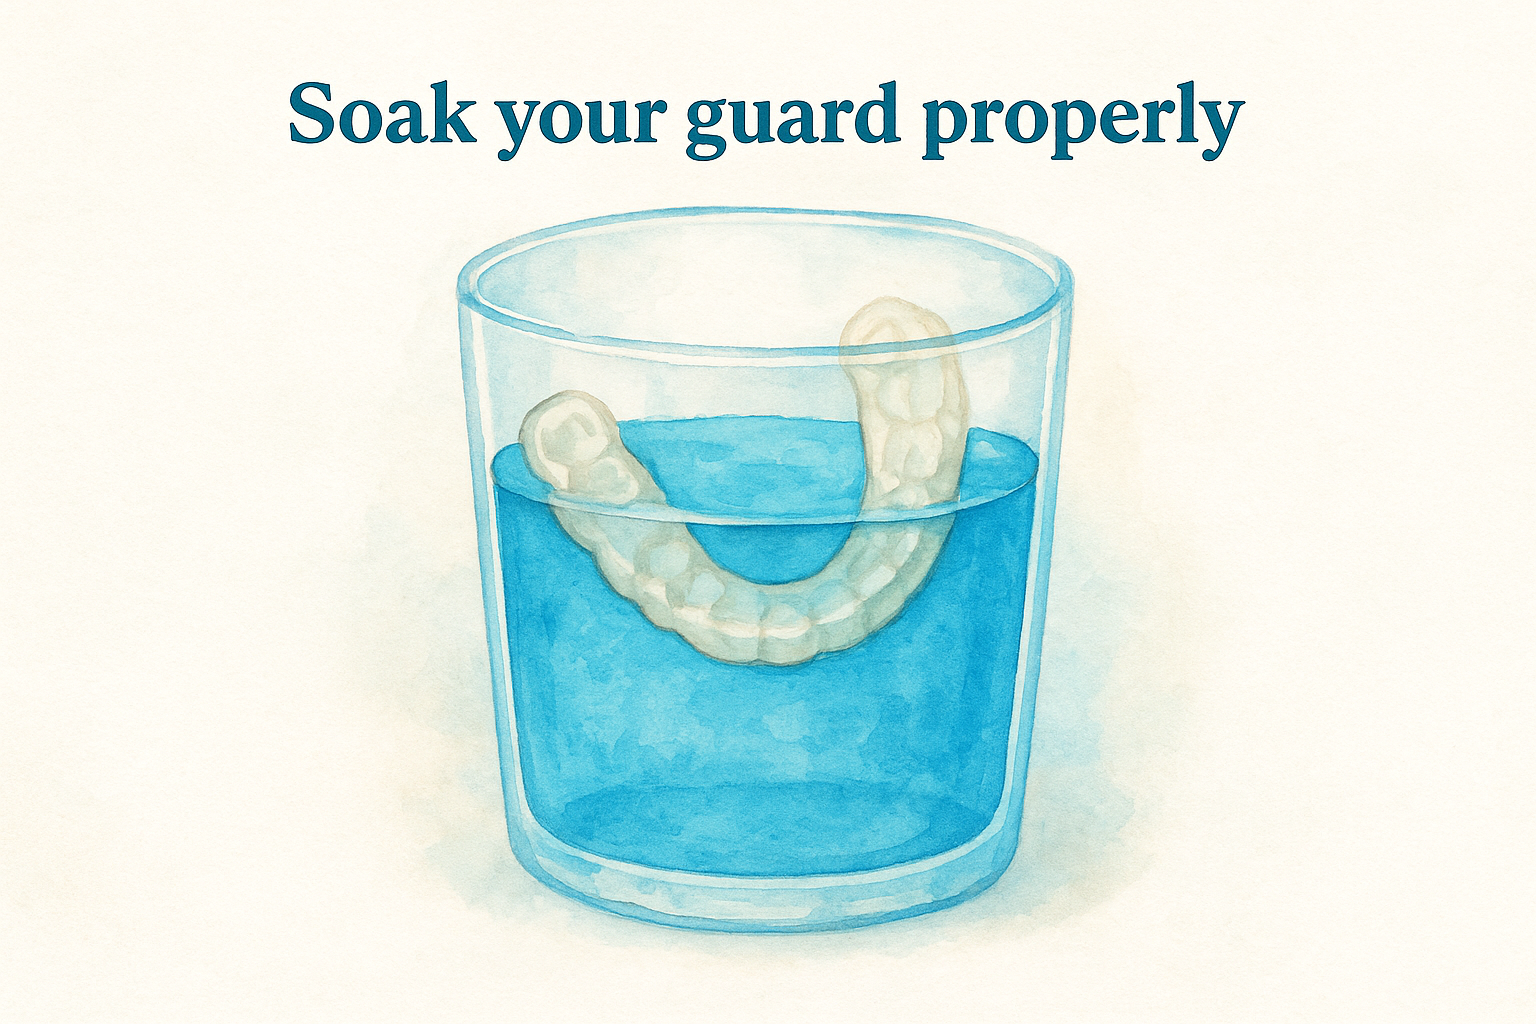
Set a timer on your phone for the appropriate soaking duration based on your chosen cleaner. Never exceed the recommended soaking time because prolonged exposure weakens the plastic bonds that hold your guard's shape. Extended soaking also makes the material absorb too much liquid, which causes temporary softening that affects the fit when you wear it next. Check the guard halfway through to ensure it remains fully submerged, pushing it down gently if it floats to the surface.
Scrub after soaking
Remove your guard from the solution and rinse it under cool running water for 45 seconds to remove all cleaning solution residue. Take your soft-bristled brush and scrub the entire surface again, applying slightly more pressure than your daily cleaning. The soaking loosens deposits, making this post-soak scrubbing much more effective at removing stubborn buildup. You will notice that cloudy areas brighten and rough spots smooth out after this combination of soaking and brushing.
Pay special attention to any remaining discoloration or rough patches that did not come clean during soaking. These areas often require a second round of gentle scrubbing with a tiny amount of baking soda on your damp brush to fully remove. Rinse again thoroughly, inspect your guard under good lighting to confirm all residue is gone, then air dry it completely on a clean towel for at least 30 minutes before storing it in your ventilated case.
Step 3. Do an extra deep clean monthly
Your weekly soaking removes most stubborn buildup, but minerals from saliva continue accumulating in microscopic layers that require more aggressive treatment once per month. This monthly maintenance targets the hardened calcium deposits, deep-set stains, and bacterial colonies that survive your regular cleaning schedule. You will notice that your guard develops a chalky white film or rough texture over time, especially if you have naturally mineral-rich saliva. Understanding how often clean night guard deep maintenance should happen (monthly) prevents these deposits from becoming permanent discoloration or creating surface damage that harbors bacteria.
Use a baking soda paste treatment
Create a cleaning paste by mixing three tablespoons of baking soda with just enough water to form a thick, spreadable consistency similar to toothpaste. Apply this paste generously to all surfaces of your night guard, coating it completely with a layer about one-eighth inch thick. Use your soft-bristled brush to work the paste into every groove and crevice using small circular motions for three to four minutes, applying moderate pressure to scrub away mineral deposits.
Baking soda's mild abrasiveness removes calcified buildup without scratching your guard's surface when you apply it correctly.
Let the paste sit on your guard for 10 additional minutes after scrubbing to allow the alkaline properties to neutralize acidic bacterial waste products. Rinse the guard thoroughly under running water for a full minute, ensuring all white residue disappears completely. Follow this baking soda treatment with a 30-minute soak in hydrogen peroxide to disinfect deeply and bleach any remaining stains. This combination approach tackles both physical deposits and bacterial contamination that weekly cleaning misses.
Inspect for damage and wear
Examine your night guard closely under bright light during your monthly deep clean, looking for cracks, thin spots, rough edges, or changes in shape. Run your finger along all edges to feel for sharp points that could irritate your gums, and check the bite surface for deep grooves or holes worn through the material. Hold the guard up to a light source to spot hairline cracks that appear as thin lines running through the plastic.
Test the fit by placing the guard in your mouth and biting down gently. A properly fitting guard should feel snug without excessive pressure or loose areas that allow it to shift position. Note any changes from when you first received it, including areas that feel tighter or looser than before. Document these observations in your phone or calendar so you can track degradation patterns and know when replacement becomes necessary, typically every one to three years depending on your material type and grinding severity.
Step 4. Store and handle your guard correctly
Proper storage and handling directly impact how often clean night guard maintenance needs to happen because contamination occurs more from poor storage practices than from actual wear. You can scrub your guard perfectly every morning, but if you store it in a dirty case or handle it with unwashed hands, you reintroduce bacteria immediately. Your storage routine matters just as much as your cleaning routine because bacteria multiply fastest in warm, enclosed, damp environments where most people keep their guards. Creating the right storage habits takes five minutes to set up and five seconds to maintain daily, yet most night guard wearers completely overlook this critical step.
Keep your case clean and ventilated
Your storage case needs weekly cleaning with hot water and dish soap, scrubbing all interior surfaces with a clean cloth or paper towel. Bacteria from your guard transfer to the case during storage, then transfer back to your freshly cleaned guard the next time you put it away. Rinse the case thoroughly after washing and let it air dry completely for at least 30 minutes before returning your guard to it. Never skip the drying step because moisture trapped in a closed case creates the perfect breeding ground for mold and bacterial colonies.
A contaminated storage case can reinfect your clean night guard with bacteria within hours, completely negating your cleaning efforts.
Choose a case with ventilation holes or slits that allow continuous airflow rather than solid containers that seal completely. These air vents prevent humidity buildup while protecting your guard from dust and damage. Replace your case every six months because plastic cases develop scratches and cracks that harbor bacteria permanently, making thorough cleaning impossible no matter how hard you scrub.
Handle your guard with clean hands
Wash your hands with soap and water for 20 seconds before touching your night guard, whether you are inserting it, removing it, or cleaning it. Your fingers carry bacteria, food particles, and oils that contaminate your guard's surface instantly upon contact. This simple habit prevents cross-contamination that occurs when you touch your phone, doorknobs, or other surfaces throughout the day, then handle your guard without washing first.
Remove your guard using both hands to grasp it firmly on opposite sides, pulling straight out rather than prying from one corner. Single-handed removal or using your fingernails to pop it out creates stress points that lead to cracks over time. Insert your guard by pressing it into place with your thumbs on both sides simultaneously, ensuring even pressure distribution. Never bite your guard into position because this distorts the material and damages the precise fit that protects your teeth effectively.
Step 5. Avoid these cleaning mistakes
Most people damage their night guards or reduce their effectiveness through common cleaning errors that seem harmless but cause serious problems over time. These mistakes range from using the wrong water temperature to storing your guard while still wet, and each one creates issues that compromise your oral health or shorten your guard's lifespan. Understanding what not to do matters just as much as knowing proper cleaning techniques because a single mistake can undo weeks of careful maintenance. Learning how often clean night guard routines should happen means nothing if you damage your guard through improper cleaning methods that seem convenient in the moment.
Don't use hot water or harsh chemicals
Hot water ranks as the number one mistake people make when cleaning their night guards because it seems like it would kill bacteria more effectively than cool water. The reality is that water above 120°F softens and warps the plastic material, distorting the precise fit your dentist or manufacturer created. You will notice that your guard feels loose, uncomfortable, or fails to stay in place after exposure to hot water, forcing you to order a replacement months earlier than necessary.
Hot water damage occurs in seconds and remains permanent, making this the costliest cleaning mistake you can make.
Bleach, alcohol-based mouthwashes, and other harsh chemicals break down the plastic bonds that give your guard its structural integrity. People assume these strong cleaners provide superior disinfection, but they actually create microscopic cracks and cloudiness that weaken the material and create bacterial hiding spots. Stick to mild dish soap, white vinegar, hydrogen peroxide, or commercial denture cleaners specifically labeled as safe for dental appliances.
Avoid abrasive cleaners and stiff brushes
Regular toothpaste contains silica particles designed to polish tooth enamel, but these same abrasives scratch your night guard's smooth surface. These scratches feel rough against your tongue and create grooves where bacteria colonizes and thrives beyond the reach of normal cleaning. You end up with a guard that looks cloudy, feels gritty, and harbors more bacteria than before you cleaned it. Use only clear liquid soap without added scrubbing agents or moisturizers that leave residue.
Hard-bristled toothbrushes or scrubbing pads work the same way as abrasive toothpaste, creating surface damage that defeats your cleaning purpose. Choose a soft or extra-soft bristled brush designated exclusively for your night guard, replacing it every three months just like your regular toothbrush. Some people try to speed up cleaning by applying heavy pressure, but this aggressive scrubbing causes more harm than gentle, thorough brushing with proper technique.
Never skip the drying step before storage
Placing your wet night guard directly into its case creates a sealed, humid environment where bacteria and mold multiply rapidly, often faster than they would if you skipped cleaning entirely. The moisture trapped inside the closed case provides perfect conditions for microbial growth that causes the musty smell many people associate with old night guards. Always air dry your guard for at least 15 minutes on a clean paper towel before storing it, checking that no water droplets remain on any surface or in any grooves before closing the case.
Step 6. Watch for signs it is time to replace
Even when you maintain your night guard perfectly, the material eventually wears down from nightly grinding pressure and natural degradation over time. Most guards last between one and three years depending on material type and how severely you grind your teeth, but some signs indicate you need replacement sooner. Ignoring these warning signals compromises the protection your guard provides and can even create new dental problems when damaged guards shift position or develop sharp edges that cut your gums. Knowing how often clean night guard inspections should include replacement checks (monthly during deep cleaning) helps you catch problems before they worsen.
Physical damage indicators
Examine your guard under bright light during monthly cleaning and look for these specific problems that require immediate replacement. Visible cracks longer than one-quarter inch weaken the structural integrity and will spread wider with continued use, eventually breaking completely during the night. Small holes worn through the bite surface expose your teeth to direct grinding contact, defeating the guard's protective purpose entirely.
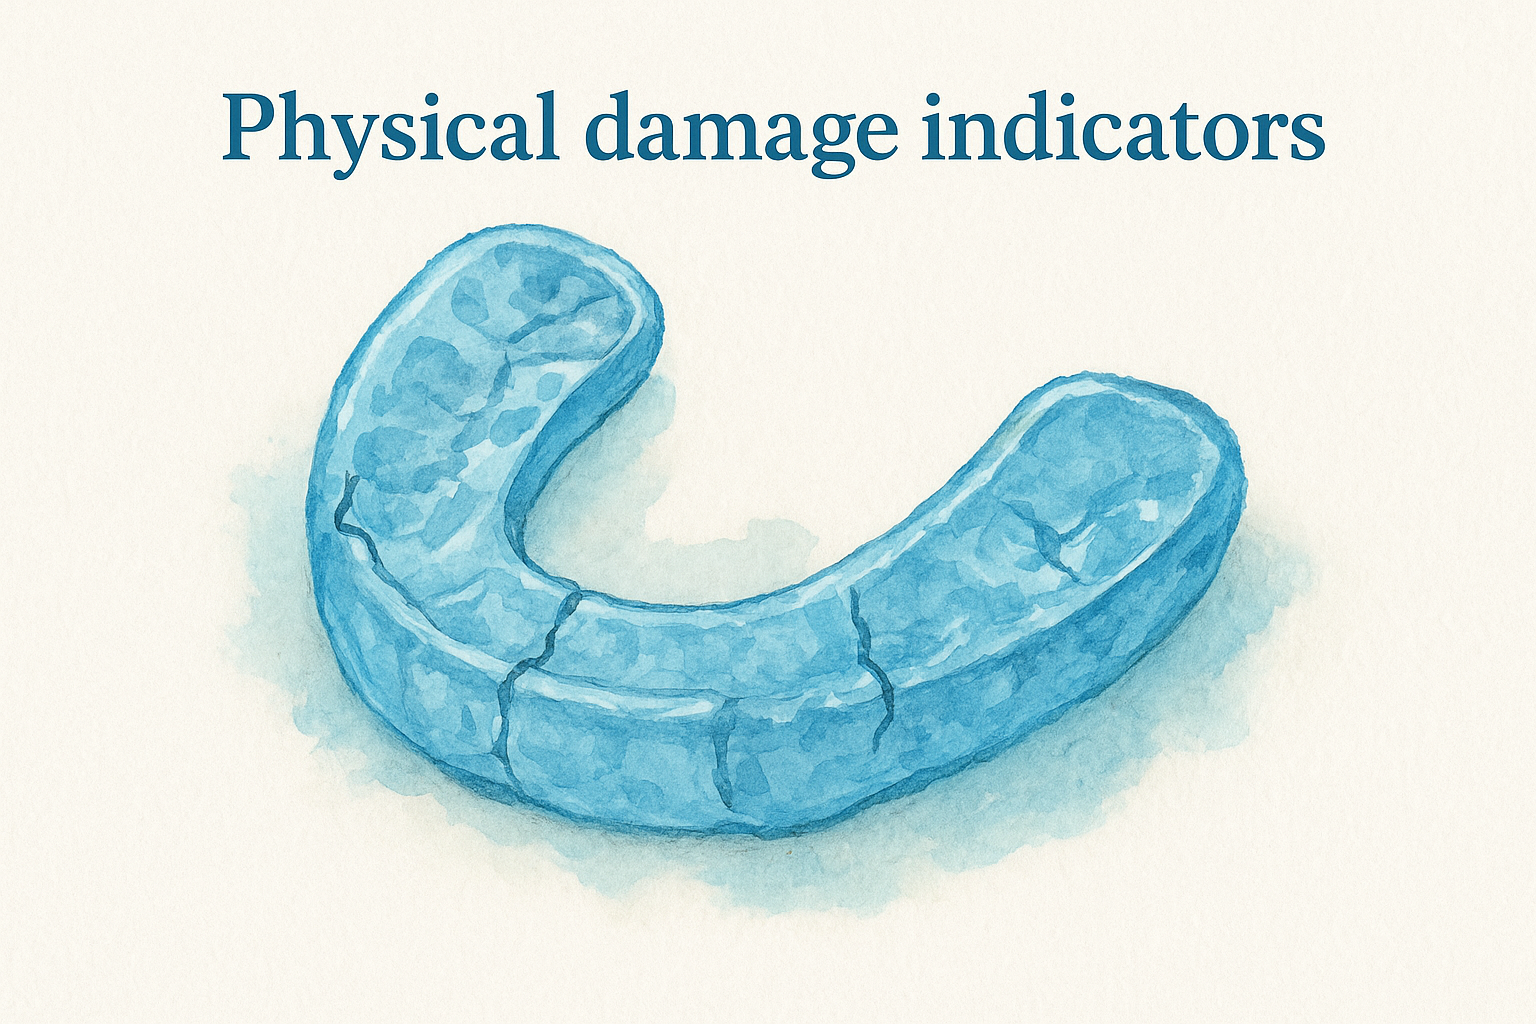
Check for these clear replacement signals:
- Deep grooves or worn-through spots on the biting surface
- Cracks that extend from edges toward the center
- Rough or sharp edges that irritate your gums
- Cloudy discoloration that persists after deep cleaning
- Warped shape that no longer matches your teeth contours
A night guard with any crack visible to the naked eye has lost its structural integrity and will fail completely within weeks of continued use.
Performance and fit issues
Your guard's fit changes as the material breaks down, creating gaps where it used to fit snugly or pressure points where it feels uncomfortably tight. Notice if your guard falls out during sleep, requires effort to snap into place, or feels loose when you bite down. These changes mean the precise custom shape has degraded beyond effective function.
Pay attention to increased teeth sensitivity or jaw soreness that develops despite wearing your guard nightly. This discomfort indicates your guard no longer provides adequate cushioning between upper and lower teeth, allowing grinding forces to reach your tooth enamel directly. Replace your guard immediately if you wake with tooth pain or notice new chips appearing on your teeth after months of protection.
FAQs about night guard cleaning
Your questions about night guard maintenance deserve clear, specific answers that help you avoid common mistakes and keep your guard in optimal condition. These frequently asked questions address the most common concerns people face when establishing their cleaning routines.
Can I use toothpaste to clean my night guard?
You should avoid using regular toothpaste on your night guard because most brands contain abrasive silica particles designed to polish tooth enamel. These abrasives scratch your guard's smooth surface, creating microscopic grooves that trap bacteria and make your guard cloudy over time. The scratches feel rough against your tongue and become permanent damage that no amount of cleaning can reverse. Use clear liquid dish soap instead, which cleans effectively without causing surface damage.
How long does a night guard last with proper cleaning?
Your night guard's lifespan depends entirely on material type and grinding severity, ranging from six months to three years with consistent maintenance. Soft guards typically last six months to one year, while hard acrylic guards extend to one to three years when you maintain them properly. Dual-layer guards fall in the middle at one to two years. Regular cleaning prevents premature breakdown, but even perfectly maintained guards eventually wear through from nightly grinding pressure and require replacement when you notice cracks, holes, or fit changes.
What should I do if my night guard smells bad despite cleaning?
Bad odor indicates bacterial colonization deep in the material that your current cleaning routine is not reaching effectively. Soak your guard in a 1:1 mixture of white vinegar and water for 30 minutes, followed by scrubbing with baking soda paste and rinsing thoroughly. Understanding how often clean night guard deep cleaning should happen becomes critical here because persistent smell requires immediate weekly soaking instead of waiting for your regular schedule. Replace your guard if the odor continues after two consecutive deep cleanings because this signals permanent bacterial penetration.
Persistent bad smell after proper deep cleaning means your guard has reached the end of its usable life and poses an infection risk.
Can I soak my night guard overnight?
Never soak your night guard for more than 30 minutes in any cleaning solution because extended exposure weakens the plastic bonds and makes the material absorb too much liquid. Overnight soaking causes your guard to soften temporarily and lose its precise fit, requiring several hours to return to normal shape. This repeated swelling and shrinking accelerates material breakdown and shortens your guard's lifespan dramatically. Set a timer when you soak your guard and remove it promptly when the time expires.
Do I need to clean my night guard if I brush my teeth before bed?
You absolutely must clean your night guard every morning regardless of your pre-bedtime oral hygiene routine. Brushing before bed reduces food particles, but your mouth produces saliva continuously throughout the night that deposits minerals, bacteria, and proteins on your guard's surface. These accumulations begin hardening within hours of wear, making morning cleaning essential for preventing buildup. Skipping daily cleaning leads to bacterial growth that causes gum infections and tooth decay regardless of how thoroughly you brush your teeth.
Key takeaways for your night guard
Your night guard stays clean and effective when you follow a simple three-tier cleaning schedule: rinse and brush it every single morning with mild soap, soak it in a cleaning solution once per week, and perform a baking soda deep clean once per month. Store your dried guard in a ventilated case that you wash weekly, handle it only with clean hands, and avoid hot water or abrasive cleaners that damage the material permanently. Knowing how often clean night guard maintenance should happen prevents bacterial buildup, extends your guard's lifespan to three years, and protects your oral health from infections that develop when you skip these routines.
Replace your guard immediately when you spot cracks, holes, or fit changes that compromise protection. If you need a replacement or want to upgrade to a professionally fitted guard, check out Remi's custom night guards for dental-grade protection at 80% less than traditional dental office costs.

