

Every custom night guard, retainer, or dental restoration starts the same way, with an impression of your teeth. The accuracy of that impression depends almost entirely on the material used to capture it. Understanding dental impression material types helps you make sense of what your dentist (or your at-home kit) is actually putting in your mouth, and why it matters for the final fit of your dental appliance.
Not all impression materials behave the same way. Some set rigid, others stay flexible. Some capture microscopic detail, while others prioritize ease of use and cost. Choosing the wrong material can mean a poor fit, wasted time, and a product that doesn't do its job, whether that's a crown, a denture, or a custom-fitted night guard for teeth grinding.
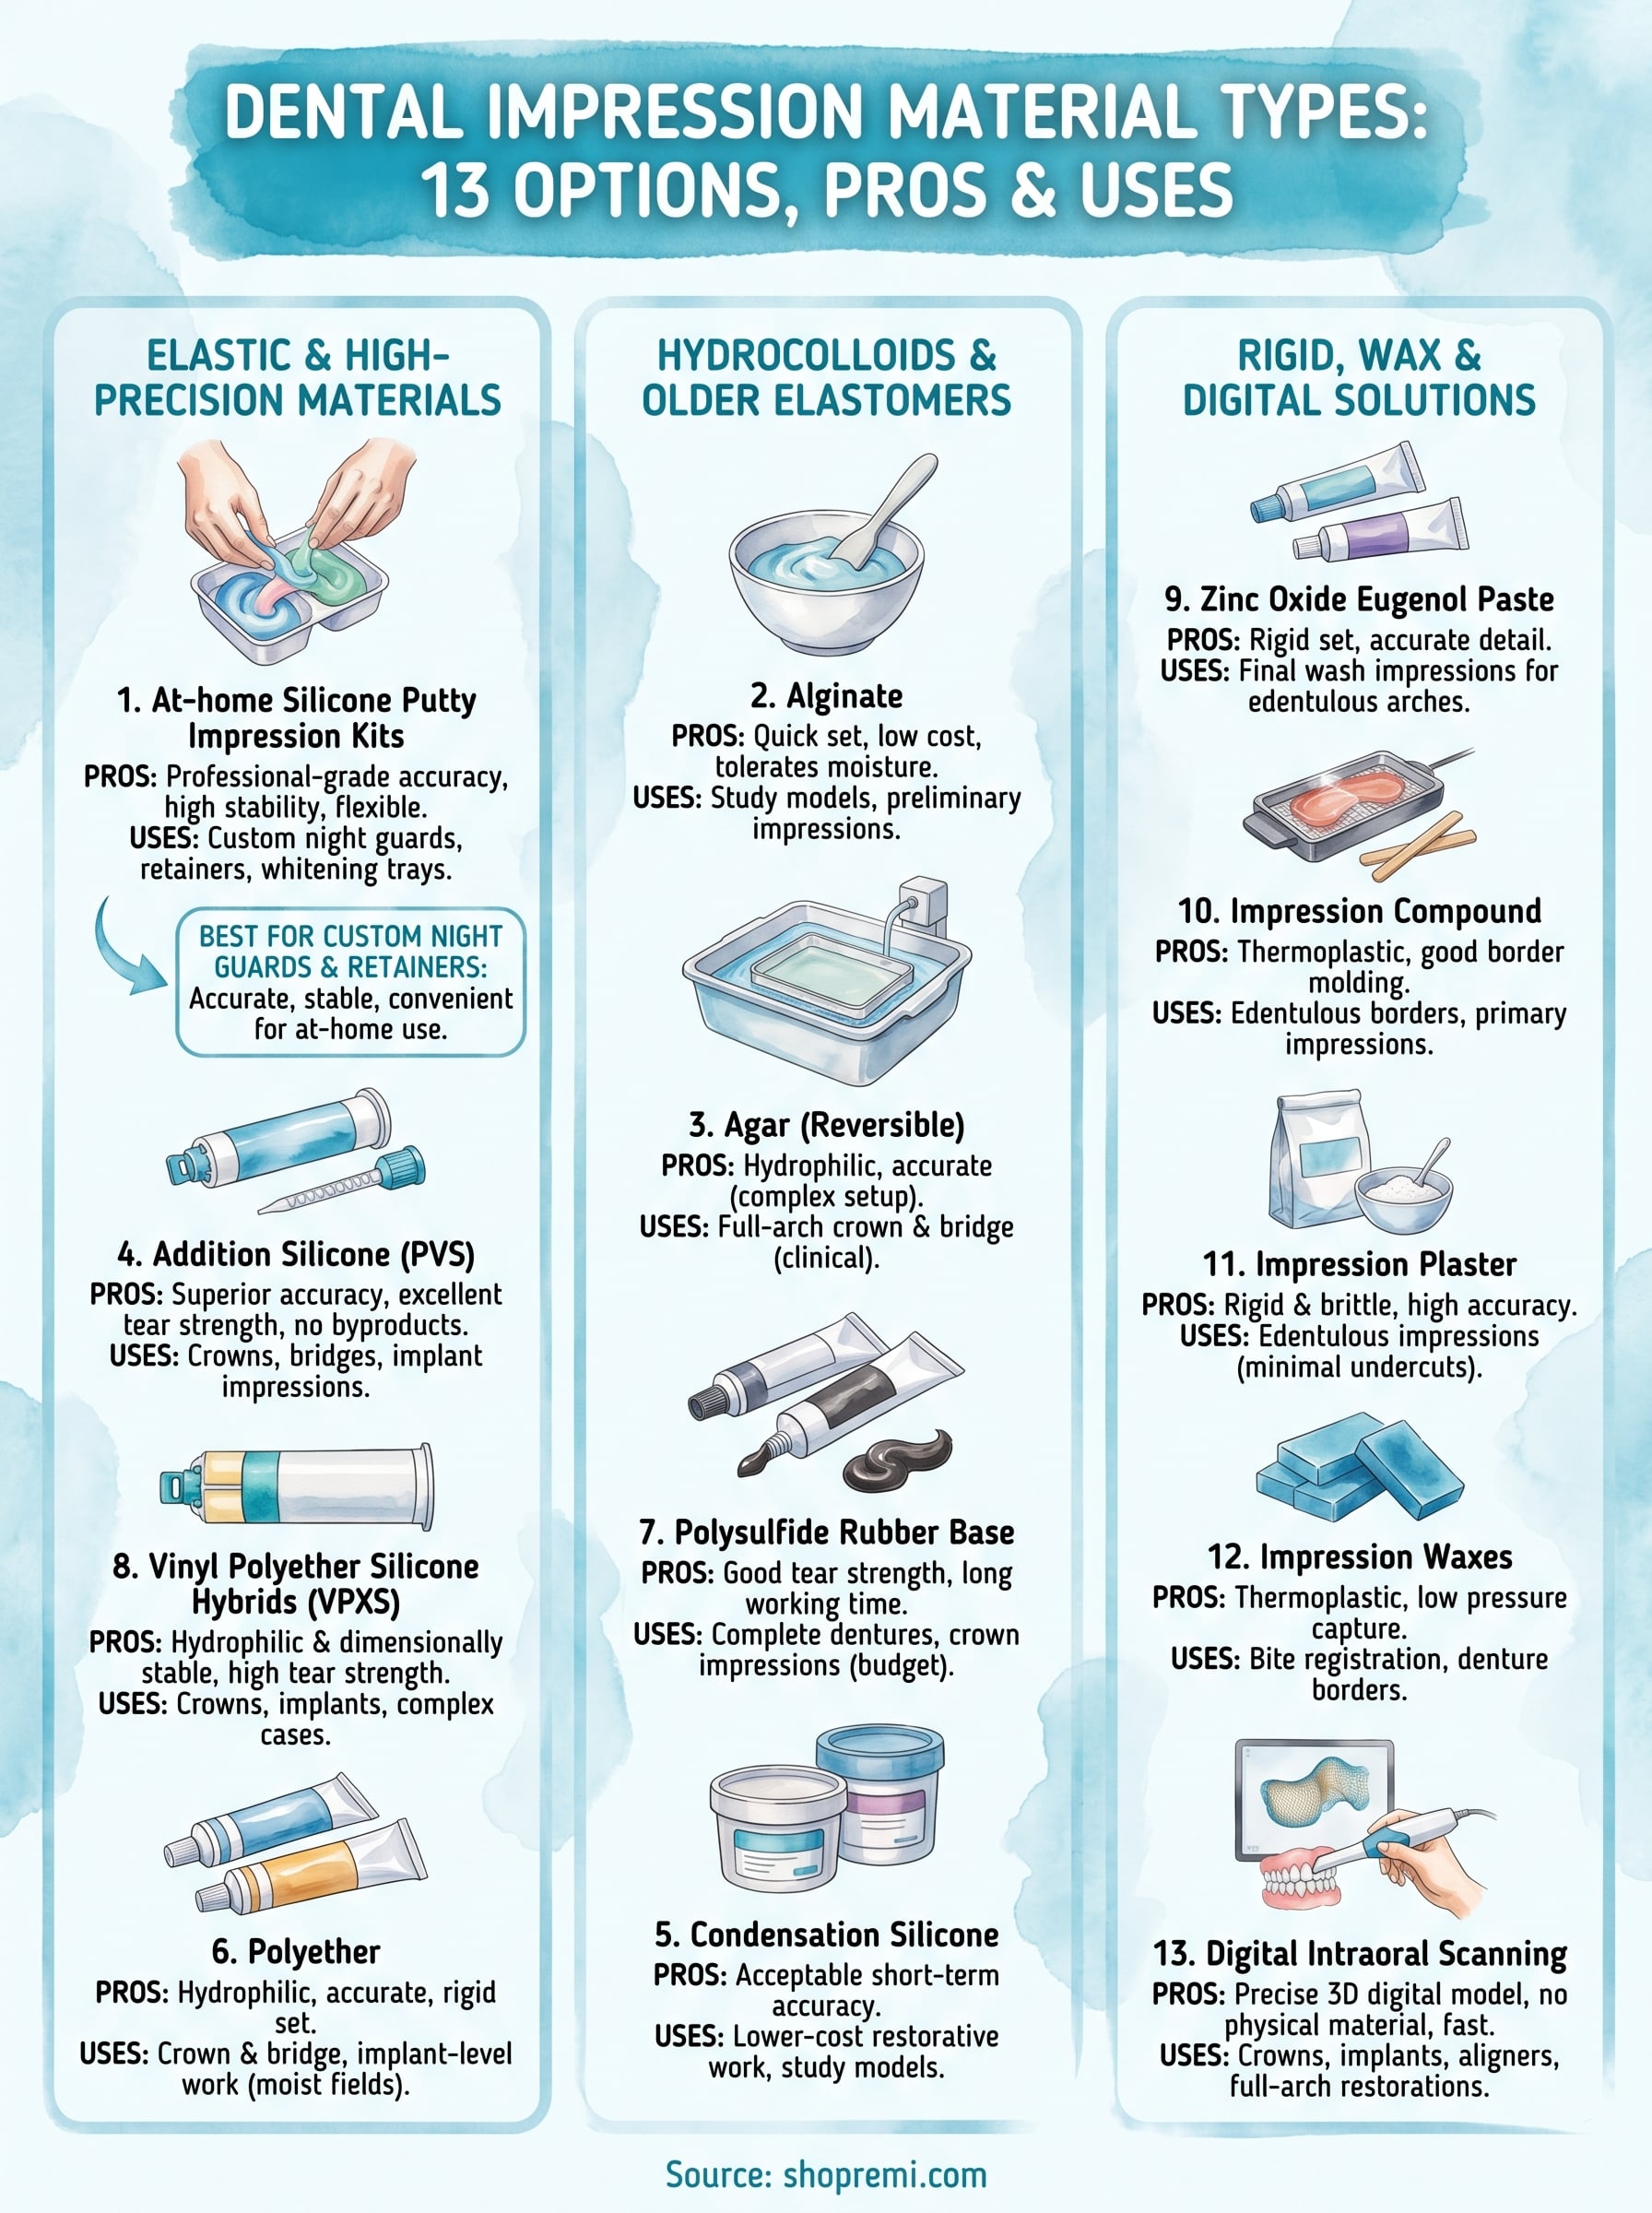
At Remi, we use dental-grade impression materials in our at-home kits so you can get professional-quality custom night guards and retainers without sitting in a dental chair. That process gave us a deep appreciation for what separates one material from another. Below, we break down 13 dental impression material types, covering their properties, clinical uses, and the pros and cons of each.
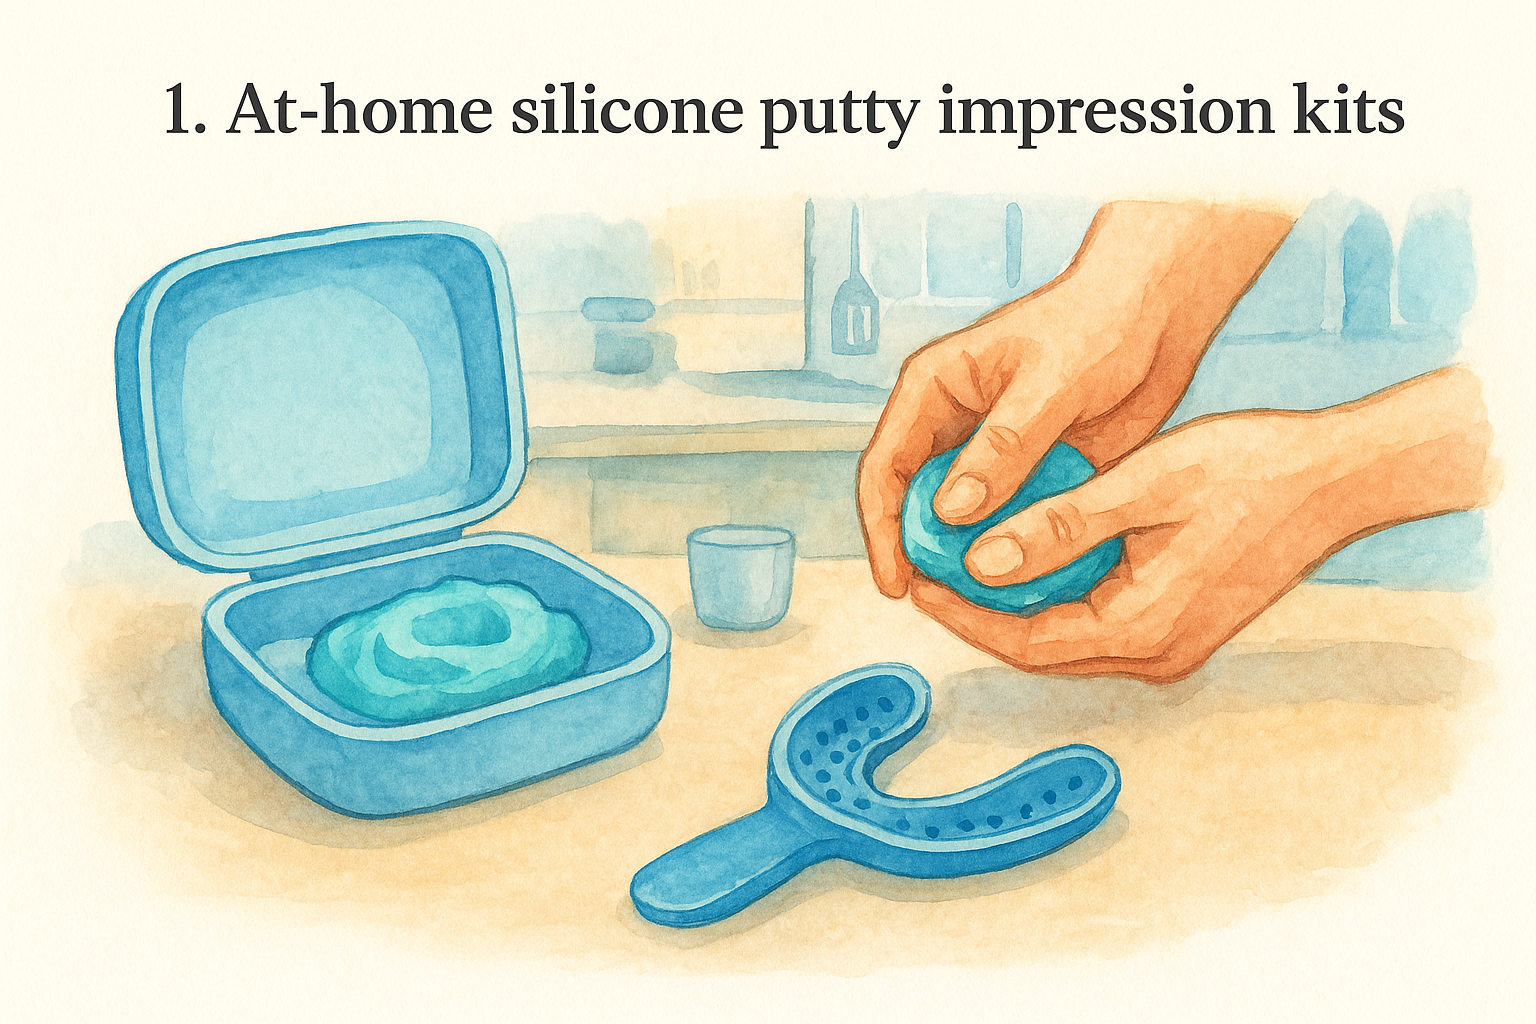
1. At-home silicone putty impression kits
At-home silicone putty impression kits bring a professional-grade impression process directly to your kitchen counter. These kits use a two-part addition silicone putty that you mix by hand, press over your teeth, and allow to set in minutes. The result is a flexible, dimensionally stable mold that a dental lab uses to fabricate a custom appliance built precisely to your bite.
What it is and how it captures detail
Silicone putty works through a vinyl polysiloxane reaction that begins the moment you combine the two components. The material flows into the grooves and contact points of your teeth, capturing fine anatomical detail down to the margins of each tooth. Because the set material is elastic rather than rigid, it pulls free from undercuts without distorting the impression.
Accuracy, stability, and tear strength
Addition silicone putty ranks among the most dimensionally stable impression materials available to consumers. Once set, it does not shrink, expand, or absorb moisture, so the mold you send to a lab accurately represents your teeth even days after you take it. Tear strength is high, meaning thin sections between teeth survive removal without tearing or warping.
A well-mixed silicone putty impression can remain dimensionally accurate for up to two weeks before pouring, giving labs flexibility without sacrificing fit quality.
Moisture tolerance and user comfort
The putty's hydrophobic nature means saliva on tooth surfaces can interfere with detail capture if you skip drying your teeth first. Most consumer kits address this with a quick-dry instruction or a surfactant-treated tray that improves wetting. On the comfort side, silicone putty carries no strong taste or odor, which makes it significantly more tolerable than older impression materials.
Best uses and common pitfalls
These kits work best for custom night guards, retainers, and whitening trays. Under-mixing the two putty components is the most common pitfall, leaving uncured streaks that create soft spots in the final mold. A close second is pulling the tray before the material fully sets, which stretches and distorts the impression beyond usable accuracy.
Practical handling, storage, and turnaround
Store unmixed putty components in a cool, dry location away from direct sunlight to protect shelf life. Once you combine the two parts, you have roughly two to three minutes of working time before the material stiffens. After a four to six minute set time, your impression is ready to package and ship to the lab.
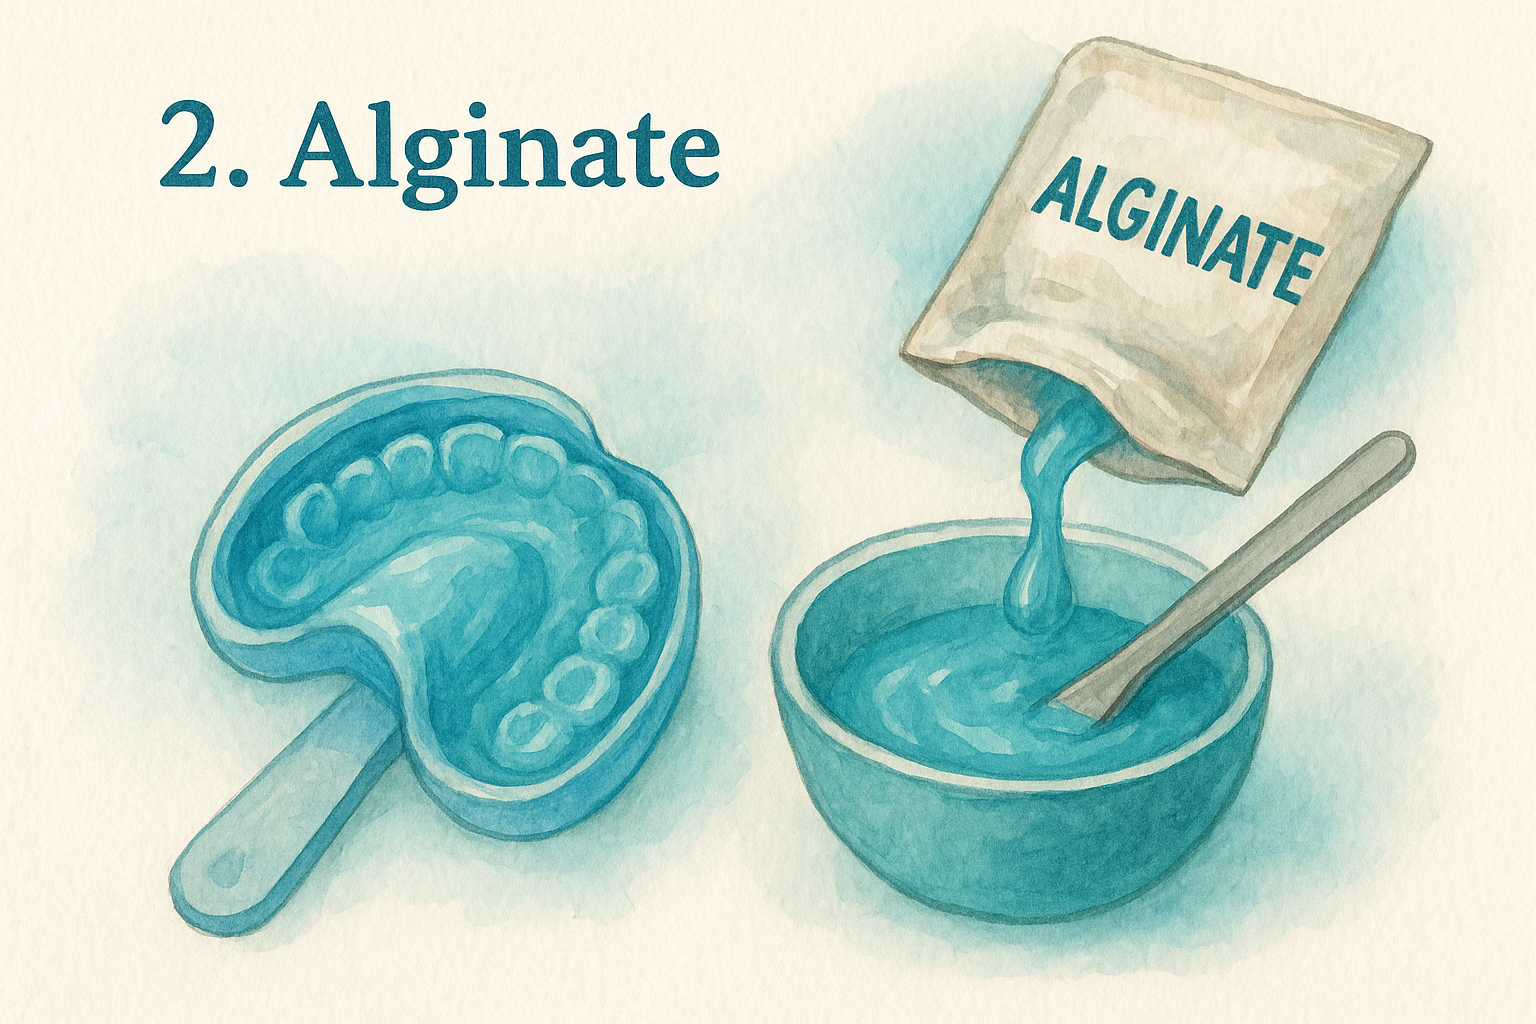
2. Alginate
Alginate is one of the most widely used dental impression material types in clinical dentistry. Derived from brown seaweed, it mixes with water to form a smooth, gel-like paste that sets through an irreversible chemical reaction, capturing the shape of your teeth quickly and at low cost.
What it is and how it captures detail
Alginate belongs to the irreversible hydrocolloid family, meaning it transitions from a fluid paste to a firm gel and cannot return to its original state. The material flows around your teeth and soft tissues, capturing general tooth shape and arch form well enough for study models, space maintainers, and preliminary work.
Accuracy, stability, and tear strength
Alginate provides adequate accuracy for diagnostic purposes but falls short of elastomers for precision restorative work. It shrinks and warps rapidly once removed from the mouth due to water loss through syneresis, which means the lab needs to pour the model within 15 minutes for reliable results. Tear strength is low in thin cross-sections.
Pouring an alginate impression within 15 minutes of removal is the single most effective way to preserve its accuracy before distortion sets in.
Moisture tolerance and patient comfort
Alginate actually requires a moist oral environment to set properly, which is an advantage over many hydrophobic elastomers. Patients generally tolerate it well because it carries a mild flavor, though its slightly grainy texture can trigger a gag reflex in some individuals.
Best uses and common pitfalls
Dentists rely on alginate for orthodontic study models and opposing arch impressions. The biggest pitfall is delayed pouring, which renders the impression unusable.
Practical handling, storage, and turnaround
Store alginate powder in a sealed, airtight container to prevent premature moisture absorption. Setting time runs roughly two to four minutes depending on water temperature, with cooler water extending your working time.
3. Agar
Agar is the reversible hydrocolloid among dental impression material types. Unlike alginate, agar can be liquefied and re-gelled multiple times, making it one of the older biologically derived materials still used in select clinical settings. Its base comes from seaweed polysaccharides that transition between a fluid sol and a firm gel depending on temperature.
What it is and how it captures detail
This material starts as a semisolid gel that you liquefy by heating it in a conditioning bath, then load into a water-cooled tray and seat over the teeth. As it cools in the mouth, it returns to a gel state, capturing fine surface detail comparable to some elastomers when handled correctly.
Accuracy, stability, and tear strength
When used properly, agar produces accurate impressions for crown and bridge work, but it shares the same time-sensitivity as alginate. The material loses moisture quickly after removal, leading to shrinkage and distortion if you delay pouring the stone model. Tear strength is low, particularly in thin interproximal areas.
Pour agar impressions within 15 minutes of removal to prevent dimensional distortion from water loss.
Moisture tolerance and patient comfort
Its hydrophilic nature helps it flow into sulcular detail, making it well-suited to a moist oral environment. Patients generally find it comfortable, though the required water-cooled tray adds equipment complexity compared to simpler impression materials.
Best uses and common pitfalls
Agar suits full-arch crown and bridge impressions in well-equipped offices. The main pitfall is improper conditioning temperature, which leaves the material either too stiff to seat or too fluid to capture usable detail.
Practical handling, storage, and turnaround
Store agar in sealed tubes at room temperature away from heat sources. The conditioning process involves a boiling, storage, and tempering phase that takes roughly 60 to 90 minutes before you can seat the tray.
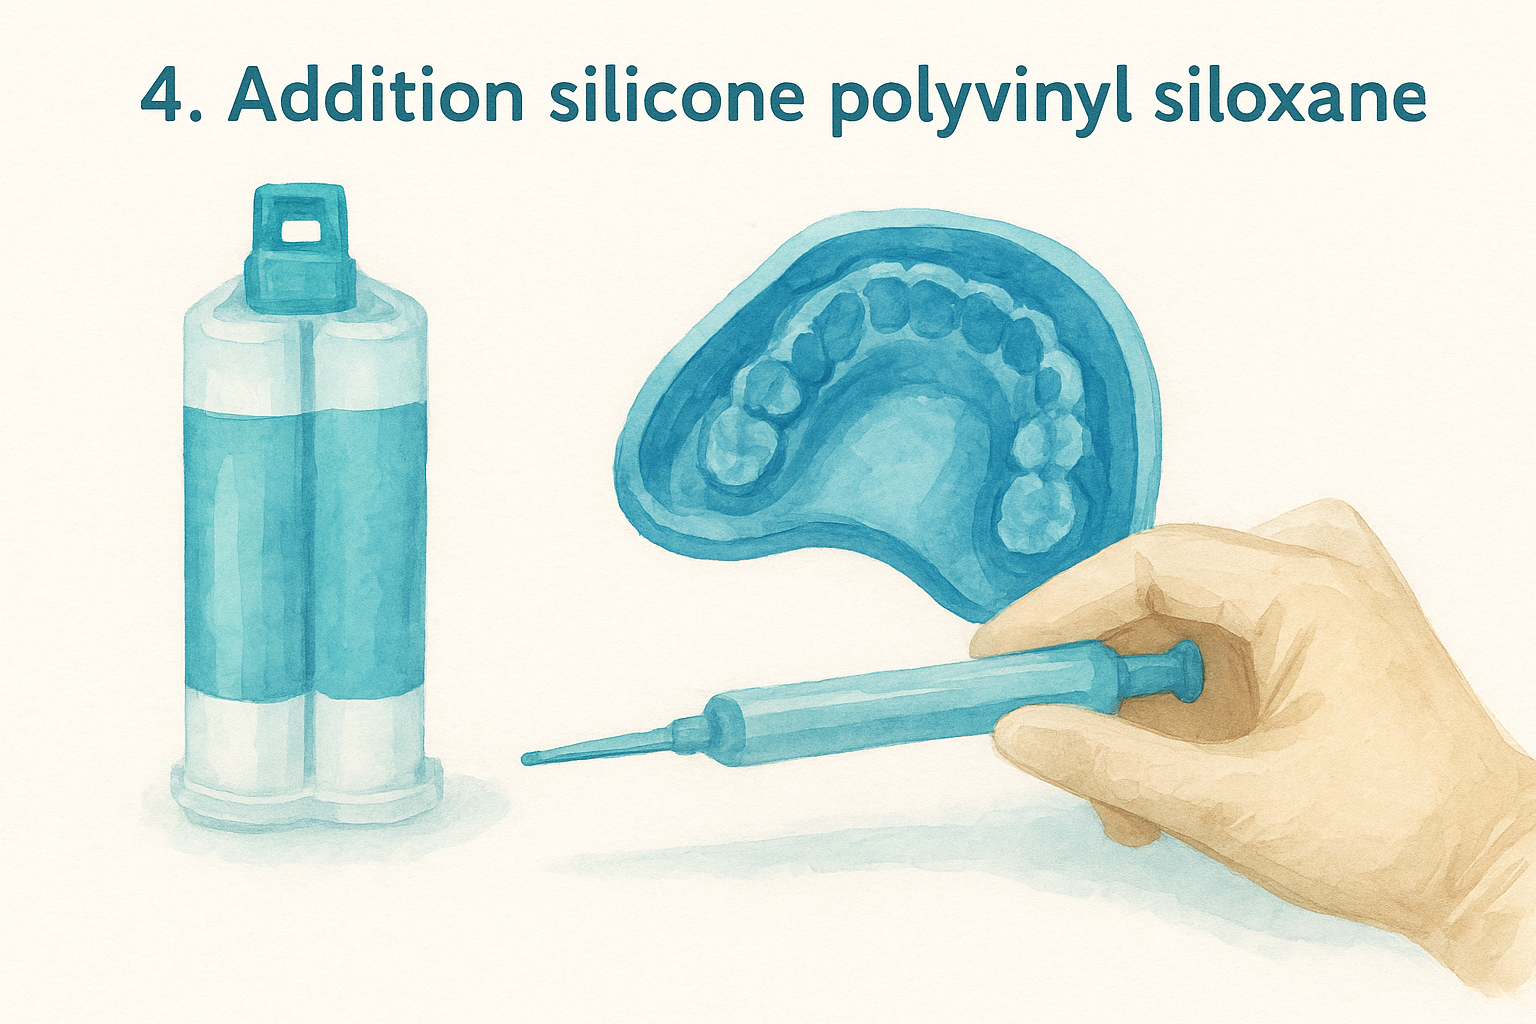
4. Addition silicone polyvinyl siloxane
Addition silicone, also called polyvinyl siloxane (PVS), sits at the top tier of dental impression material types for precision restorative work. It cures through a platinum-catalyzed addition reaction that produces no byproducts, making it dimensionally stable and reliable across a wide range of clinical applications.
What it is and how it captures detail
PVS comes in multiple viscosities, from light-body syringe formulations that flow into fine margins to heavy-body tray materials that support the overall arch. This range lets you layer viscosities for detailed, full-arch impressions in a single seating appointment.
Accuracy, stability, and tear strength
This material delivers superior dimensional accuracy that holds for up to two weeks after the impression is taken, giving labs flexible scheduling without sacrificing fit quality. Tear strength is excellent, particularly in thin interproximal sections where weaker materials would distort on removal.
PVS is the preferred material for fixed prosthodontics precisely because it maintains accuracy long after the appointment ends.
Moisture tolerance and patient comfort
The main drawback is that PVS is hydrophobic by nature, meaning sulcular moisture and saliva reduce detail capture at critical margins. Manufacturers address this with surfactant additives that improve wetting, but you still need good moisture control during seating.
Best uses and common pitfalls
PVS works best for crowns, bridges, implant impressions, and custom-fitted night guards. The most common pitfall is latex glove contamination, as sulfur compounds in latex inhibit the platinum catalyst and leave uncured soft spots throughout the set material.
Practical handling, storage, and turnaround
Store PVS cartridges away from heat and direct sunlight to preserve shelf life. Working time runs two to three minutes, with a full set time of four to six minutes depending on the specific formulation.
5. Condensation silicone
Condensation silicone represents the first generation of silicone-based dental impression material types. It cures through a tin-catalyzed condensation reaction that releases ethanol as a byproduct, which causes measurable dimensional shrinkage over time and separates it from the more modern addition silicone covered in the previous section.
What it is and how it captures detail
Available in putty and light-body viscosities, condensation silicone allows a two-stage or one-stage technique for capturing tooth and arch anatomy. The material flows reasonably well into tooth surfaces, but the ethanol byproduct released during curing starts to shrink the impression almost immediately after removal from the mouth.
Accuracy, stability, and tear strength
This material produces acceptable accuracy for short-term use, but dimensional instability is its defining weakness. You need to pour the stone model within one hour of removing the impression to avoid clinically significant shrinkage. Tear strength is moderate and generally adequate for full-arch work.
Pour condensation silicone impressions within one hour of removal to limit the dimensional changes caused by ongoing ethanol evaporation.
Moisture tolerance and patient comfort
Like PVS, condensation silicone is hydrophobic, so moisture control during seating improves detail capture at tooth margins. Patients generally find the material comfortable and odor-neutral, with no strong taste or gag-inducing texture to manage.
Best uses and common pitfalls
You can use condensation silicone for lower-cost restorative work and study models where the tightest tolerances are not required. The most common pitfall is delayed pouring, which amplifies shrinkage and produces a model that no longer matches your patient's actual tooth dimensions.
Practical handling, storage, and turnaround
Store condensation silicone in a cool, dry location away from heat sources to protect its shelf life. Working time runs roughly two to three minutes, and the material reaches full set in four to six minutes.
6. Polyether
Polyether is a rigid-setting elastomeric material that stands out among dental impression material types for combining natural hydrophilicity with strong dimensional stability. Developed in Germany in the 1960s, it remains a reliable option in fixed prosthodontics where moisture control is difficult and precision is non-negotiable.
What it is and how it captures detail
This two-component material comes in light, medium, and heavy viscosities that you can combine for detailed full-arch impressions. It flows into sulcular tissue readily, capturing fine marginal detail without requiring surfactant additives or intensive dry-field preparation.
Accuracy, stability, and tear strength
Dimensional accuracy is one of polyether's clearest strengths, holding its shape for several days after you remove it from the mouth. The rigid set is also its main limitation, since tear strength is lower than PVS, and thin interproximal sections can fracture when you pull the tray from deep undercuts.
Evaluate undercut depth before seating a polyether tray, since the rigid set makes removal difficult and raises the risk of impression fracture on withdrawal.
Moisture tolerance and patient comfort
The material's hydrophilic chemistry allows it to wet tooth surfaces and gingival sulci without additional conditioning steps. Patients most often report its bitter, astringent taste as the primary discomfort, and extended contact with the floor of the mouth can cause soft tissue irritation.
Best uses and common pitfalls
Polyether works best for crown, bridge, and implant-level impressions where accuracy in a moist field is a priority. The most common pitfall is underestimating undercut depth, which leads to a fractured or distorted impression on removal.
Practical handling, storage, and turnaround
Store polyether cartridges in a cool, low-humidity environment because the material absorbs atmospheric moisture and stiffens prematurely on the shelf. Working time runs approximately two minutes, with a full set time of four to six minutes depending on the formulation.
7. Polysulfide rubber base
Polysulfide, sometimes called mercaptan rubber or thiokol, is one of the oldest elastomeric dental impression material types still in clinical use. It cures through an oxidation reaction between a base paste and a lead dioxide accelerator, producing a tough, flexible set material with a distinctive brown color and sulfur odor that makes it immediately recognizable in any operatory.
What it is and how it captures detail
Polysulfide comes in light, medium, regular, and heavy viscosities, allowing you to combine consistencies for detailed full-arch impressions. The material flows into sulcular margins and interproximal spaces well during its extended working phase, capturing anatomical detail sufficient for crown, bridge, and denture work.
Accuracy, stability, and tear strength
Polysulfide produces good dimensional accuracy, but it continues to polymerize slowly after removal, meaning you should pour the stone model within 30 minutes to limit distortion from ongoing shrinkage. Its tear strength is excellent, which helps thin sections survive removal from deep undercuts without distorting.
Pour polysulfide impressions within 30 minutes of removal to stay ahead of the post-set polymerization that gradually shifts the impression's dimensions.
Moisture tolerance and patient comfort
The material tolerates a moist oral environment better than most elastomers, which helps in deep sulcular work where controlling moisture completely is difficult. Patients consistently report that the strong sulfur smell and prolonged chair time are their main complaints, since working time stretches to six or more minutes.
Best uses and common pitfalls
Polysulfide suits complete denture and crown impressions where budget matters and extended working time is an advantage. The most common pitfall is underestimating how far post-set shrinkage travels if you delay pouring past the recommended window.
Practical handling, storage, and turnaround
Store polysulfide pastes in a cool, dark location and avoid contaminating the base tube with accelerator, since even trace amounts trigger premature setting. Full set time in the mouth runs eight to twelve minutes depending on room temperature and the accelerator-to-base ratio you use.
8. Vinyl polyether silicone hybrids
Vinyl polyether silicone hybrids, often marketed under the trade name VPXS, represent a newer generation of dental impression material types that deliberately combine the hydrophilicity of polyether with the dimensional stability of addition silicone. The result is a single material that handles moisture-prone environments without sacrificing the precision that prosthodontic work demands.
What it is and how it captures detail
This material uses a hybrid polymer chemistry that bonds vinyl siloxane and polyether segments into one chain, giving it properties from both parent materials. It flows well in light-body formulations, capturing fine marginal and interproximal detail in sulcular areas where other elastomers would miss critical geometry due to hydrophobic repulsion.
Accuracy, stability, and tear strength
VPXS impressions hold their dimensions for up to two weeks after removal, matching the storage stability of premium addition silicone. Tear strength is high, allowing thin sections to survive withdrawal from undercuts without distorting the captured surface.
VPXS combines two previously incompatible strengths, moisture tolerance and long-term dimensional stability, into one material that gives labs extended pouring flexibility.
Moisture tolerance and patient comfort
The polyether segment in the hybrid chain makes this material genuinely hydrophilic, so it wets tooth surfaces and gingival tissue without relying on surfactant additives. Patients report a neutral taste and no strong odor, which places it among the more comfortable elastomeric options available.
Best uses and common pitfalls
VPXS suits crowns, implants, and full-arch bridge cases where a moist field is difficult to avoid. The main pitfall is cost, since this material runs significantly more expensive than standard PVS or polyether alone.
Practical handling, storage, and turnaround
Store cartridges in a cool, dry environment away from humidity to preserve the polyether segments from absorbing atmospheric moisture. Working time runs approximately two minutes, with full set achieved in four to five minutes.
9. Zinc oxide eugenol paste
Zinc oxide eugenol (ZOE) paste is one of the older dental impression material types still in regular clinical use. The material consists of a two-paste chelation system that sets rigid, making it useful for specific edentulous applications where flexibility is not required.
What it is and how it captures detail
ZOE functions as a wash material applied inside a custom tray or over a primary impression. It flows smoothly across edentulous ridge and mucosal surfaces, capturing fine tissue contours at low viscosity before the chelation reaction hardens it to a rigid state.
Accuracy, stability, and tear strength
Set ZOE is rigid and brittle, so it records accurate surface detail but fractures on removal rather than flexing around undercuts. Dimensional stability is high on intact sections, but thin areas crack easily when you withdraw the tray, so undercut-free edentulous cases suit it best.
Pour ZOE impressions the same day you take them, since the rigid set offers no tolerance for handling stress that accumulates over time.
Moisture tolerance and patient comfort
ZOE tolerates mild mucosal moisture during setting, which suits edentulous ridge capture. The primary comfort concern is eugenol itself, which triggers tissue irritation or allergic reactions in some patients, making eugenol-free formulations a practical alternative worth considering.
Best uses and common pitfalls
ZOE works best for complete denture final wash impressions. The most common pitfall is using it on eugenol-sensitive patients, which causes tissue inflammation that distorts the final denture fit.
Practical handling, storage, and turnaround
Mix the two pastes on a non-absorbent pad until the color becomes uniform, typically around 45 seconds. Setting time runs three to five minutes in the mouth depending on room temperature and the ratio you use.
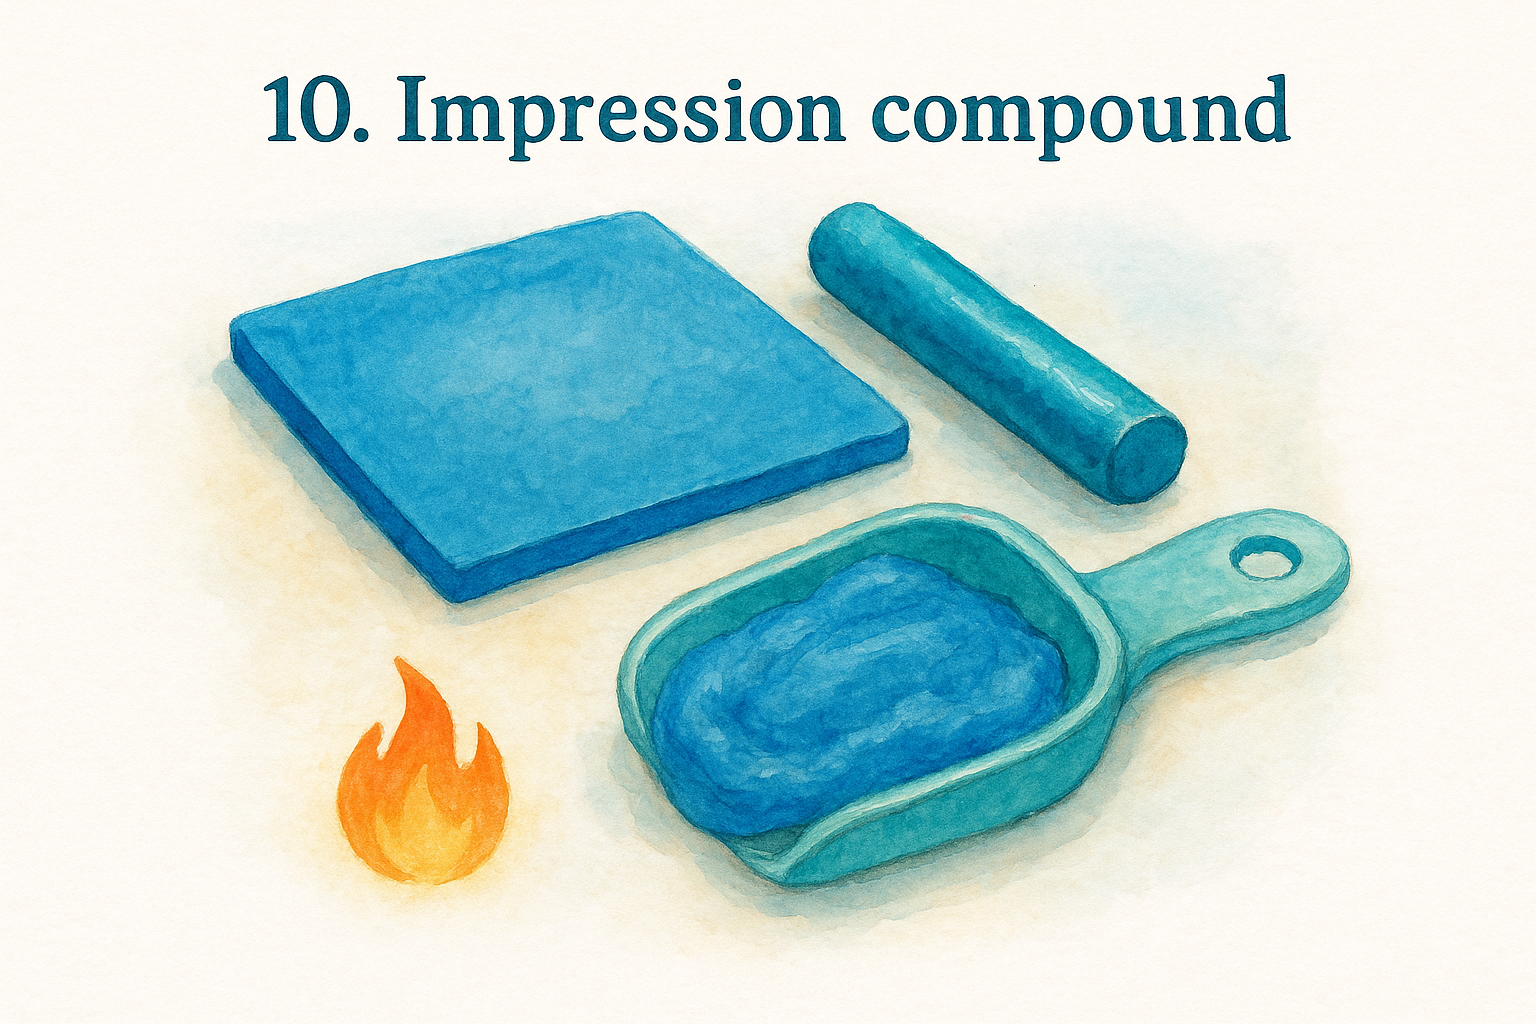
10. Impression compound
Impression compound is a thermoplastic material, meaning it softens when you heat it and hardens when it cools back down. It belongs to the rigid, non-elastic category of dental impression material types and has been used in clinical dentistry for over a century.
What it is and how it captures detail
Compound comes in stick or sheet form and softens in a warm water bath before you adapt it to a tray or press it directly against tissue. The material flows only moderately at working temperature, so it records broad surface contours rather than fine marginal detail, placing it firmly in the category of primary impression and border-molding tools rather than precision restorative materials.
Accuracy, stability, and tear strength
Dimensional stability is good once the material cools to room temperature, but the set compound remains susceptible to distortion if you expose it to heat above roughly 45 degrees Celsius. Because it sets rigid with no elasticity, it cannot flex around undercuts and will fracture or distort on removal from anything but the most straightforward arch anatomy.
Avoid storing compound impressions in warm rooms or vehicles, since temperatures above body level will soften the set material and shift its dimensions before you pour the model.
Moisture tolerance and patient comfort
Compound does not absorb moisture and performs adequately in a moderately wet oral environment. Some patients find it uncomfortable due to the heat required to soften it before seating, so verify the material has cooled to a safe temperature before placing it against soft tissue.
Best uses and common pitfalls
This material suits edentulous tray border molding and primary complete denture impressions. The most common pitfall is overheating the compound, which burns soft tissue on contact and distorts the final shape before you even seat the tray.
Practical handling, storage, and turnaround
Soften compound in water heated to 55 to 60 degrees Celsius until it becomes uniformly pliable throughout. It hardens fully in the mouth within three to four minutes once you remove it from the heat source and seat it against the tissue.
11. Impression plaster
Impression plaster is a gypsum-based, rigid-setting material that represents one of the earliest formal dental impression material types. It sets through an irreversible chemical reaction between calcium sulfate hemihydrate and water, producing a hard, brittle solid that records surface detail well but offers no flexibility on removal.
What it is and how it captures detail
Impression plaster flows at low viscosity when freshly mixed, allowing it to capture fine mucosal and edentulous ridge contours. Because it sets rigid with no elastic recovery, it works best in areas with minimal undercuts where the brittle set material can be removed intact without fracturing across the captured surface.
Accuracy, stability, and tear strength
Dimensional accuracy is high once the material sets fully, and it does not shrink or warp over time the way hydrocolloids do. Tear strength is essentially zero, since the rigid, brittle structure fractures rather than stretches on removal, making technique and tray design critical to getting a usable impression.
Sectioning a plaster impression into segments before removal helps you retrieve it without destroying the surface detail you need for an accurate model.
Moisture tolerance and patient comfort
Plaster is hydrophilic and sets reliably in a moist oral environment, which suits edentulous ridge capture where controlling moisture completely is difficult. Patients generally tolerate the material, though the chalky texture and rigid bulk can feel uncomfortable during the setting period.
Best uses and common pitfalls
This material works best for complete denture impressions of edentulous arches. The most common pitfall is attempting to remove the tray as a single piece, which fractures the plaster and destroys the impression you need for an accurate denture base.
Practical handling, storage, and turnaround
Mix plaster to a smooth, lump-free consistency before loading your tray, and seat it promptly before viscosity increases. Full set takes roughly three to five minutes in the mouth depending on the water-to-powder ratio you use.
12. Impression waxes
Impression waxes occupy a narrow but practical niche among dental impression material types. These thermoplastic materials soften under heat and firm up at room temperature, recording tissue contours at low pressure without the chemical complexity of elastomers or gypsum systems.
What it is and how it captures detail
Dental impression waxes cover baseplate wax, bite registration wax, and corrective wax formulations. You soften the material, seat it against tissue or occlusal surfaces, and let body temperature firm it into shape. The set material captures broad surface contours rather than fine marginal detail, so it serves a supportive role rather than a primary impression function for precision restorative work.
Accuracy, stability, and tear strength
Wax records acceptable contours for bite registration and denture border work, but accuracy degrades fast if the material warms past mouth temperature. The rigid, brittle set carries no meaningful tear strength, and any flexing on removal permanently distorts the captured surface.
Store wax impressions away from heat immediately after removal, since mild ambient warmth softens the material and shifts its dimensions before the lab can pour a model.
Moisture tolerance and patient comfort
This material does not absorb moisture, which helps it hold surface detail in a wet oral environment. Patients tolerate it well because it seats at low pressure and mild warmth, with no chemical reaction occurring in the mouth.
Best uses and common pitfalls
Your most reliable applications are bite registration and denture border correction. The most common pitfall is transporting the impression in warm conditions, which softens the set wax and destroys detail before the lab uses it.
Practical handling, storage, and turnaround
Soften wax in warm water or under a gentle heat source until it becomes uniformly pliable. It firms in the mouth within one to two minutes, making it one of the faster-setting options in this list.
13. Digital intraoral scanning
Digital intraoral scanning replaces physical impression material entirely with a handheld camera wand that captures thousands of surface images per second and assembles them into a precise three-dimensional digital model of your teeth and gums. No trays, no putty, and no gag-inducing bulk sitting in your mouth while you wait for a material to set.
What it is and how it captures detail
The scanner uses structured light or laser triangulation to map tooth surfaces in real time, generating a full-arch digital model that the software renders on screen within minutes. You see the impression as it forms, which lets the clinician identify and re-scan any areas where the data is incomplete before you leave the chair.
Accuracy, stability, and tear strength
Digital scans match or exceed the accuracy of premium elastomers for crown, bridge, and implant restorations. Because the data is mathematical rather than physical, it carries no risk of distortion, shrinkage, or tearing, and you can store it indefinitely without any degradation.
A well-captured digital scan eliminates the one-hour-to-two-week pouring window that governs every physical dental impression material type.
Moisture tolerance and patient comfort
Saliva and blood in the sulcus can scatter light and create gaps in the scan data, so moisture control still matters. Most patients find the experience significantly more comfortable than any tray-based system, with no taste, no pressure, and no chemical reaction occurring against their tissue.
Best uses and common pitfalls
Intraoral scanning works best for crowns, implants, orthodontic aligners, and full-arch restorations. The most common pitfall is incomplete sulcular capture around prepared margins, which produces a restoration that does not seat cleanly.
Practical handling, storage, and turnaround
The scan file transmits to the lab digitally, eliminating shipping time and physical handling errors entirely. Turnaround depends on the lab's milling or printing workflow, but digital delivery typically compresses the overall production timeline by one to two days.
Key takeaways
The right dental impression material types depend on what the final appliance needs to do, how much moisture control you can achieve, and how quickly the lab needs to pour the model. Elastomers like PVS and VPXS lead for precision restorative work, while hydrocolloids and rigid materials serve specific edentulous and diagnostic applications. Digital scanning removes physical material from the equation entirely but still requires good sulcular moisture control to capture margins cleanly.
For most people getting a custom night guard or retainer, the material in your at-home kit does the same job as the elastomers your dentist uses in the office. Silicone putty captures your teeth accurately, holds its dimensions long enough to reach the lab, and produces a fit that rivals chair-side impressions at a fraction of the cost. If you want to experience that process firsthand, order a custom-fitted night guard from Remi and see the difference a proper impression makes.
