

Most people brush their teeth twice a day and call it done. But the order you complete each step of your daily oral care routine actually matters more than you might think. Brushing before flossing, flossing before rinsing, using mouthwash at the wrong time, small sequence mistakes can reduce the effectiveness of products you're already using.
Getting the order right protects your enamel, keeps your gums healthy, and helps prevent problems like teeth grinding damage and decay from compounding overnight. For the millions of people who clench or grind their teeth, layering in the right protective steps, like wearing a custom night guard, makes a proper routine even more critical.
At Remi, we work alongside dentists to design custom-fitted night guards and oral care products that slot right into your daily habits. This guide breaks down the exact step-by-step order for morning and night routines, explains why sequence matters, and shows you how to build a routine that actually protects your teeth long-term.
What to do before you start
Before you touch a toothbrush, a quick setup review saves you from mid-routine scrambling and builds consistent habits from day one. Most people run their daily oral care routine on autopilot, using whatever products happen to be on the counter without checking whether those tools are still doing their job. Taking two minutes to organize your setup makes every step that follows work better.
Gather the right tools
Your routine is only as good as the tools backing it up. Check that your toothbrush bristles are not frayed or splayed outward. The American Dental Association recommends replacing your toothbrush every three to four months, or sooner if the bristles look worn. A worn brush cleans roughly 30% less effectively than a fresh one, which means you can spend two full minutes brushing and still leave significant plaque behind.
Worn bristles are one of the most overlooked reasons brushing stops protecting your teeth, even when your technique is correct.
Along with your toothbrush, confirm you have dental floss or a water flosser, a fluoride toothpaste, and an alcohol-free mouthwash. If you wear a night guard or retainer, keep your cleaning solution nearby so it fits into the end of your routine without any hunting around.
| Tool | What to check before you start |
|---|---|
| Toothbrush | Replace every 3-4 months or when bristles fray |
| Floss or water flosser | Enough supply for the week |
| Toothpaste | Contains fluoride |
| Mouthwash | Alcohol-free for daily use |
| Night guard or retainer | Cleaned and stored in its case |
Know your timing
Morning and night routines serve different purposes, and understanding that distinction upfront changes how you approach each session. Your morning routine removes bacteria and plaque that built up overnight while your saliva production was low. Your nighttime routine is the more critical of the two because it clears the full day's buildup before saliva flow drops again during sleep, which is when bacteria cause the most damage to enamel and gum tissue.
Budget two to three minutes in the morning and three to four minutes at night. That extra evening time accounts for thorough flossing, brushing, rinsing, and properly cleaning any oral appliances you wear while you sleep.
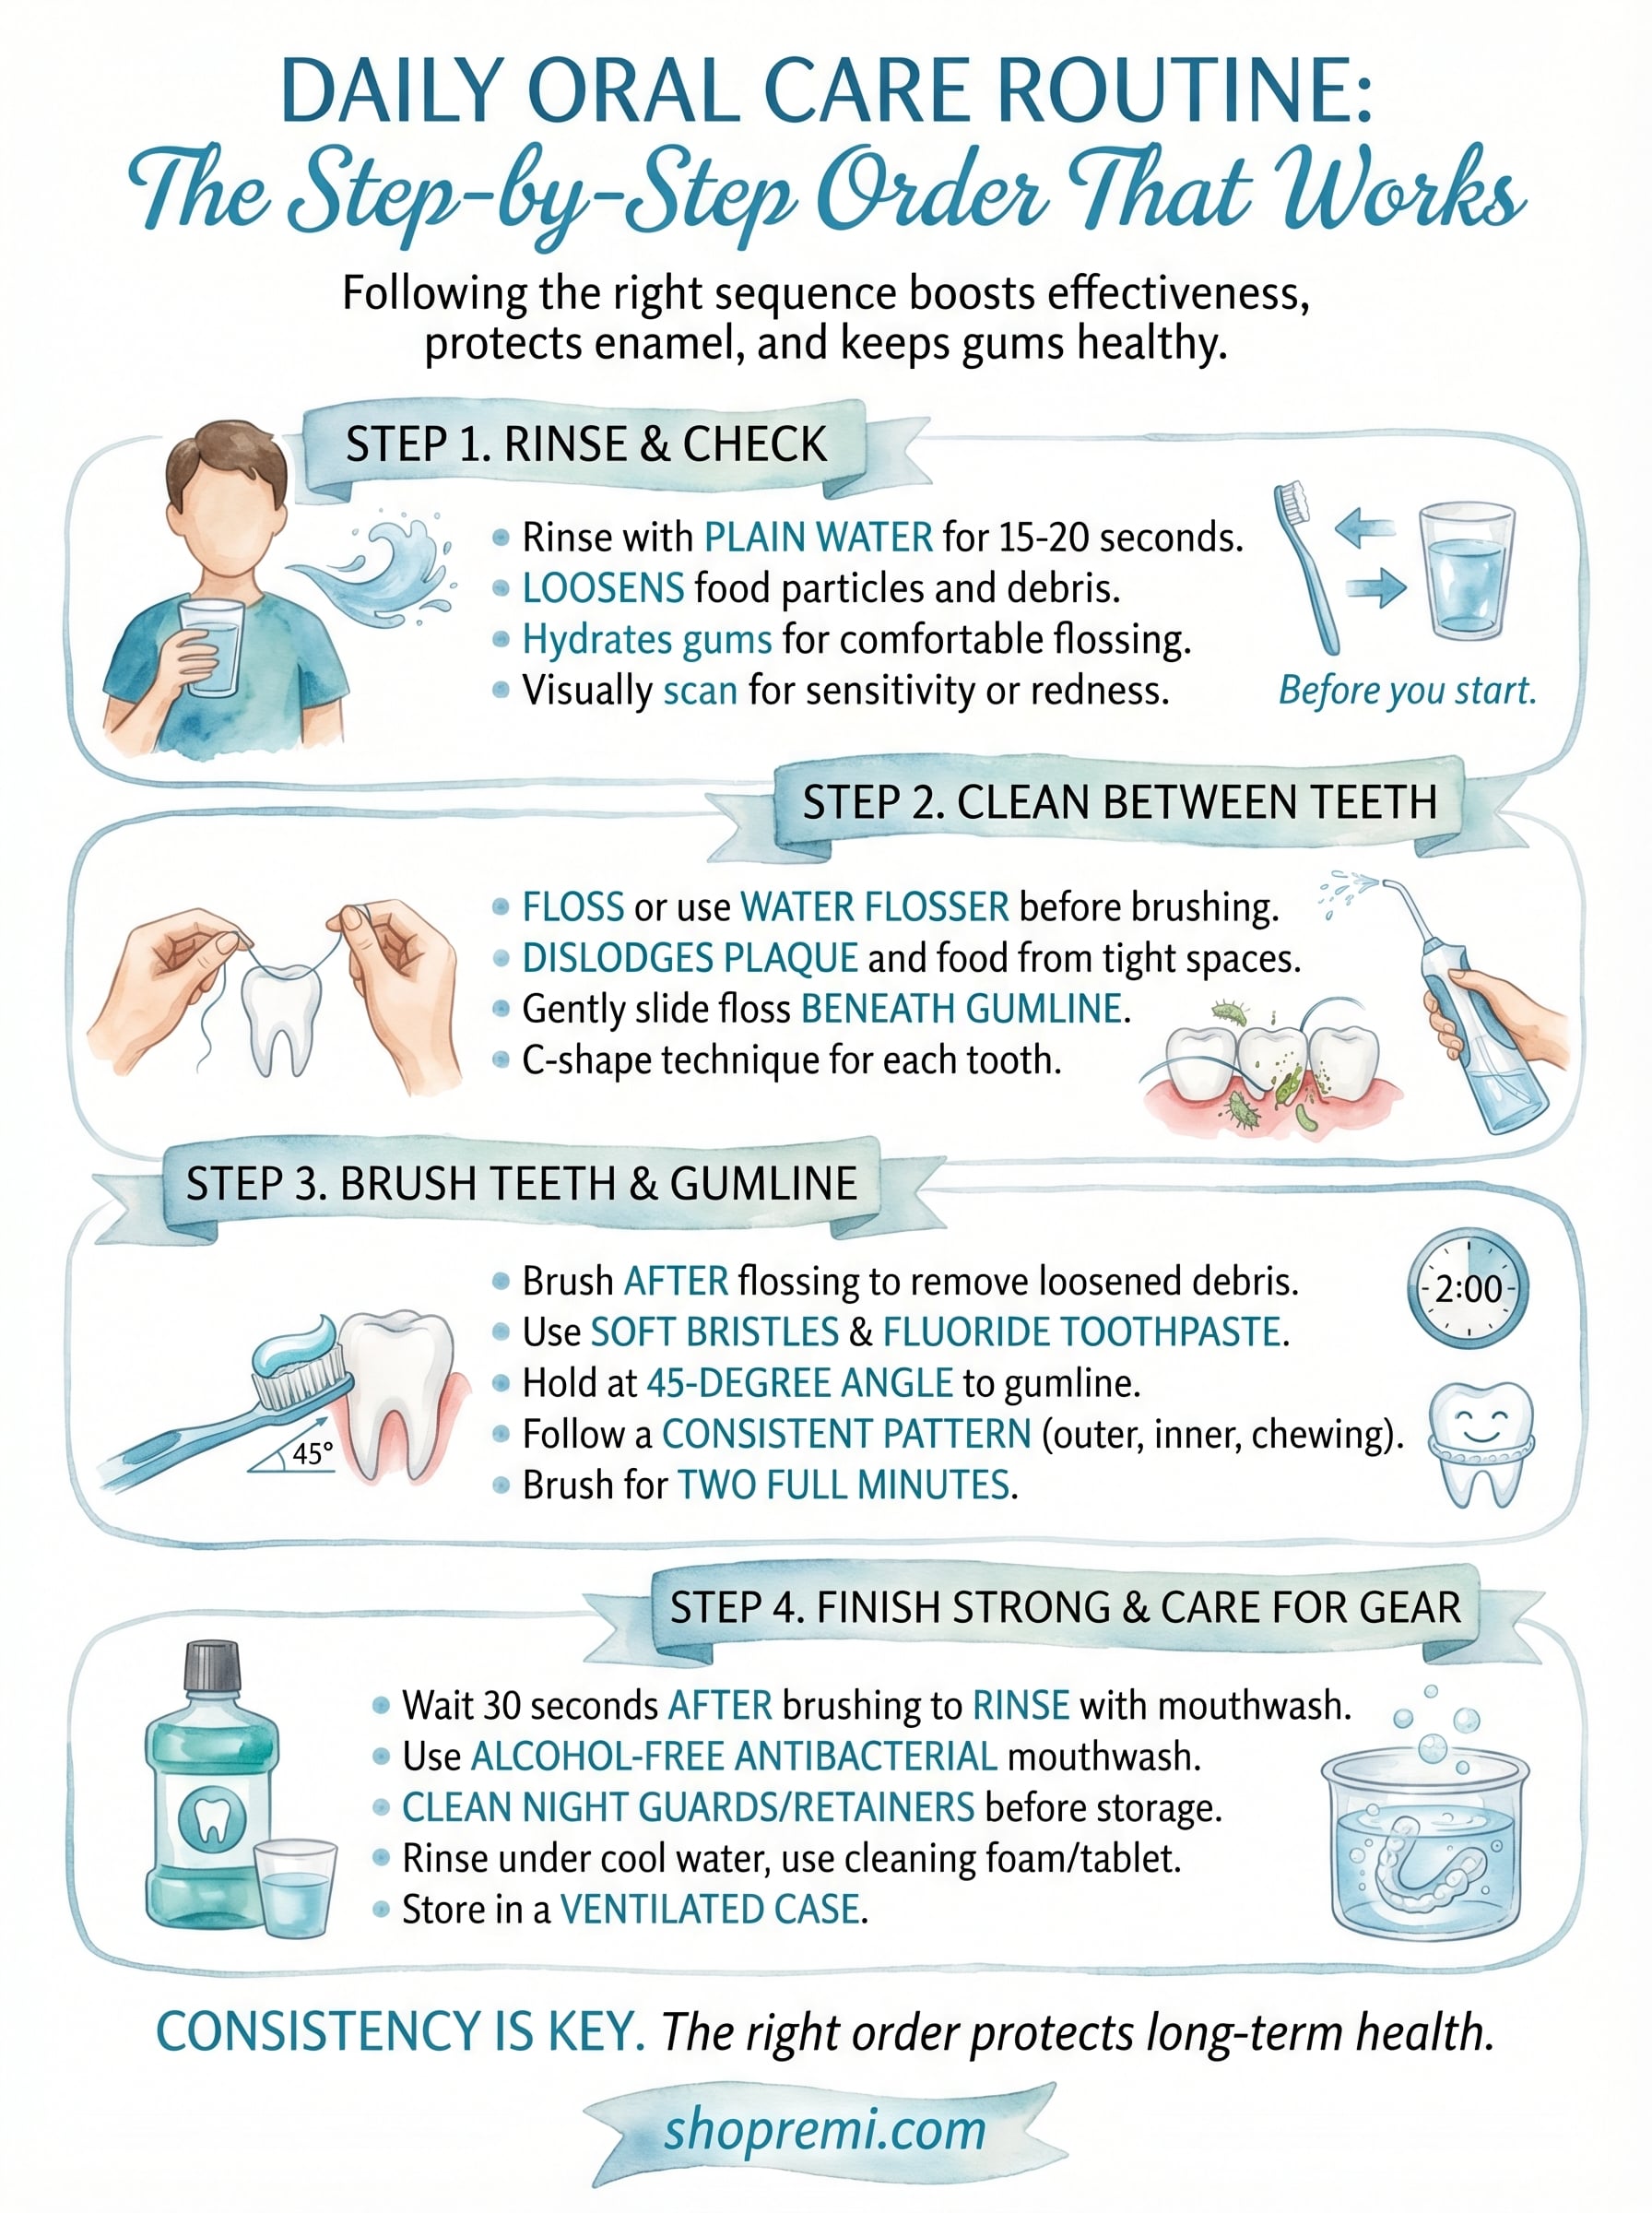
Step 1. Rinse and check your mouth
Start by rinsing with plain water for 15 to 20 seconds. This loosens food particles and surface debris before any product touches your teeth or gums, which means your floss and brush can focus on actual plaque instead of pushing food around. It also gives you a natural moment to pause before rushing into the rest of your daily oral care routine.
Why rinsing comes first
Skipping the rinse means your toothbrush bristles contact loose food debris from the start, spreading it around rather than cleaning your teeth. Rinsing first also hydrates your gum tissue slightly, which makes flossing more comfortable and less likely to cause minor irritation or bleeding.
Starting with a water rinse takes less than 20 seconds and makes every step that follows more effective.
Check your mouth before you brush
Use this rinse moment to visually scan your mouth in the mirror. Look for any areas that feel tender, spots where gums appear red or swollen, or sensitivity along the gumline. These are the areas that need extra attention during brushing and flossing, not areas to skip over.
If you wear a night guard, take it out before rinsing and set it aside to clean at the end of your routine. Removing it first prevents bacteria from the appliance from transferring back onto your teeth while you work through each step.
Step 2. Clean between teeth
Flossing or using a water flosser comes before brushing, not after. This order matters because cleaning between teeth dislodges plaque and food particles from the spaces your brush cannot reach, and brushing afterward sweeps those loosened particles away rather than leaving them trapped along the gumline. Reversing the order significantly reduces how much debris you actually remove during your daily oral care routine.
Choose your tool
Both traditional floss and a water flosser effectively remove plaque from between teeth when used correctly. Traditional floss gives you precise, direct contact with each tooth surface. A water flosser uses a pressurized stream to flush debris from tight spaces and is often more comfortable for people with sensitive gums or dental appliances like night guards and retainers.
| Tool | Best for |
|---|---|
| Traditional floss | Close contact, tight spaces |
| Water flosser | Sensitive gums, dental appliance wearers |
| Floss picks | Convenience, travel |
How to floss correctly
Start at the back of your mouth and work forward, using a fresh section of floss for each gap. Curve the floss into a C-shape around each tooth and slide it gently below the gumline, not just between the teeth. Hold for two seconds on each side of the gap before moving to the next.
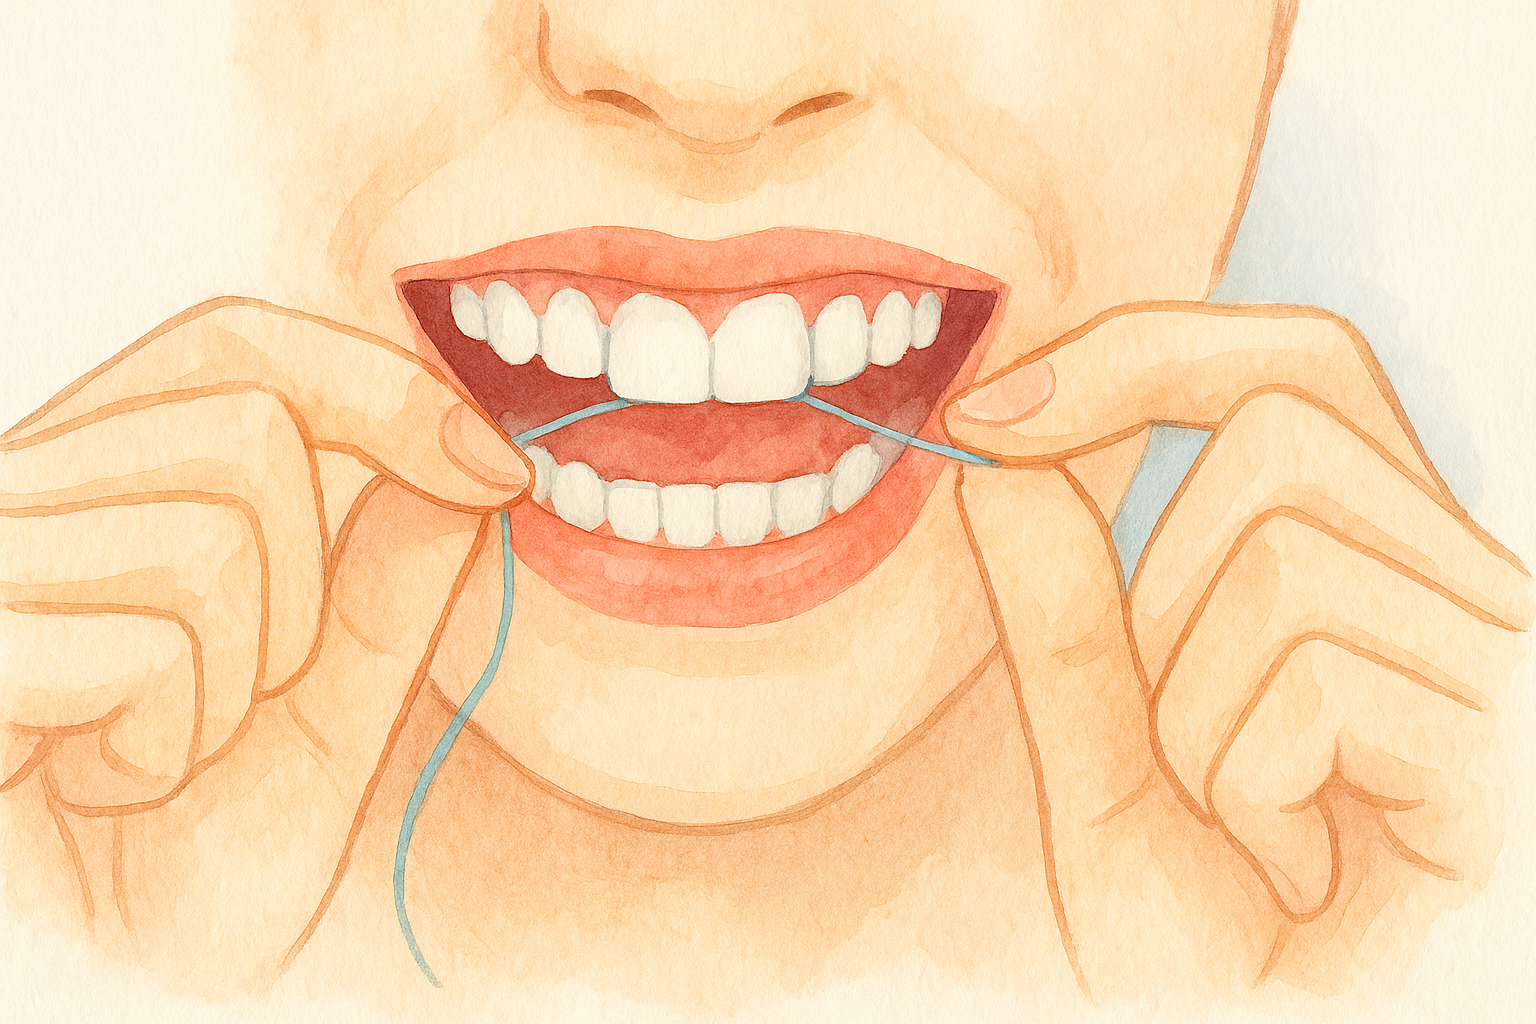
Sliding floss below the gumline, rather than just snapping it between teeth, is what actually disrupts the bacteria that cause gum disease.
Use 18 inches of floss per session so you always have a clean segment available. Reusing the same section transfers bacteria from one gap to the next, which cancels out the cleaning you just did.
Step 3. Brush teeth and gumline
Now that loose plaque and debris sit exposed along your gumline and tooth surfaces, brushing locks in the full benefit of your daily oral care routine. Brushing after flossing means your toothbrush actually removes what the floss dislodged, rather than pushing debris back into gaps you just cleared.
Set up your brush correctly
Apply a pea-sized amount of fluoride toothpaste to a soft-bristled brush. Soft bristles clean as effectively as medium or hard bristles without abrading your enamel or irritating your gum tissue. Hold the brush at a 45-degree angle to your gumline so the bristles reach just underneath, where most plaque buildup starts.
Angling your brush at 45 degrees toward the gumline is the single most important adjustment most people can make to improve their brushing results.
Follow a consistent pattern
Working through a set pattern each time prevents you from missing the same spots session after session. A reliable sequence looks like this:
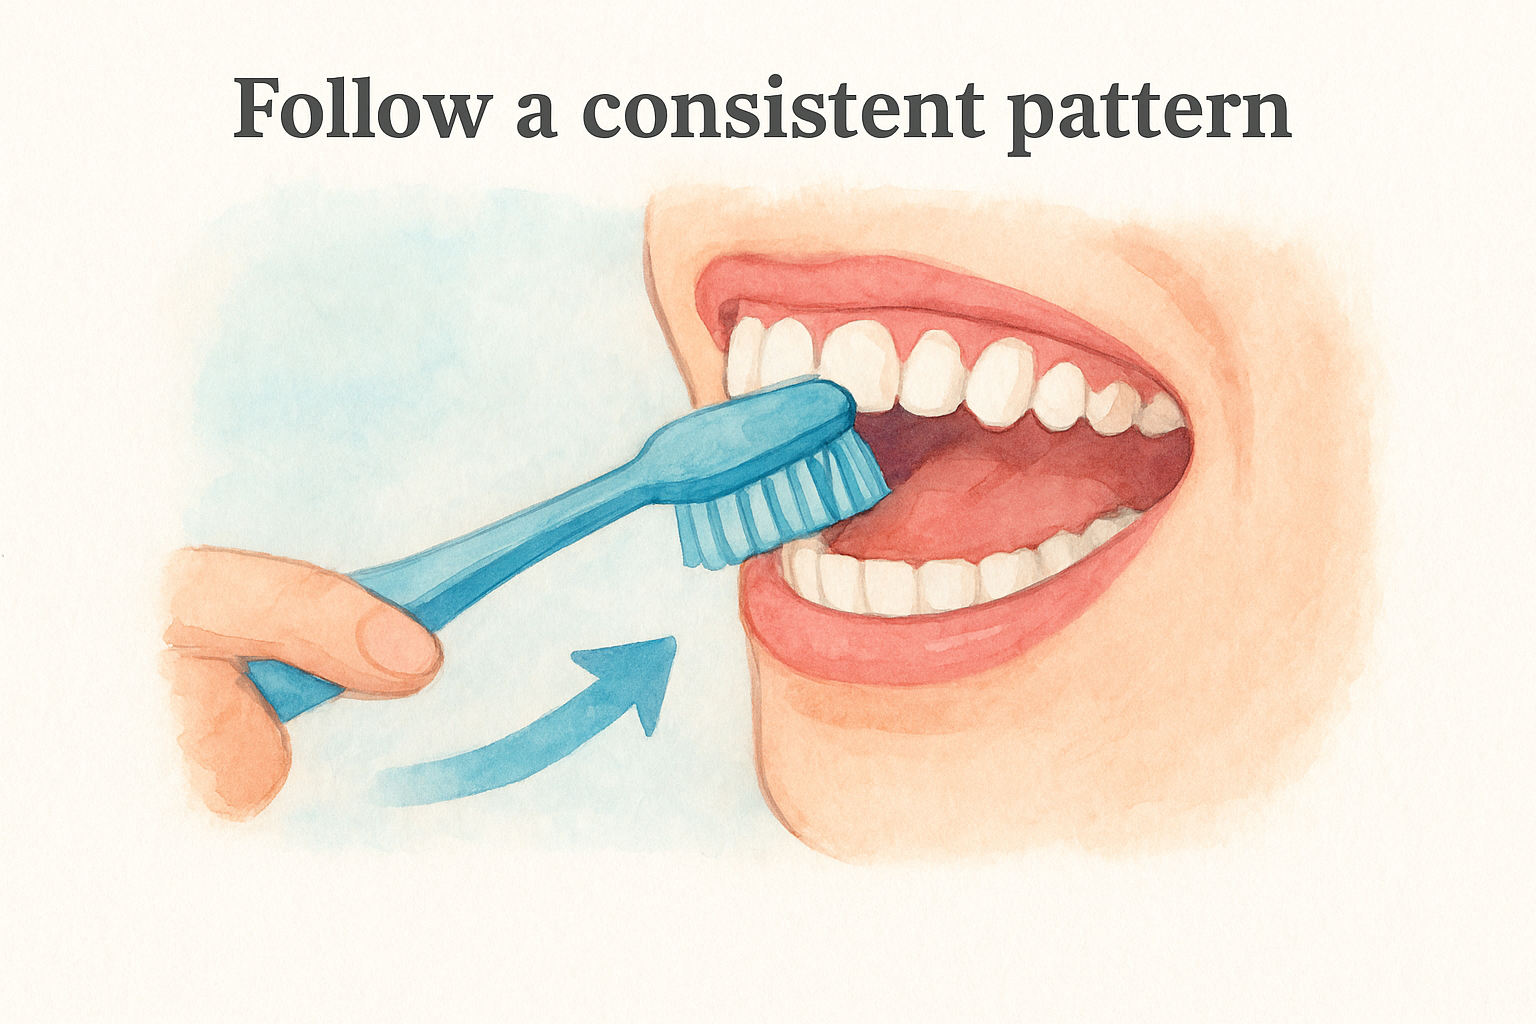
- Outer surfaces of upper teeth, back to front
- Outer surfaces of lower teeth, back to front
- Inner surfaces of upper teeth, back to front
- Inner surfaces of lower teeth, back to front
- Chewing surfaces of upper and lower teeth
- Tongue and roof of mouth to clear bacteria
Brush each section for 10 to 15 seconds using short, circular strokes rather than long horizontal scrubbing. Scrubbing back and forth wears down enamel over time. Set a timer until the habit feels automatic, and aim for a full two minutes total every session.
Step 4. Finish strong and care for gear
After brushing, your enamel is temporarily softened by the fluoride toothpaste and the mechanical action of the brush. Rinsing with water immediately after brushing washes away the protective fluoride film before it can absorb fully, which is why the final two steps of your daily oral care routine follow a specific order.
Rinse with mouthwash last
Wait 30 seconds after brushing before using mouthwash, then swish an alcohol-free antibacterial rinse for 30 to 60 seconds. Timing your rinse this way locks in fluoride from your toothpaste while adding a final antibacterial layer that reaches surfaces your brush and floss cannot. Avoid eating, drinking, or rinsing with water for at least 30 minutes afterward to let the rinse fully work.
Using mouthwash after brushing, rather than before, extends fluoride contact time and gives your rinse a clean surface to work on.
Clean your oral appliances
If you wear a night guard or retainer, clean it before you store it, not in the morning when bacteria have already been sitting on it for hours. Rinse it under cool water first, then use a dedicated cleaning foam or tablet to clear buildup.
Follow this end-of-night appliance checklist:
- Rinse under cool water for 10 seconds
- Apply cleaning foam or drop in a cleaning tablet
- Rinse thoroughly and inspect for residue
- Store in a ventilated case, not a sealed container
Storing a clean, dry appliance prevents bacterial growth and significantly extends its lifespan.
Make it easy to stick with
A consistent daily oral care routine does not require more time, it requires the right order and the right tools in place before you start. Rinse first, floss second, brush third, then finish with mouthwash and clean your appliances. Follow that sequence every morning and night and you will remove more plaque, protect your enamel better, and significantly reduce your risk of long-term gum damage.
Keeping your setup simple is what makes the habit stick. Put your floss next to your toothbrush so skipping it takes more effort than using it. If you grind or clench your teeth at night, adding a custom night guard to your routine protects everything you just worked to clean. Remi makes that step straightforward with a custom-fit night guard you can order from home, built to dental-grade standards at a fraction of the office price.

