

How to Make a Dental Impression at Home: Step-by-Step Guide
Getting a custom night guard or retainer from your dentist can cost hundreds of dollars. You need to schedule an appointment, sit in the chair while they take impressions, and wait for the lab to create your device. The whole process eats up your time and money. But what if you could skip the office visit and do it yourself?
At-home impression kits let you create accurate dental molds without leaving your house. You get professional results at a fraction of the cost. The process takes about 15 minutes, and most kits include everything you need to capture detailed impressions of your upper and lower teeth.
This guide walks you through each step of making dental impressions at home. You'll learn what materials to gather, how to mix the putty correctly, and the exact technique for taking clear impressions. We'll also cover common mistakes to avoid and how to check your molds before sending them off. By the end, you'll know exactly how to create impressions that lead to a perfectly fitted night guard or retainer.
What you need before you start
Your impression kit arrives with most of what you need to make a dental impression at home. Before you open anything or start mixing materials, lay everything out on a clean surface and verify all items are included. Missing pieces mean you'll need to contact the company before proceeding, so check now rather than halfway through the process.
Inside your impression kit
A standard at-home impression kit contains impression trays for your upper and lower teeth (usually two or three of each size), putty containers in two different colors that you'll mix together, and a pair of gloves to keep the process sanitary. Most kits also include return packaging with a prepaid shipping label and detailed instructions specific to that brand. The putty works on a timer once you start mixing, so don't open those containers until you're ready to begin.
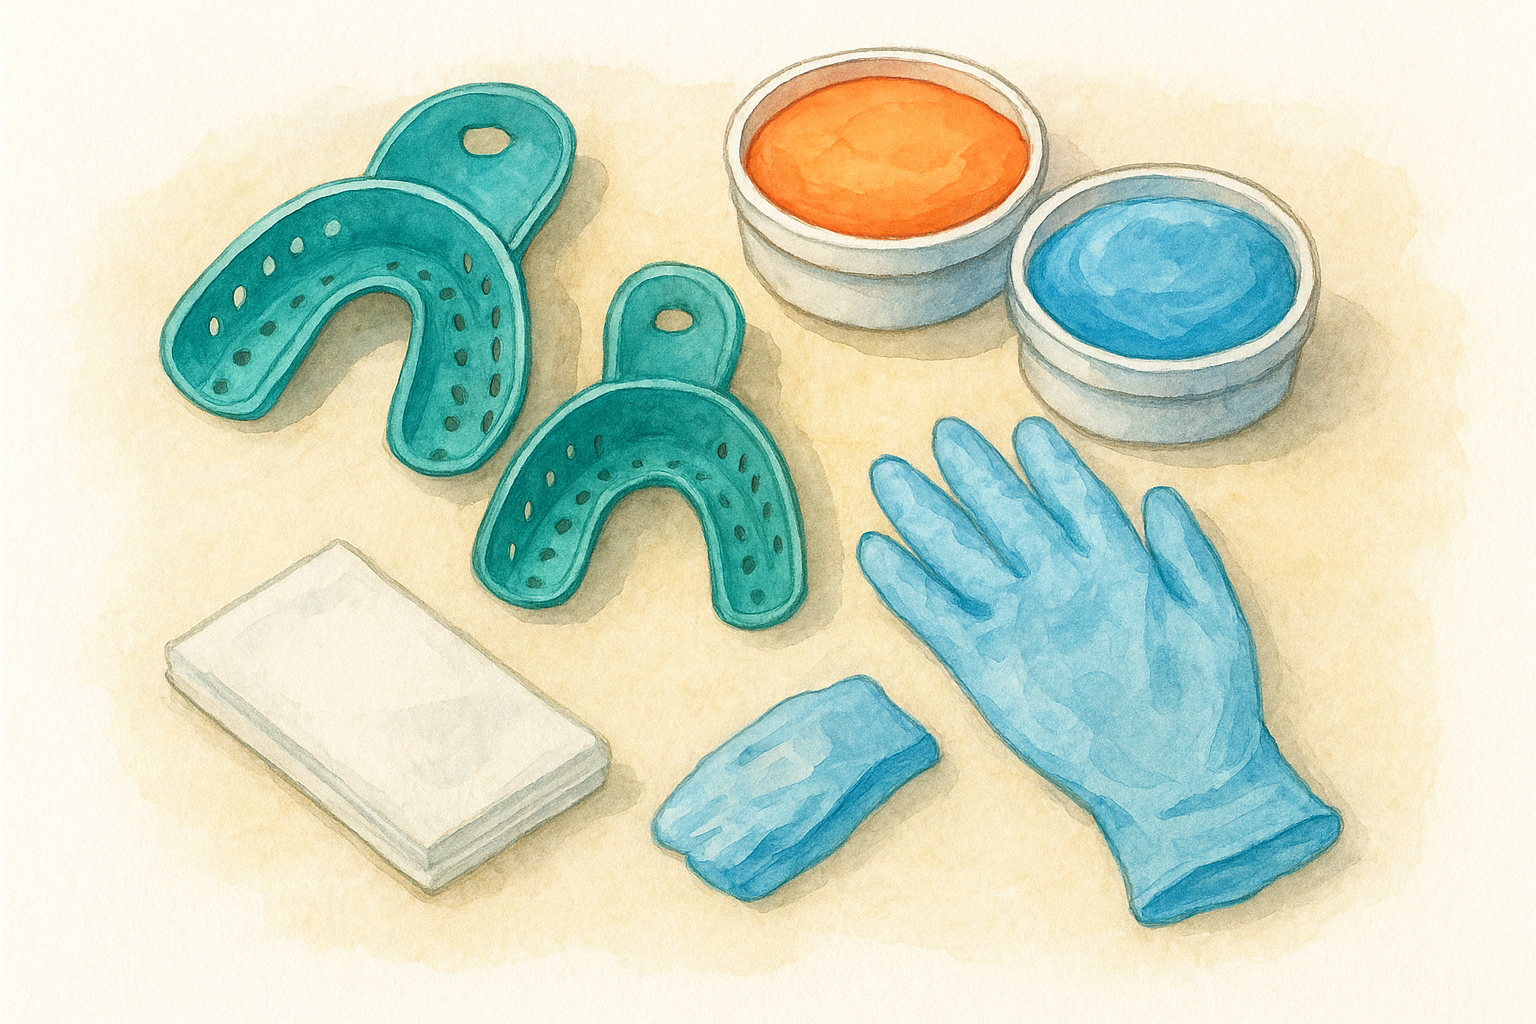
Quality kits provide backup trays and extra putty because first attempts don't always work perfectly.
Gather these items from home
You need several household items within arm's reach before starting. A timer or phone lets you track the precise mixing and setting times, which determine whether your impressions turn out usable. A mirror helps you position the trays correctly in your mouth, especially for the upper arch. Keep paper towels or napkins nearby because excess putty can squeeze out during the process. Finally, clear your workspace completely and wash your hands thoroughly before putting on the gloves included in your kit.
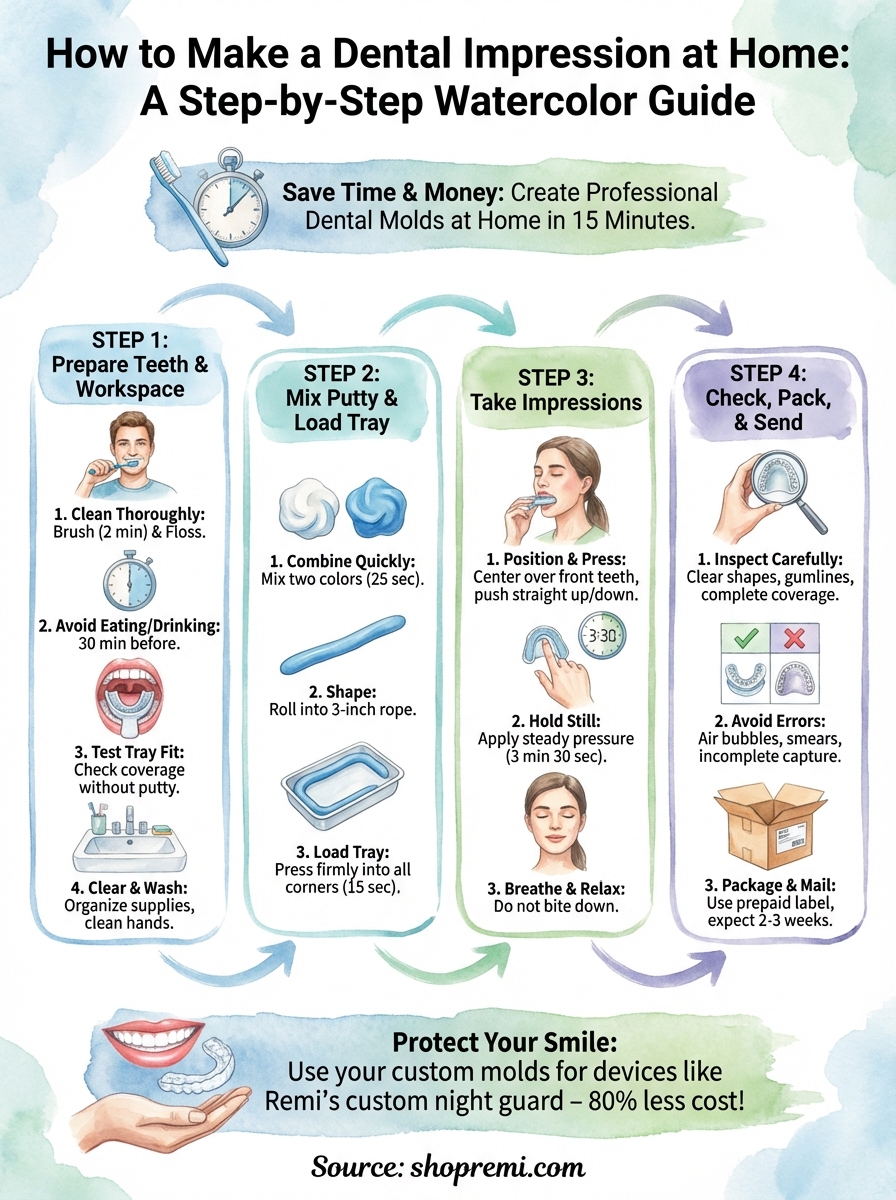
Step 1. Prepare your teeth and workspace
You cannot rush the preparation step when learning how to make a dental impression at home. Clean teeth and a controlled environment determine whether your impressions capture the detail needed for a custom-fitted device. Skipping this step leads to impressions with debris, saliva interference, or positioning problems that make the molds unusable.
Clean your mouth thoroughly
Brush your teeth for at least two minutes, reaching every surface including the backs of your molars and along the gumline. Floss between each tooth to remove any food particles that could create gaps or bumps in your impression. Rinse your mouth with water and use a towel to gently pat your teeth dry, since excess moisture can affect how the putty sets against your enamel.
Your dentist would dry your teeth with air before taking impressions, and you need similar dryness at home for accurate results.
Avoid eating or drinking for 30 minutes before starting the process. This keeps your mouth clean and prevents additional saliva production that could interfere with the putty. Your workspace should have good lighting and enough counter space to lay out all materials within reach.
Test the impression trays first
Place each tray in your mouth without any putty to check the fit. The tray should cover all your teeth including the back molars without pressing against your gums or cheeks uncomfortably. Center the tray over your front teeth first, then check that it extends far enough back. If the tray feels too small or too large, contact the kit provider for different sizes before mixing any putty.
Step 2. Mix the putty and load the tray
This step moves fast when you learn how to make a dental impression at home. The putty starts setting within 60 seconds of mixing, so you need everything ready before opening the containers. Work on one tray at a time, starting with your upper arch since most people find it easier to master first. Put on your gloves now and keep your timer nearby.
Combine the putty quickly
Open one container of white putty and one container of colored putty (usually blue or another bright color). Squeeze equal amounts of each putty into your gloved palm and immediately begin mixing them together. Knead the two colors by folding the putty over itself repeatedly until you see no streaks or swirls remaining. The mixture should show one solid, uniform color throughout.
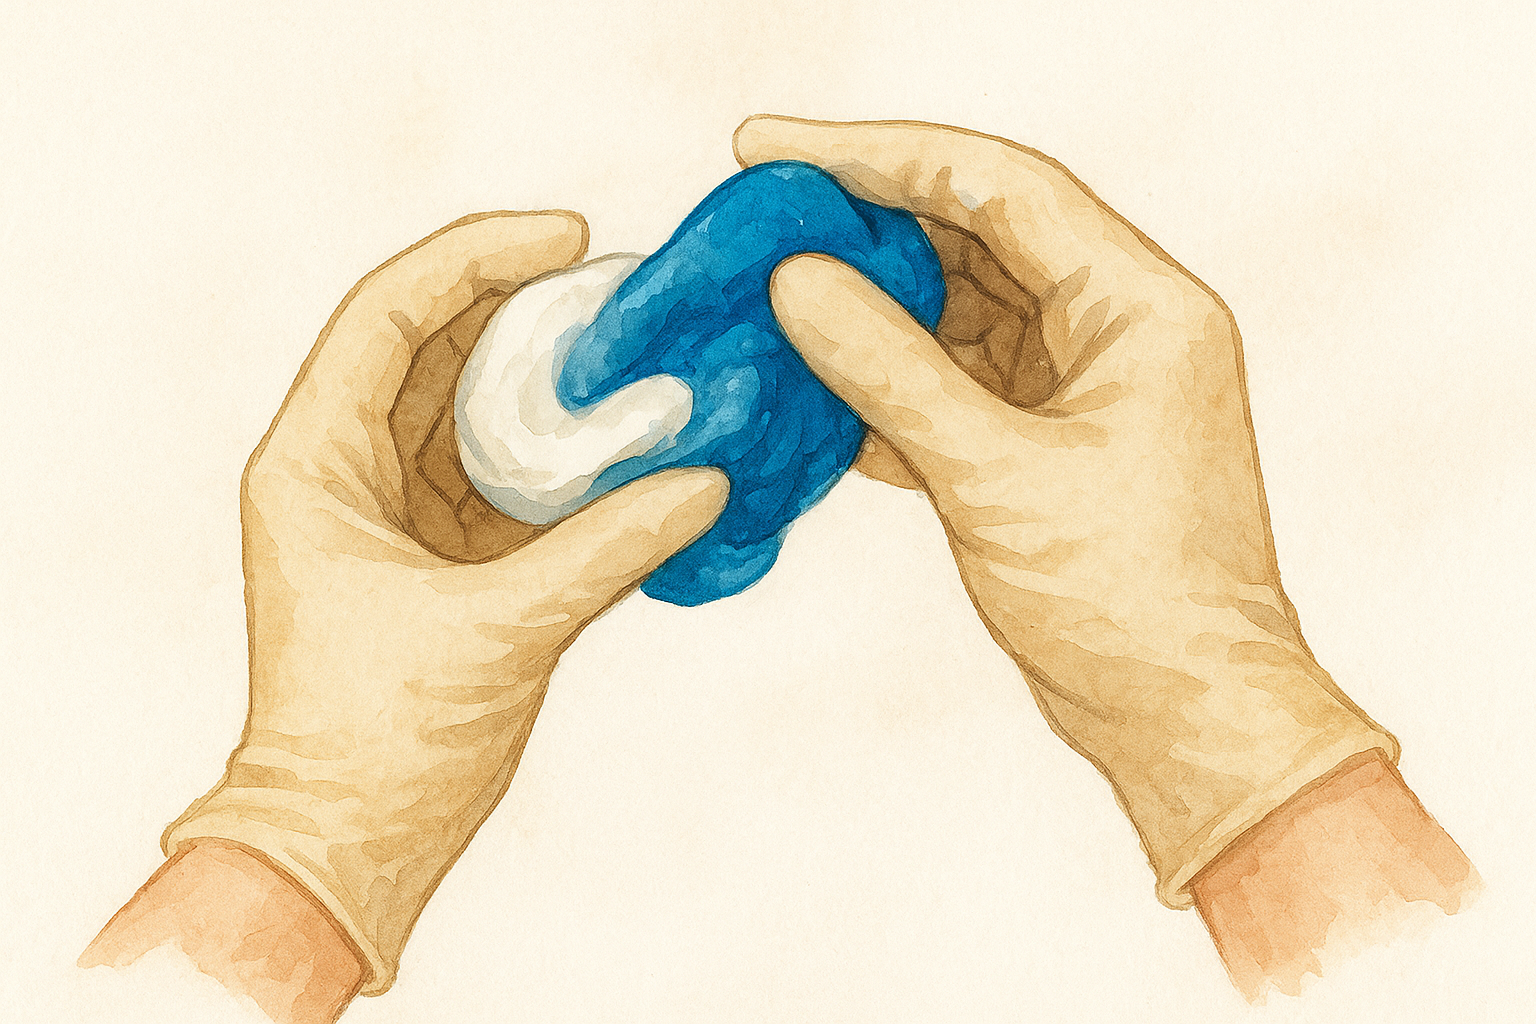
Complete this mixing within 25 seconds to leave enough working time for the remaining steps. The putty feels soft and pliable when properly mixed but will begin firming up quickly. If you still see color streaks after 25 seconds, keep mixing for a few more seconds rather than using partially blended material.
Incomplete mixing creates impressions with soft spots that won't hold their shape or capture accurate tooth details.
Shape and load the tray
Roll the mixed putty between your palms to form a rope shape about 3 inches long and roughly the diameter of your thumb. This cylindrical shape distributes evenly when you press it into the tray. Complete this shaping within 10 seconds after mixing ends.
Press the putty rope into the impression tray, spreading it from one end to the other. Push the material firmly into all corners of the tray and make sure it covers the entire base with no gaps. The putty should reach the edges but not overflow the sides. You have about 15 seconds maximum to finish loading the tray before the putty becomes too firm to work with properly.
Step 3. Take your upper and lower impressions
Working quickly matters when you learn how to make a dental impression at home because the putty continues to firm up. Start with your upper tray since it gives you practice before the slightly trickier lower impression. You have about 60 seconds from loading the tray to get it positioned correctly in your mouth, so don't hesitate once the putty is in place.
Position and press the upper tray
Open your mouth wide and tilt your head back slightly to help position the tray. Center the tray over your front teeth first, lining up the middle of the tray with the space between your two front incisors. Push the tray straight up in one smooth motion rather than sliding it into place, which can smear the putty and ruin the impression.
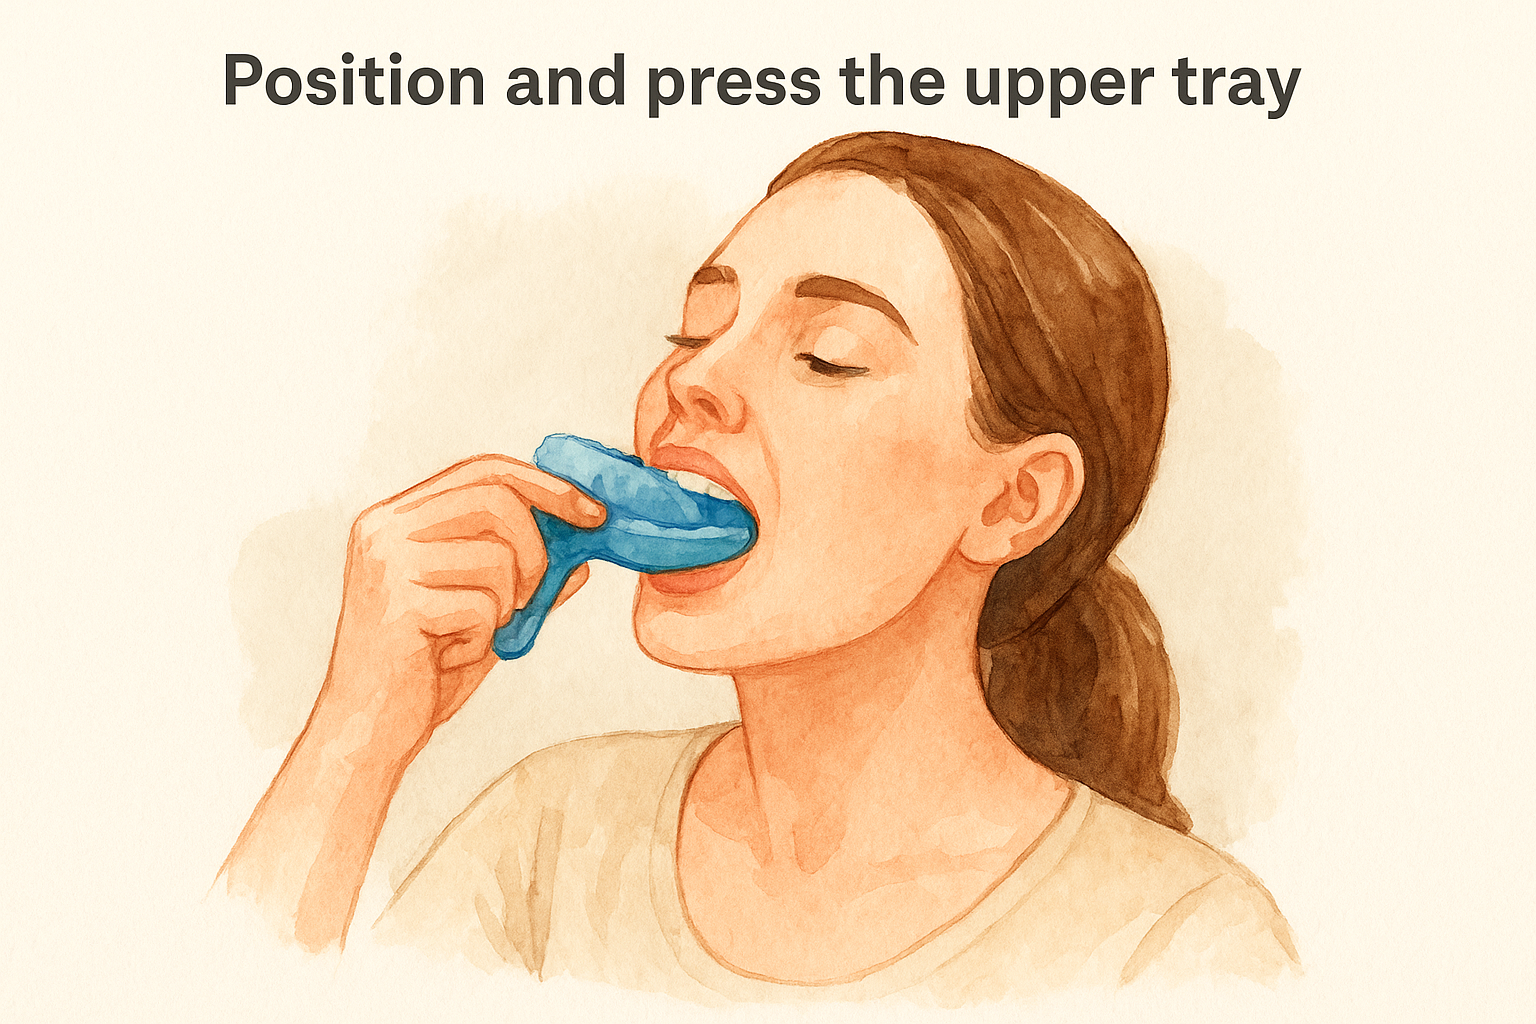
Press firmly and evenly across all teeth using your fingers on top of the tray. The putty should flow around each tooth and extend up to your gumline, creating a seal against the soft tissue. Apply steady pressure to ensure the material reaches into the spaces between teeth and captures the full height of each tooth from gumline to biting edge.
Never bite down or chew on the tray, as this creates a double impression that makes the mold unusable.
Hold still during the setting time
Keep the tray in position for 3 minutes and 30 seconds without moving, talking, or adjusting it. Set your timer before inserting the tray so you know exactly when to remove it. Breathe slowly through your nose and try to relax your jaw muscles. Removing the tray too early results in a distorted impression that won't capture accurate tooth shapes, while leaving it too long makes removal uncomfortable.
Pull the tray straight down when the timer goes off, using steady pressure without twisting or rocking it side to side. The impression should release cleanly from your teeth with all tooth shapes clearly visible in the putty.
Repeat for your lower teeth
Mix a fresh batch of putty for your lower impression following the same 25-second mixing process. Lower impressions require you to keep your tongue flat against the floor of your mouth and away from the putty. Press the loaded tray down onto your lower teeth, applying even pressure and holding for the full 3 minutes and 30 seconds before removing it straight up.
Step 4. Check, pack, and send your molds
Examining your impressions before sending them saves you from waiting weeks only to learn they need redoing. Look at each impression under good lighting and compare what you see against the quality standards your kit provider includes. Clear tooth shapes, visible gumlines, and complete coverage of all teeth including back molars indicate successful impressions.
Inspect your impressions carefully
Check for these quality markers in both your upper and lower impressions. Each tooth should show distinct edges and surfaces without any blurred areas, double imprints, or visible tray material showing through gaps in the putty. The impression should extend to your gumline on all sides, capturing where each tooth meets the soft tissue. Back molars must appear in the impression, not cut off at the edges.
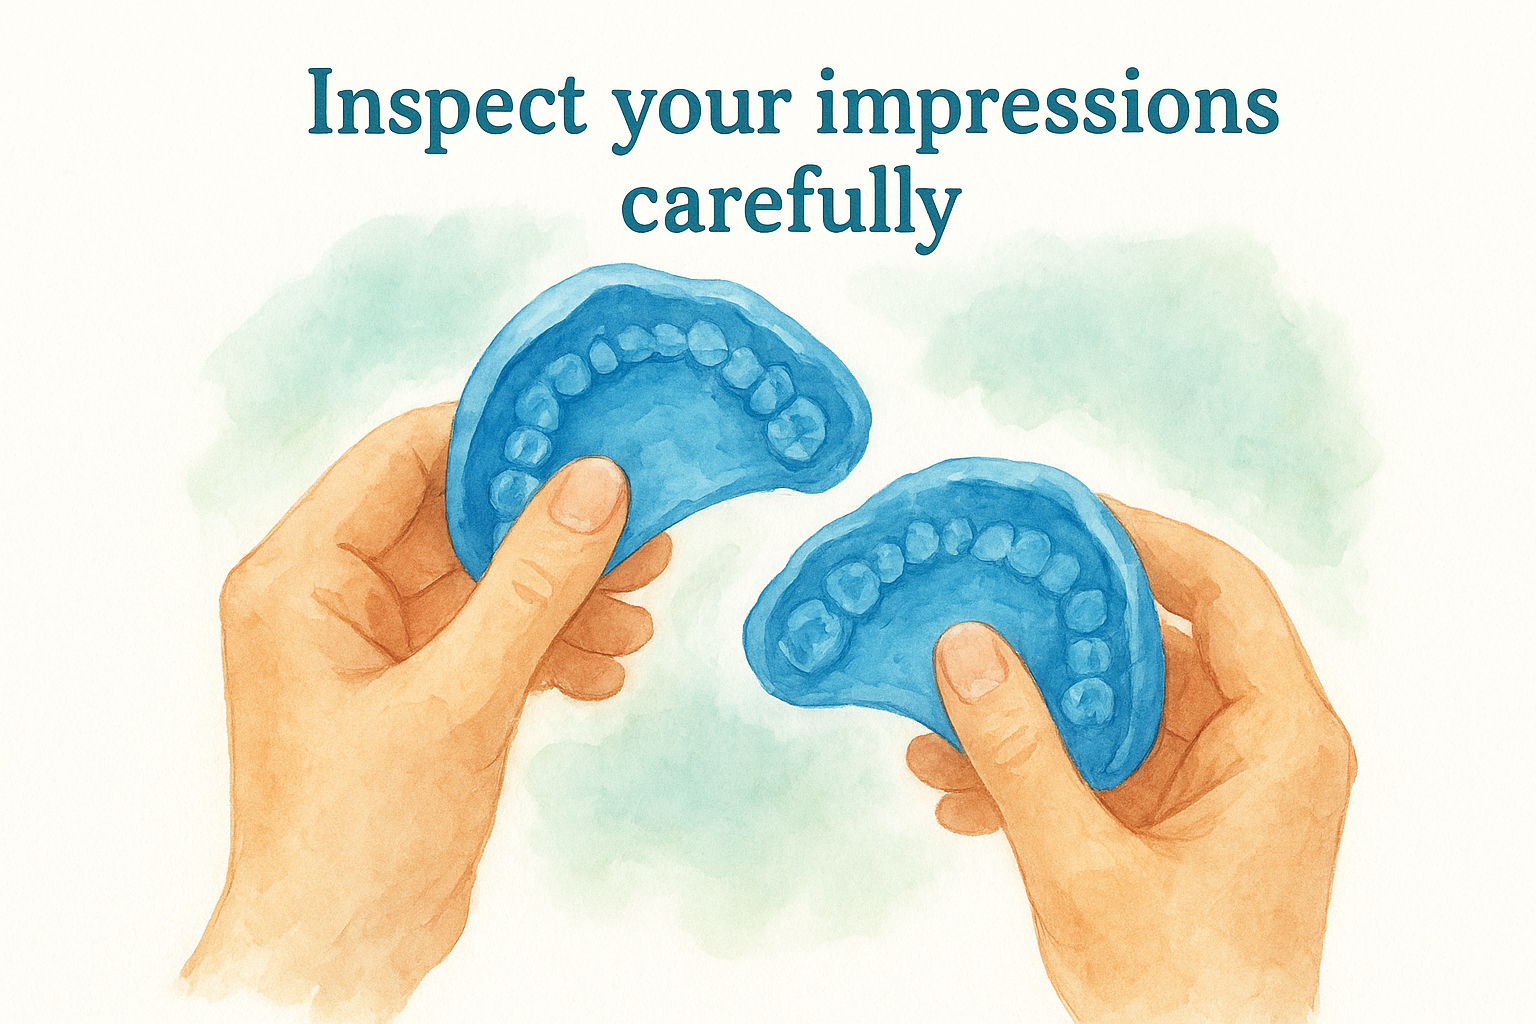
Avoid sending impressions with air bubbles, smeared surfaces from movement, or incomplete tooth coverage. Most companies reject these and require you to restart the process with new materials.
Many kits ask you to photograph your impressions and submit them for approval before mailing, which prevents wasted shipping time.
Package and mail your kit
Place your approved impressions back into the clear bags provided with your kit, then put everything into the return box. Use the prepaid shipping label included in your package and drop it at any appropriate shipping location. Your custom device typically arrives two to three weeks after the company receives your molds.
Keep your smile protected
You now know how to make a dental impression at home with the right materials and technique. Clean preparation, proper mixing timing, and steady pressure during the setting period determine whether your impressions lead to a perfectly fitted device. Following these steps saves you hundreds of dollars compared to dental office visits while giving you the same professional results.
Protect your teeth from grinding and clenching with a custom-fit solution made from your impressions. Remi's custom night guard uses your at-home impressions to create a dental-grade device that fits your teeth perfectly and costs 80% less than traditional dentist options.

