

Your teeth used to be whiter. Years of coffee, tea, red wine, and everyday eating have left stubborn stains that make you hesitate to smile in photos. You want a brighter smile but professional whitening costs hundreds of dollars and drugstore options feel like a gamble. Some products promise dramatic results but come with warnings about sensitivity and enamel damage. Others use ingredients you can't pronounce or techniques that sound too good to be true.
This guide cuts through the confusion with 11 home teeth whitening solutions that deliver real results without harming your teeth. You'll find everything from professional grade whitening foam and custom tray systems to natural DIY methods your dentist would approve. Each solution includes how it works, exact usage instructions, safety guidelines, cost breakdowns, and who should avoid it. Whether you need quick touch ups before a big event or gradual whitening you can maintain long term, you'll discover options that fit your budget and sensitivity level.
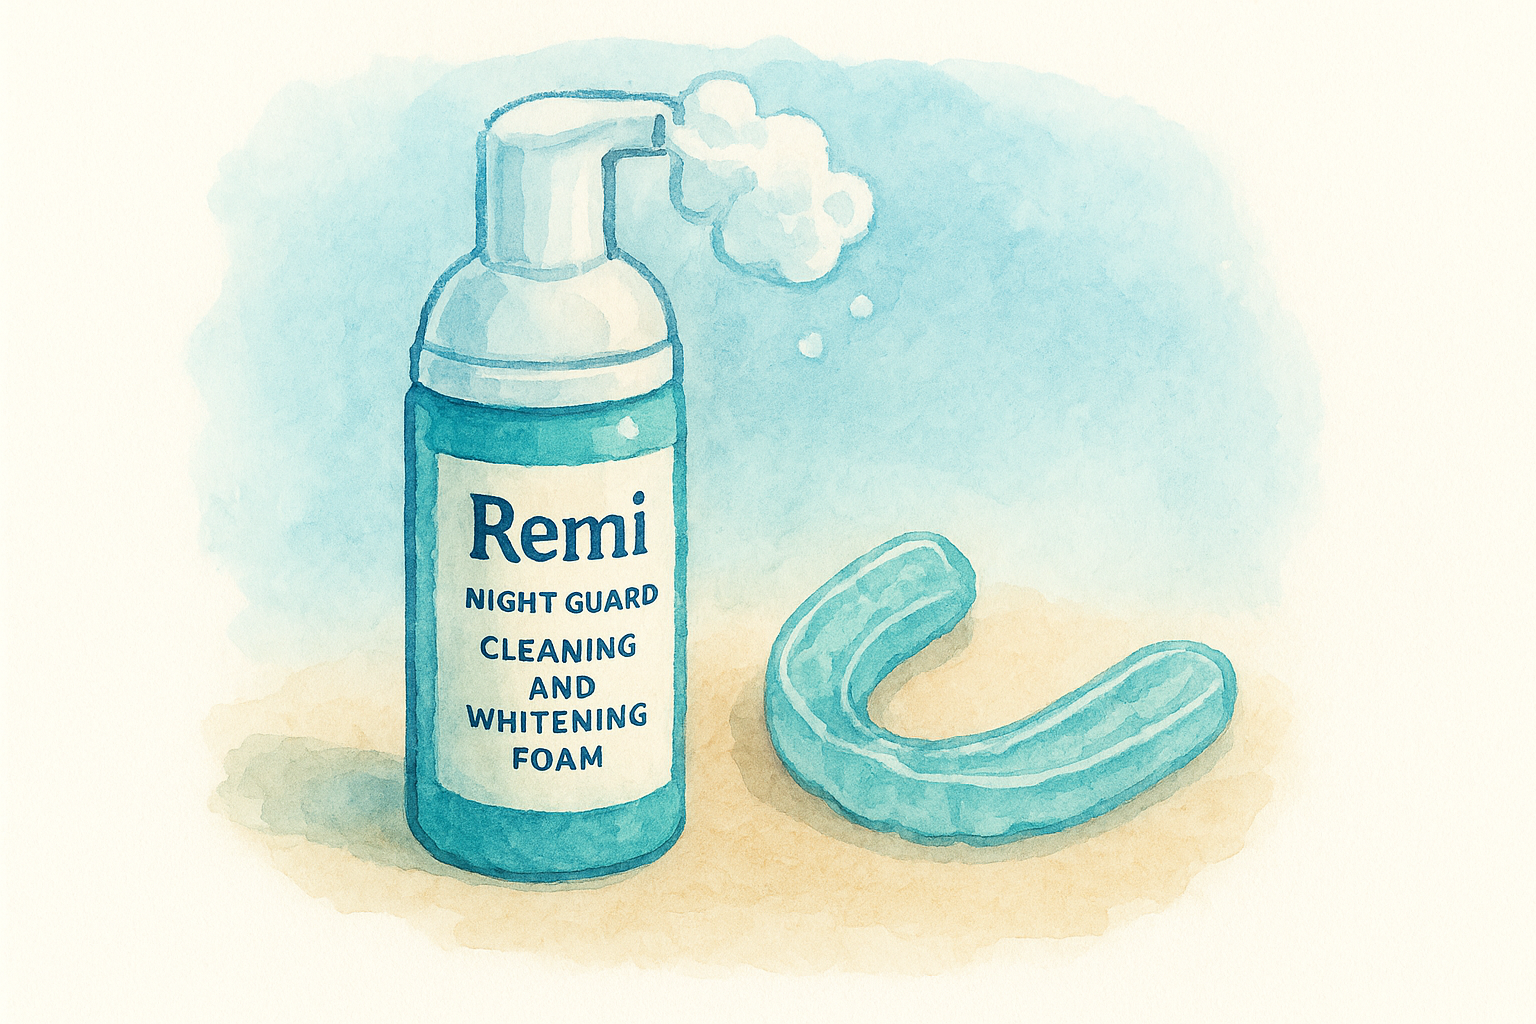
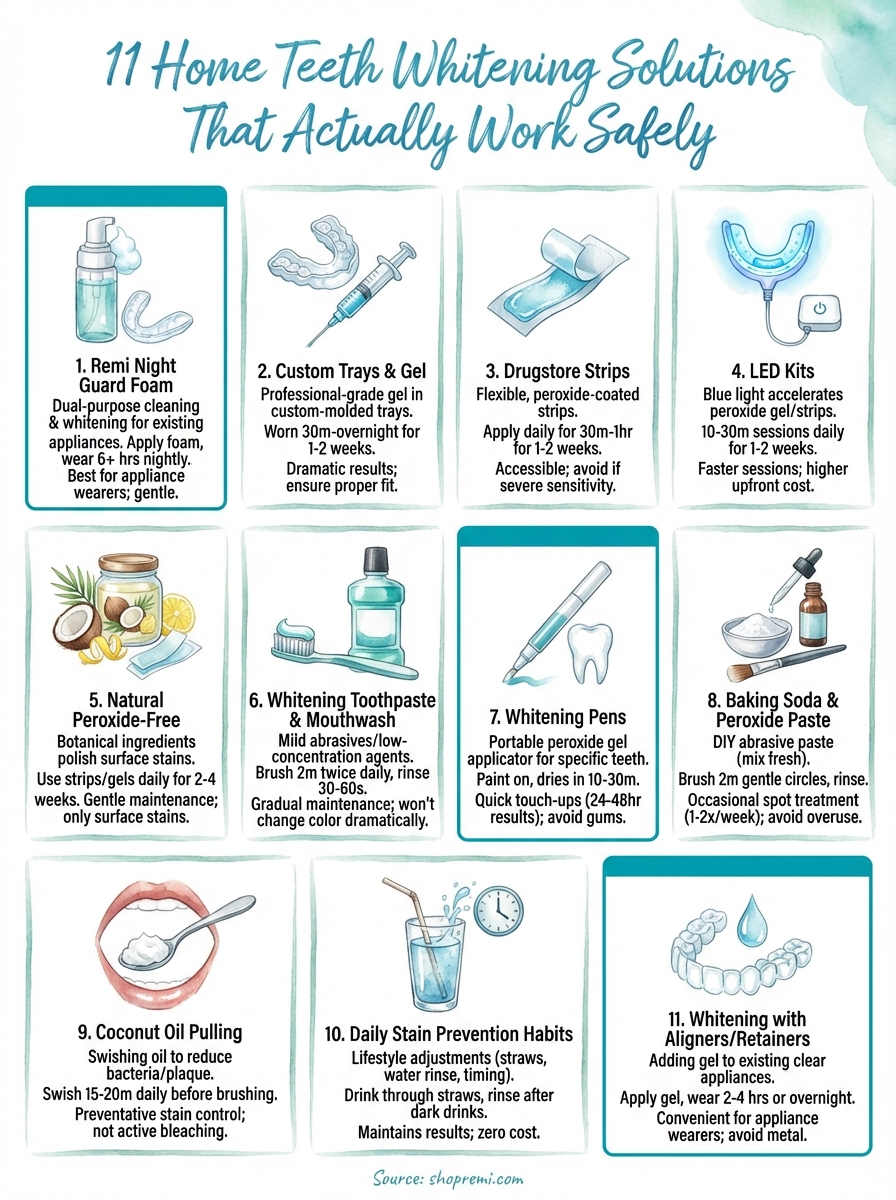
1. Remi night guard cleaning and whitening foam
Remi night guard cleaning and whitening foam offers a dual purpose solution that cleans dental appliances while simultaneously whitening your teeth. This foam based product combines gentle cleaning agents with whitening ingredients in a single application, making it one of the most convenient home teeth whitening solutions for people who already wear night guards or retainers. You apply it directly to your dental appliance before inserting it, allowing the formula to work while you sleep or wear your device during the day.
What it is
The foam comes in a pump bottle and contains a proprietary blend of cleaning and whitening agents designed specifically for use with dental appliances. You don't need special trays or strips because your existing night guard or retainer acts as the delivery system. The low foam formula prevents excess buildup and stays in contact with your teeth throughout wear time without causing discomfort or excess saliva production.
How it works on stains
The whitening ingredients in the foam target surface stains from coffee, tea, and food by breaking down discoloration molecules on your enamel. Unlike harsh bleaching agents, this formula uses a gentle oxidation process that lifts stains gradually without penetrating deep into your tooth structure. The cleaning components simultaneously remove bacteria and plaque that can dull your smile and cause new stains to form more easily.
How to use it at home
You pump one to two pumps of foam directly onto your clean night guard or retainer before inserting it into your mouth. Spread the foam evenly across the inner surface that contacts your teeth. Wear your appliance as you normally would for at least six hours to allow the whitening ingredients to work effectively. After removing your appliance, brush your teeth normally and rinse both your mouth and the appliance thoroughly.
Most users see noticeable whitening results within two to three weeks of consistent nightly use.
Safety tips and limits
Never exceed the recommended amount of foam per application because excess product won't speed up whitening and may cause gum irritation. If you experience tooth sensitivity or gum discomfort, reduce usage to every other night until your mouth adjusts. This product works best on natural tooth enamel and won't whiten crowns, veneers, or fillings. Stop use immediately if you develop an allergic reaction to any ingredients.
Cost and how long results last
The foam costs approximately $20 to $30 per bottle, with each bottle lasting roughly one to two months depending on nightly use. Results typically last three to six months if you maintain regular use and follow good oral hygiene practices. You'll need to reorder the product for maintenance whitening, making the long term cost more affordable than professional treatments but higher than one time DIY methods.
Who should use or avoid this
This solution works best for you if you already wear a custom night guard or retainer regularly and want to add whitening benefits to your routine. People with sensitive teeth often tolerate this gentler formula better than traditional whitening strips or trays. Avoid this product if you don't have a dental appliance, have active gum disease, are pregnant or nursing, or have deep intrinsic stains that require professional treatment. Teenagers under 16 should consult a dentist before using any whitening products.
2. At home custom whitening trays and gel
Custom whitening trays with professional grade gel represent one of the most effective home teeth whitening solutions available without a dentist visit. These systems use trays molded specifically to your teeth paired with carbamide or hydrogen peroxide gel that you apply yourself. The custom fit ensures even gel distribution and prevents product from leaking onto your gums, delivering results comparable to professional in office treatments at a fraction of the cost.
What it is
This system includes impression materials you use at home to create molds of your upper and lower teeth. You send these impressions to a lab that fabricates clear plastic trays that fit your unique dental structure. The kit arrives with whitening gel syringes containing professional strength bleaching agents, typically ranging from 10% to 35% carbamide peroxide or 3% to 10% hydrogen peroxide.
How it works on stains
The peroxide in the gel penetrates your enamel and breaks down both surface stains and deeper discoloration through an oxidation process. Carbamide peroxide converts to hydrogen peroxide when it contacts saliva, then releases oxygen molecules that lift stain compounds from inside your tooth structure. This deeper action tackles stubborn stains from medications, aging, and years of accumulated discoloration that surface treatments can't reach.
How to use it at home
You squeeze a small ribbon of gel into each tray and insert them over your teeth for the recommended duration, typically 30 minutes to two hours depending on gel strength. Some formulations allow overnight wear for six to eight hours. Wear the trays daily for one to two weeks until you achieve your desired shade. Remove the trays, rinse your mouth thoroughly, and clean the trays with cool water and a soft toothbrush.
Safety tips and limits
Start with shorter wear times to gauge your sensitivity level before committing to full duration sessions. Never use custom trays designed for someone else because improper fit allows gel to irritate your gums. Store gel in a cool, dark place to maintain potency and avoid applying gel more than once per day. If you experience sharp pain or prolonged sensitivity lasting more than 48 hours, stop treatment and consult your dentist.
Custom trays deliver up to three to eight shades of whitening improvement when used correctly over a full treatment cycle.
Cost and how long results last
Custom tray systems cost between $80 and $150 for the initial kit including impression materials, trays, and several gel syringes. Replacement gel syringes run $15 to $40 for touch up treatments. Results last six months to two years depending on your diet, oral hygiene, and whether you use tobacco products. You can maintain your results with occasional touch up sessions using your existing trays and fresh gel.
Who should use or avoid this
This option suits you if you want dramatic whitening results and don't mind the multi step process of creating impressions and waiting for trays. People with moderate to severe staining benefit most from the higher peroxide concentrations these systems offer. Avoid custom trays if you have untreated cavities, gum disease, or extremely sensitive teeth. Pregnant and nursing mothers should postpone whitening treatments, and anyone with extensive dental work should understand that only natural teeth will lighten.
3. Drugstore whitening strips with peroxide
Drugstore whitening strips provide the most accessible and widely tested home teeth whitening solutions you can buy without a prescription. These thin, flexible plastic strips coated with peroxide gel adhere directly to your teeth and deliver consistent whitening results at a budget friendly price. Major brands like Crest and Colgate dominate this category because they've invested decades in research and earned American Dental Association acceptance for safety and effectiveness.
What it is
Whitening strips consist of polyethylene film coated with a hydrogen peroxide or carbamide peroxide gel that sticks to your tooth surfaces. You peel each strip from its backing and press it onto your teeth, where it conforms to your tooth shape. Most boxes contain 14 to 28 treatment pairs for upper and lower teeth, with peroxide concentrations ranging from 5% to 14% hydrogen peroxide.
How it works on stains
The peroxide gel on these strips penetrates your enamel surface and oxidizes stain molecules that cause yellowing. Hydrogen peroxide breaks down into water and oxygen, with the oxygen molecules lifting discoloration from coffee, wine, and tobacco. This chemical process whitens teeth by two to three shades over a complete treatment cycle.
How to use it at home
You apply the shorter strip to your lower teeth and the longer strip to your upper teeth, pressing firmly to ensure full contact with tooth surfaces. Wear the strips for 30 minutes to one hour depending on the product strength. Remove the strips, discard them, and rinse your mouth thoroughly. Repeat this process daily for one to two weeks.
Most people see visible whitening improvements within three to five days of consistent strip use.
Safety tips and limits
Never wear strips longer than directed because excessive peroxide exposure damages your gums and increases tooth sensitivity. Skip treatments if you develop sharp pain or notice white spots on your gums that indicate chemical irritation. Avoid eating or drinking for 30 minutes after removing strips to let the peroxide finish working.
Cost and how long results last
Whitening strips cost between $25 and $60 per box, making them one of the most economical whitening options per treatment. Results typically last four to six months with good oral hygiene and limited stain causing beverages. You'll need to purchase a new box for touch ups, but the low cost makes maintenance affordable.
Who should use or avoid this
Strips work well for you if you want convenient, proven whitening without custom trays or professional appointments. People with straight teeth get the best coverage, while those with crooked or gapped teeth may see uneven results. Avoid strips if you have receding gums, exposed roots, or severe sensitivity, as the peroxide will cause discomfort on unprotected tooth surfaces.
4. LED whitening kits with trays or strips
LED whitening kits combine traditional peroxide based treatments with blue light technology to accelerate the whitening process and deliver faster results. These systems include either custom fitted trays or adhesive strips paired with an LED light device that you hold against your teeth during treatment. The added light component makes these kits more expensive than standard strips but potentially cuts your treatment time in half compared to gel only methods.
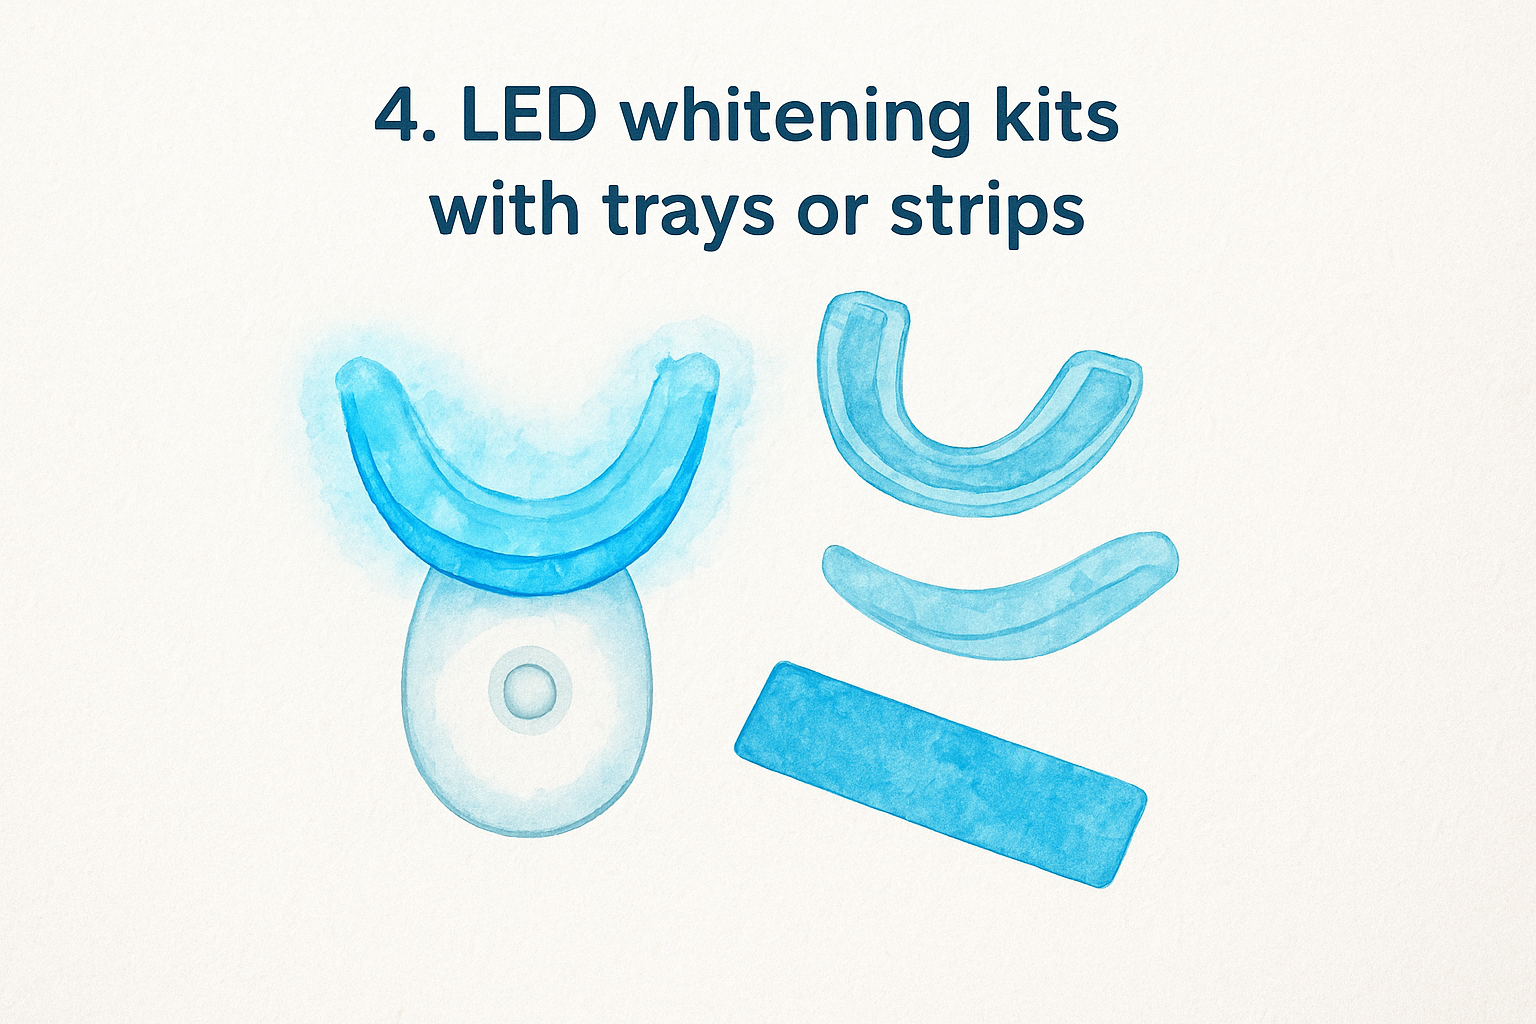
What it is
These kits contain whitening gel or strips with hydrogen peroxide concentrations between 6% and 16%, plus a battery powered or plug in LED mouthpiece that emits blue light wavelengths. The mouthpiece typically features a curved design that fits over your teeth while you apply the whitening agent. Premium kits include rechargeable lights with automatic shutoff timers.
How it works on stains
The LED light activates the peroxide molecules and speeds up the oxidation reaction that breaks down stain compounds. This acceleration means you achieve similar results in 10 to 20 minutes instead of the 30 to 60 minutes required by gel alone. The light doesn't whiten teeth by itself but enhances the peroxide's ability to penetrate enamel and lift stubborn discoloration.
How to use it at home
You apply the whitening gel to your teeth or position the strips, then place the LED device over your teeth and turn it on. Hold the light steady for 10 to 30 minutes per session depending on the product specifications. Remove the device, rinse your mouth, and clean the light with a damp cloth. Repeat daily for one to two weeks.
LED activated treatments can whiten teeth up to five shades in as little as one week with consistent daily use.
Safety tips and limits
Never look directly at the LED light during treatment and avoid using the device longer than recommended because extended peroxide exposure damages gums. Keep the light clean between uses to prevent bacterial buildup on the mouthpiece surface.
Cost and how long results last
LED whitening kits range from $40 to $150 depending on whether you choose strips or custom trays and the quality of the light device. Results last four to eight months with proper maintenance and limited consumption of staining foods.
Who should use or avoid this
This option suits you if you want faster whitening sessions and don't mind the higher upfront investment. People with busy schedules appreciate the shorter treatment times. Avoid LED kits if you have photosensitivity conditions, epilepsy triggered by flashing lights, or dental work on front teeth that won't respond to whitening.
5. Peroxide free natural whitening systems
Peroxide free natural whitening systems offer a gentler alternative among home teeth whitening solutions for people who want to avoid chemical bleaching agents. These products use botanical ingredients like coconut oil, sage, and lemon peel combined with mineral compounds to remove surface stains without penetrating deep into your enamel. Brands like Lumineux have pioneered this category by replacing hydrogen peroxide with plant based formulas that dentists recognize as safe for daily use.
What it is
These systems come as strips, gels, or toothpaste containing ingredients such as dead sea salt, essential oils, activated charcoal, and natural enzymes. You won't find carbamide peroxide or hydrogen peroxide listed anywhere on the label. The formulas rely on mild abrasives and oil based cleansers to polish away stains rather than chemically breaking them down.
How it works on stains
Natural ingredients work through mechanical polishing and oil absorption to lift surface discoloration from coffee, tea, and food. Coconut oil binds to stain molecules while activated charcoal absorbs pigments that cause yellowing. These methods only remove surface level stains and won't change your underlying tooth color like peroxide based treatments do.
How to use it at home
You apply natural whitening strips or gels according to package directions, typically once or twice daily for 30 minutes. Some products require two week treatment cycles while others work as maintenance systems you use indefinitely. Brush your teeth before application to remove debris that blocks the whitening ingredients.
Safety tips and limits
Natural doesn't automatically mean safe for everyone. Activated charcoal can be too abrasive for people with thin enamel or exposed roots. Test any new product on a small area first and watch for gum irritation from essential oils.
Natural whitening systems typically lighten teeth by one to two shades compared to the three to eight shades possible with peroxide treatments.
Cost and how long results last
Natural whitening products cost $20 to $50 per package and results last two to four months. You'll need ongoing purchases to maintain improvements.
Who should use or avoid this
Choose natural systems if you have sensitive teeth, are pregnant or nursing, or want daily whitening maintenance without harsh chemicals. Avoid these if you need dramatic results quickly or have deep intrinsic stains.
6. Whitening toothpaste and whitening mouthwash
Whitening toothpaste and mouthwash represent the most gradual and maintenance focused options among home teeth whitening solutions you can integrate into your existing oral hygiene routine. These products contain mild abrasives and low concentration whitening agents that polish away surface stains with regular use rather than dramatically changing your tooth color. You brush and rinse as you normally would, making this the easiest whitening method to stick with long term without adding extra steps to your day.
What it is
Whitening toothpastes contain abrasive particles like silica or calcium carbonate combined with small amounts of hydrogen peroxide or specialized enzymes. Whitening mouthwashes feature alcohol or peroxide based formulas with blue covarine that creates an optical whitening effect. Both products fit into your standard twice daily brushing and rinsing routine.
How it works on stains
The abrasives in toothpaste scrub away surface deposits from coffee, tea, and food before they set into deeper stains. Mouthwash ingredients coat your teeth with light reflecting compounds that make them appear whiter while preventing new stains from adhering to enamel.
How to use it at home
You brush with whitening toothpaste for two minutes twice daily and follow with whitening mouthwash for 30 to 60 seconds. Continue this routine indefinitely for maintenance whitening rather than stopping after achieving results.
Safety tips and limits
Limit use to products with ADA acceptance seals to avoid overly abrasive formulas that wear down enamel. Switch to regular toothpaste if you develop sensitivity.
Whitening toothpaste and mouthwash lighten teeth by approximately one shade over three months of consistent daily use.
Cost and how long results last
These products cost $5 to $15 per bottle or tube and results accumulate gradually as long as you maintain consistent use. Benefits disappear within weeks if you stop.
Who should use or avoid this
This combination works for you if you want effortless maintenance whitening or prevention of new stains. Avoid whitening toothpaste if you have exposed roots or thin enamel that abrasives will damage.
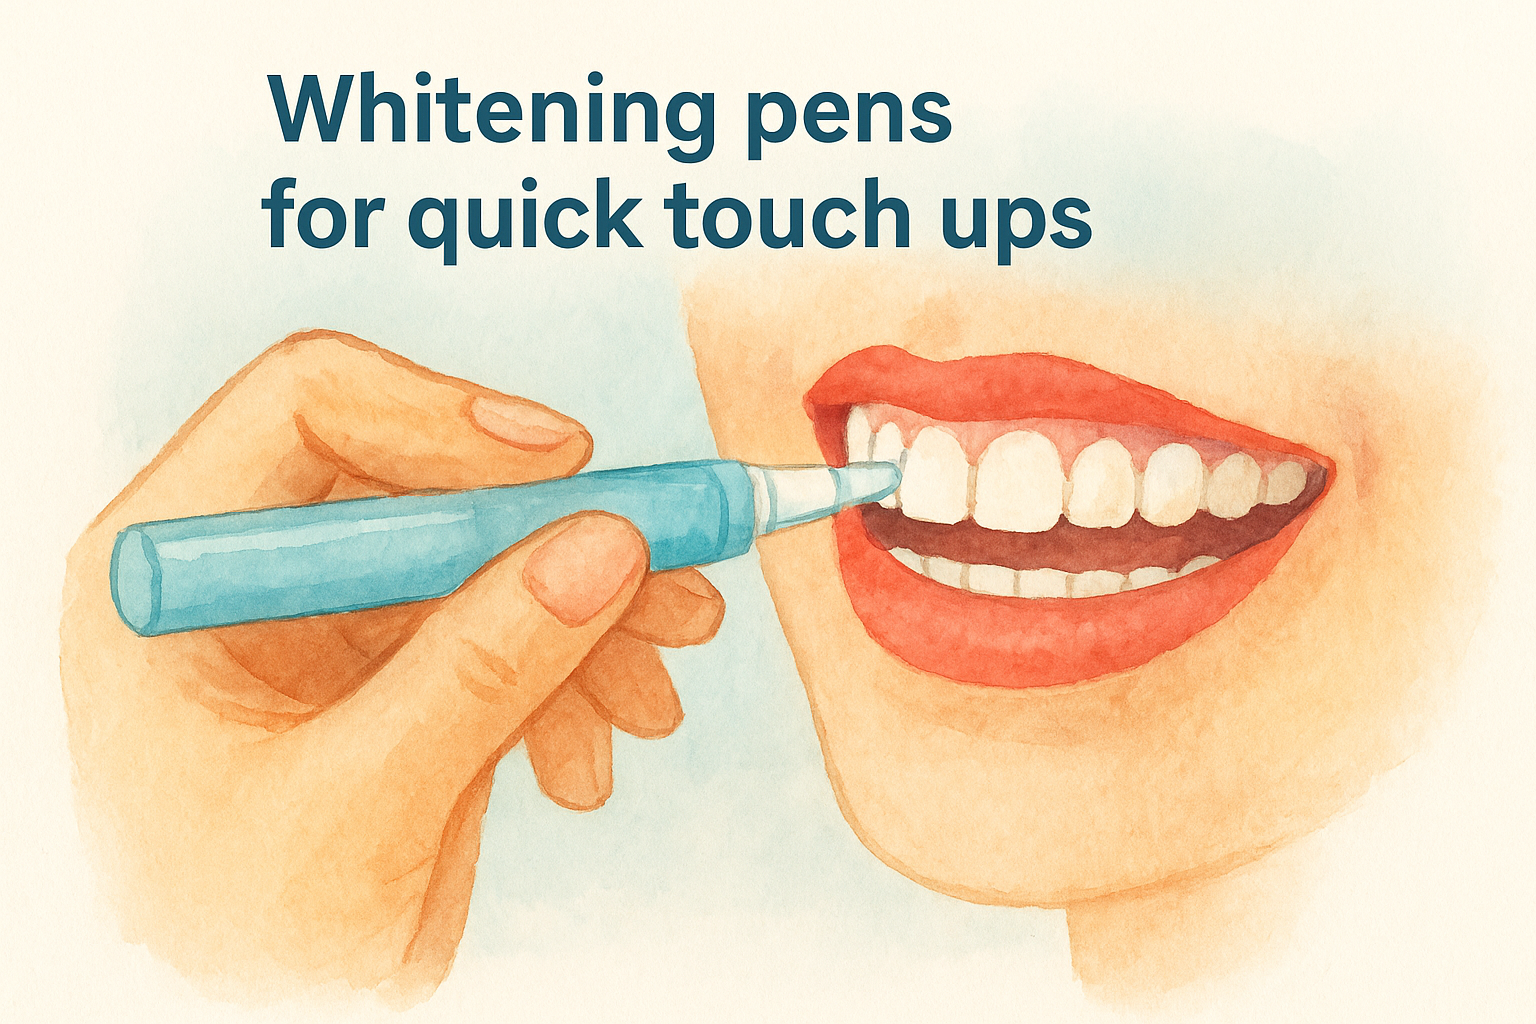
7. Whitening pens for quick touch ups
Whitening pens deliver the most portable and convenient form among home teeth whitening solutions when you need fast results before an event or want to target specific stained teeth. These slim, lipstick sized applicators contain whitening gel you paint directly onto your teeth without trays, strips, or rinsing. You can carry them in your purse or pocket and apply them anywhere in under two minutes, making them perfect for travel or last minute brightening before photos.
What it is
The pen holds a small reservoir of peroxide gel that flows through a brush tip applicator when you twist or click the bottom. Most pens contain 6% to 18% hydrogen peroxide or carbamide peroxide in a thick gel that sticks to your teeth without dripping.
How it works on stains
The concentrated gel dries on your tooth surface and continues breaking down stain molecules through oxidation for 10 to 30 minutes. This direct application method targets individual discolored teeth or specific problem areas rather than whitening your entire smile at once.
How to use it at home
You dry your teeth with a tissue, then paint a thin layer of gel across the front surfaces of visible teeth. Keep your lips away from your teeth for 20 to 30 minutes while the gel dries and works. Avoid eating or drinking during this time.
Safety tips and limits
Apply gel only to tooth surfaces and never let it touch your gums because the concentrated formula irritates soft tissue. Use pens for quick fixes rather than long term whitening programs.
Whitening pens produce temporary results lasting 24 to 48 hours, making them ideal for special occasions rather than permanent solutions.
Cost and how long results last
Pens cost $15 to $30 each and contain enough gel for 15 to 30 applications. Results fade within two to three days, requiring frequent reapplication.
Who should use or avoid this
This option suits you if you need emergency whitening before events or want to brighten one or two discolored teeth. Skip pens if you want comprehensive whitening or have sensitive teeth that react to concentrated peroxide.
8. Baking soda and hydrogen peroxide paste
Baking soda and hydrogen peroxide paste ranks among the most affordable DIY home teeth whitening solutions you can make in your own kitchen with ingredients you probably already own. This homemade mixture combines the mild abrasive properties of baking soda with the bleaching power of hydrogen peroxide to tackle surface stains without expensive products or equipment. You mix the two ingredients into a paste consistency and brush it onto your teeth like regular toothpaste for quick whitening results.
What it is
The paste consists of common baking soda mixed with 3% hydrogen peroxide from your medicine cabinet. You create a thick consistency by combining approximately one tablespoon of baking soda with two tablespoons of peroxide.
How it works on stains
Baking soda acts as a gentle abrasive that scrubs away surface deposits while hydrogen peroxide penetrates your enamel to oxidize stain molecules. This dual action removes both external discoloration from food and beverages and lighter internal stains.
How to use it at home
You mix the paste fresh each time and brush it onto your teeth for two minutes using gentle circular motions. Rinse thoroughly with water and follow with regular toothpaste to remove any residue.
Limit baking soda paste treatments to once or twice weekly to prevent enamel erosion from overuse.
Safety tips and limits
Never brush too aggressively because the abrasive nature of baking soda wears down enamel with excessive use. Stop immediately if you experience sensitivity or gum irritation.
Cost and how long results last
This method costs under $5 for supplies that last months. Results fade within two to three weeks without continued maintenance treatments.
Who should use or avoid this
This paste works for you if you want budget friendly spot treatments between professional whitening sessions. Avoid it if you have thin enamel, exposed roots, or sensitivity issues that abrasives will worsen.
9. Coconut oil pulling for stain control
Coconut oil pulling represents one of the oldest and gentlest home teeth whitening solutions rooted in ancient Ayurvedic medicine practices. This method involves swishing coconut oil in your mouth for 15 to 20 minutes to draw out bacteria and prevent plaque buildup that dulls your smile. You won't see dramatic whitening results like you would with peroxide treatments, but this technique helps maintain your current tooth color and prevents new stains from setting into your enamel.
What it is
Oil pulling uses organic coconut oil that you swish around your mouth before brushing your teeth. The practice targets oral bacteria and surface debris rather than chemically bleaching your enamel.
How it works on stains
The lauric acid in coconut oil binds to bacteria and plaque deposits that cause yellowing over time. This preventive approach stops new discoloration from forming rather than removing existing deep stains.
How to use it at home
You place one tablespoon of coconut oil in your mouth and swish it gently for 15 to 20 minutes. Spit the oil into a trash can and rinse with warm water before brushing normally.
Safety tips and limits
Never swallow the oil because it contains bacteria pulled from your teeth. Skip this method if you have a coconut allergy.
Oil pulling serves as a stain prevention strategy rather than an active whitening treatment for existing discoloration.
Cost and how long results last
A jar of coconut oil costs $8 to $15 and lasts several months. Benefits continue only with consistent daily practice.
Who should use or avoid this
This technique suits you if you want natural stain prevention alongside regular whitening treatments. Avoid it if you need quick results or have jaw problems that make prolonged swishing uncomfortable.
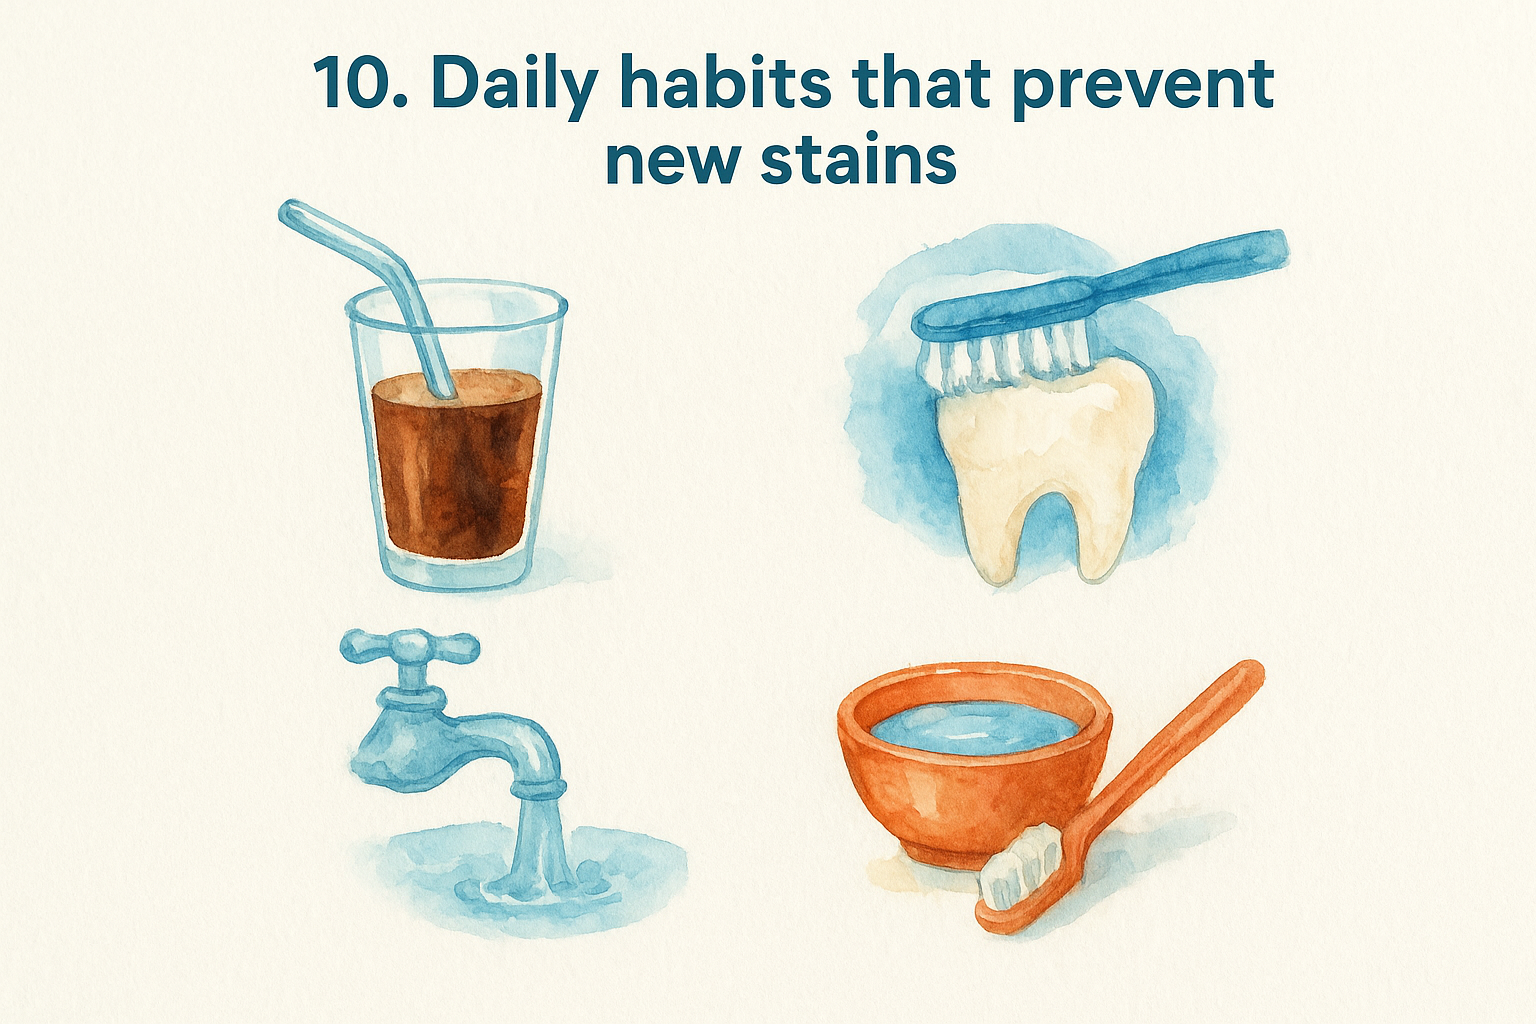
10. Daily habits that prevent new stains
Daily stain prevention habits form the foundation of lasting results among all home teeth whitening solutions by stopping discoloration before it starts. These simple lifestyle adjustments and oral care practices cost nothing extra and protect the brightness you've achieved through whitening treatments. You implement these habits alongside your regular routine to maintain your lighter tooth shade for months or years instead of watching your results fade within weeks.
What it is
This approach combines strategic eating and drinking techniques with enhanced oral hygiene practices that minimize stain causing contact with your teeth. You modify how you consume coffee, tea, red wine, and dark colored foods while upgrading your brushing and rinsing habits to remove pigments before they penetrate your enamel.
How it works on stains
These habits create a protective barrier against new discoloration by limiting exposure time and removing stain causing compounds immediately after consumption. Drinking through straws bypasses your front teeth while rinsing with water washes away pigments before they bond to your enamel surface.
How to use it at home
You drink staining beverages through reusable straws positioned toward the back of your mouth and rinse with plain water within five minutes of eating or drinking anything dark colored. Brush your teeth 30 minutes after consuming acidic foods and use whitening toothpaste twice daily to polish away fresh deposits before they set.
Consistent daily prevention habits extend whitening results by three to six months compared to people who don't modify their staining behaviors.
Safety tips and limits
Never brush immediately after acidic foods or drinks like citrus or soda because you'll scrub weakened enamel and cause damage. Wait at least 30 minutes for your saliva to neutralize acids first.
Cost and how long results last
Prevention habits cost zero dollars beyond reusable straws and maintain whitening results indefinitely when practiced consistently. Benefits last as long as you maintain these behaviors.
Who should use or avoid this
Everyone who whitens their teeth should adopt these habits regardless of which whitening method they choose. No one needs to avoid prevention strategies.
11. Whitening while you wear aligners or retainers
Whitening while wearing aligners or retainers transforms your existing orthodontic appliances into dual purpose tools among home teeth whitening solutions by adding whitening gel to devices you already wear daily. This method lets you straighten or maintain your teeth alignment while simultaneously brightening your smile without buying separate whitening trays. Your dentist or orthodontist designed your aligners or retainers to fit your teeth precisely, creating the perfect seal needed for even gel distribution across all tooth surfaces.
What it is
This technique uses professional strength whitening gel that you apply inside your clear aligners or retainers before inserting them. You purchase whitening gel separately from dental supply companies or through your dentist's office in concentrations ranging from 10% to 22% carbamide peroxide.
How it works on stains
The gel penetrates your enamel through extended contact time while you wear your aligners or retainers for several hours. This prolonged exposure allows the peroxide to break down both surface and deeper stains more effectively than quick application methods because the custom fit prevents saliva from washing away the active ingredients.
How to use it at home
You squeeze a small drop of gel into each tooth compartment of your clean aligner or retainer and insert it over your teeth. Wear the device for two to four hours or overnight depending on gel strength and your sensitivity level. Remove excess gel that seeps onto your gums and rinse thoroughly after treatment.
Whitening with aligners produces results comparable to custom tray systems because the appliances already provide the precise fit needed for professional grade treatments.
Safety tips and limits
Never use whitening gel with metal wire retainers because peroxide damages the metal and irritates surrounding gum tissue. Reduce wear time if you experience sensitivity.
Cost and how long results last
Whitening gel costs $20 to $50 for supplies that last one to two months of treatments. Results last six to twelve months with proper maintenance and good oral hygiene habits.
Who should use or avoid this
This option works perfectly for you if you already wear clear aligners or removable retainers regularly and want to maximize your device's utility. Skip this method if you have permanent retainers, active gum disease, or aligners that don't fit properly anymore.
Brighten your smile safely
You now have 11 proven home teeth whitening solutions that deliver real results without damaging your enamel or breaking your budget. Professional grade options like custom trays and LED kits provide the fastest and most dramatic whitening, while gentler methods like natural strips and oil pulling offer gradual improvements for sensitive teeth. The key to lasting results lies in matching the right solution to your specific needs, sensitivity level, and lifestyle.
Start with prevention habits and whitening toothpaste to maintain your current shade, then add targeted treatments when you need faster results. If you already wear a night guard or retainer, you can maximize those devices by adding whitening foam or gel to your routine. Your custom night guard from Remi becomes a dual purpose tool that protects your teeth from grinding while keeping them bright with our specialized cleaning and whitening foam.

