

You scrub, soak, and rinse your night guard or retainer, yet somehow it still doesn't feel completely clean. That film, that lingering odor, those hard-to-reach grooves where bacteria hide. Manual cleaning has its limits, and if you've been dealing with dental appliances, you've probably felt them. The benefits of ultrasonic cleaning offer a solution that goes far beyond what a toothbrush and soap can achieve.
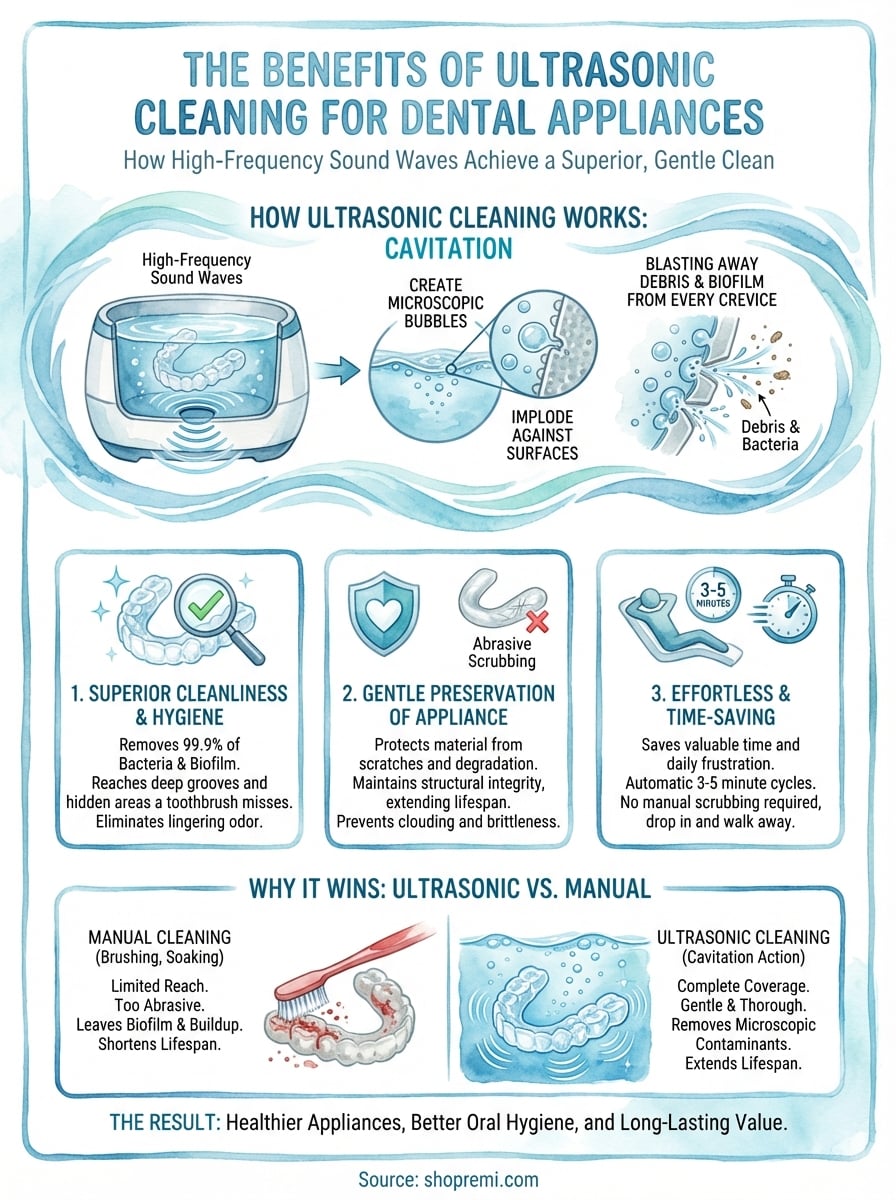
Ultrasonic cleaners use high-frequency sound waves to create microscopic bubbles that implode against surfaces, blasting away debris, bacteria, and buildup from every crevice. It's the same technology trusted by jewelers, optometrists, and medical professionals, and it works remarkably well for items like custom night guards and retainers that need thorough, gentle cleaning without damage.
At Remi, we designed our Ultrasonic Cleaner Pro specifically for people who want their dental appliances truly clean, not just rinsed off. This article breaks down how ultrasonic cleaning works, why it outperforms traditional methods, and what makes it a smart choice for anyone serious about oral hygiene and extending the life of their dental products.
Why ultrasonic cleaning matters for real-world hygiene
Your dental appliances sit in your mouth for hours every night, collecting bacteria, saliva proteins, and plaque in places a toothbrush simply cannot reach. If you wear a night guard or retainer, you already know that keeping it clean feels like a chore, and even when you think it's clean, that residue or smell tells another story. The benefits of ultrasonic cleaning become clear when you realize that traditional cleaning methods leave behind the very contaminants that cause oral health issues and shorten the life of your appliance.
The hidden problem with manual cleaning
When you brush your night guard with a toothbrush, you're only hitting the visible surface areas. The grooves, crevices, and textured surfaces where bacteria thrive remain largely untouched. These microscopic spaces trap biofilm, a sticky layer of bacteria that protects itself from basic soap and water, and no amount of scrubbing can reach every pocket where it hides.
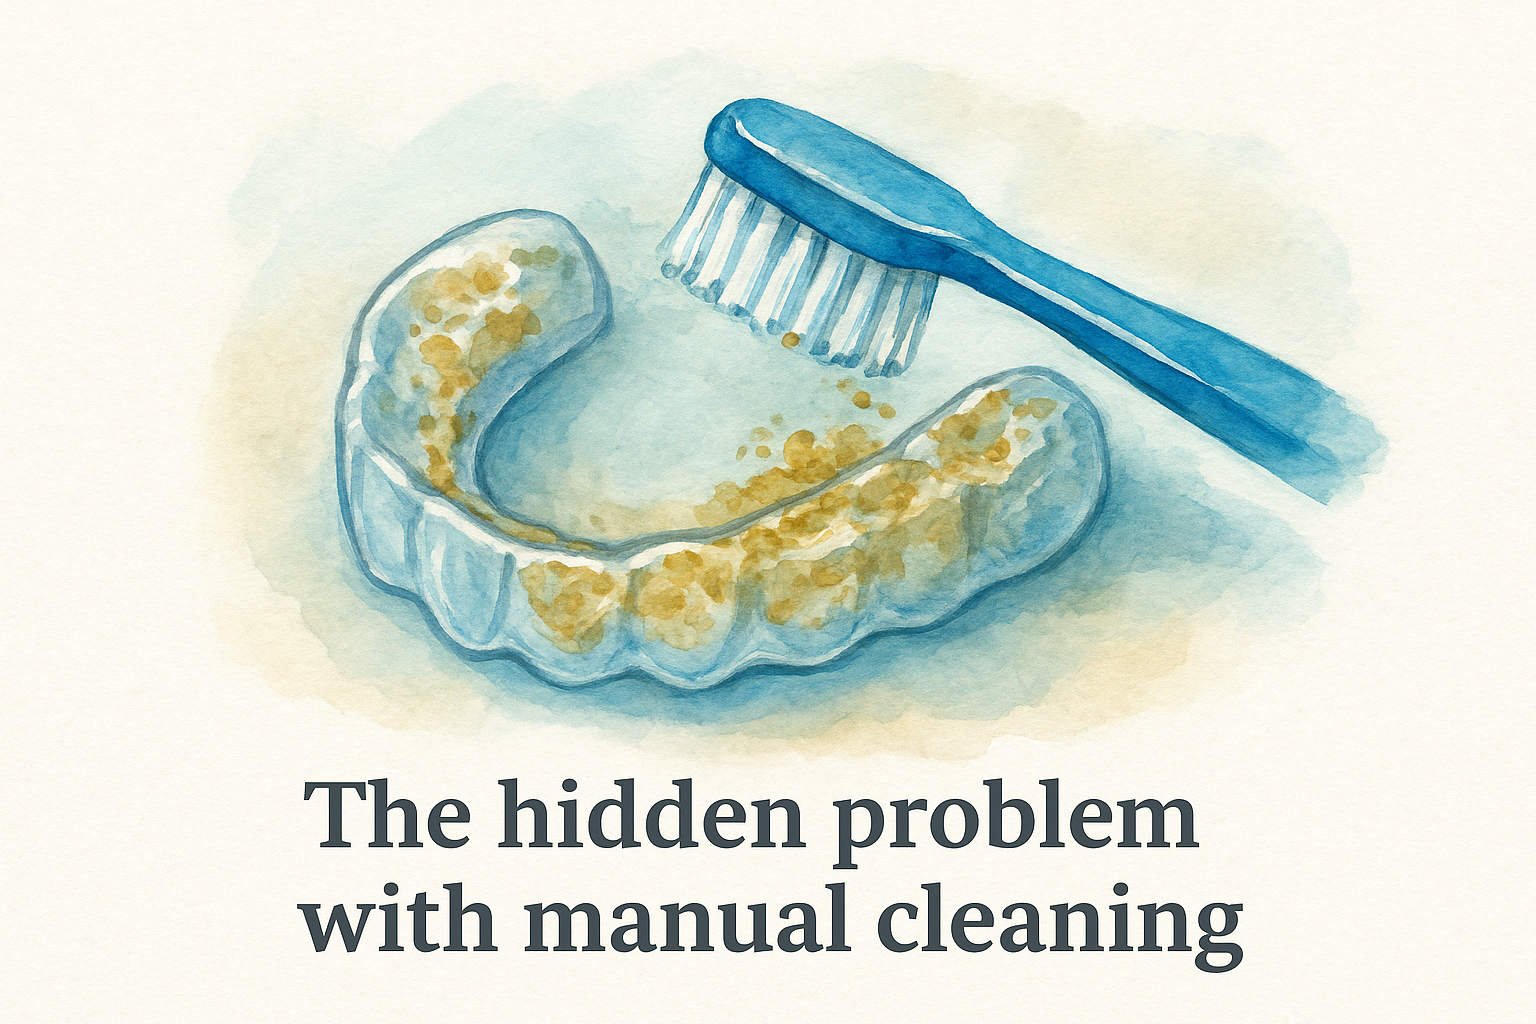
Biofilm isn't just unsightly. It creates an acidic environment that degrades the material of your appliance over time and introduces harmful bacteria back into your mouth each time you insert it. You might rinse, soak, or scrub daily, but without a method that reaches those hidden areas, you're fighting a losing battle against buildup that returns faster than you can remove it.
What happens when dental appliances stay dirty
Wearing a dirty night guard or retainer doesn't just affect the appliance itself. It directly impacts your oral health, introducing bacteria that can lead to bad breath, gum inflammation, and even tooth decay. The same device meant to protect your teeth becomes a vector for the very problems you're trying to avoid, turning your nightly routine into a source of contamination rather than care.
Beyond health concerns, persistent bacteria and mineral deposits cause material breakdown. Your custom-fitted appliance loses its clarity, becomes brittle, and develops an unpleasant odor that no amount of soaking can eliminate. What should last years starts to crack or warp within months, forcing you to replace an expensive device far sooner than necessary because cleaning methods failed to preserve it.
Dirty dental appliances don't just smell bad. They actively harm your oral health and degrade faster, costing you more in replacements and potential dental problems.
Why standard cleaning fails oral appliances
Brushing with toothpaste seems logical, but it's actually too abrasive for most night guards and retainers. The scratches you create provide even more surface area for bacteria to cling to, making the problem worse over time. You end up with a cloudy, roughened appliance that looks old and harbors more bacteria than before you started scrubbing.
Soaking in denture cleaners or mouthwash offers marginal improvement, but these solutions only work on exposed surfaces. They can't penetrate the tight spaces where debris accumulates, and they often leave behind chemical residues that taste unpleasant or irritate sensitive gums. You waste time soaking overnight for results that still require manual brushing, and you're left wondering why something so simple feels so ineffective.
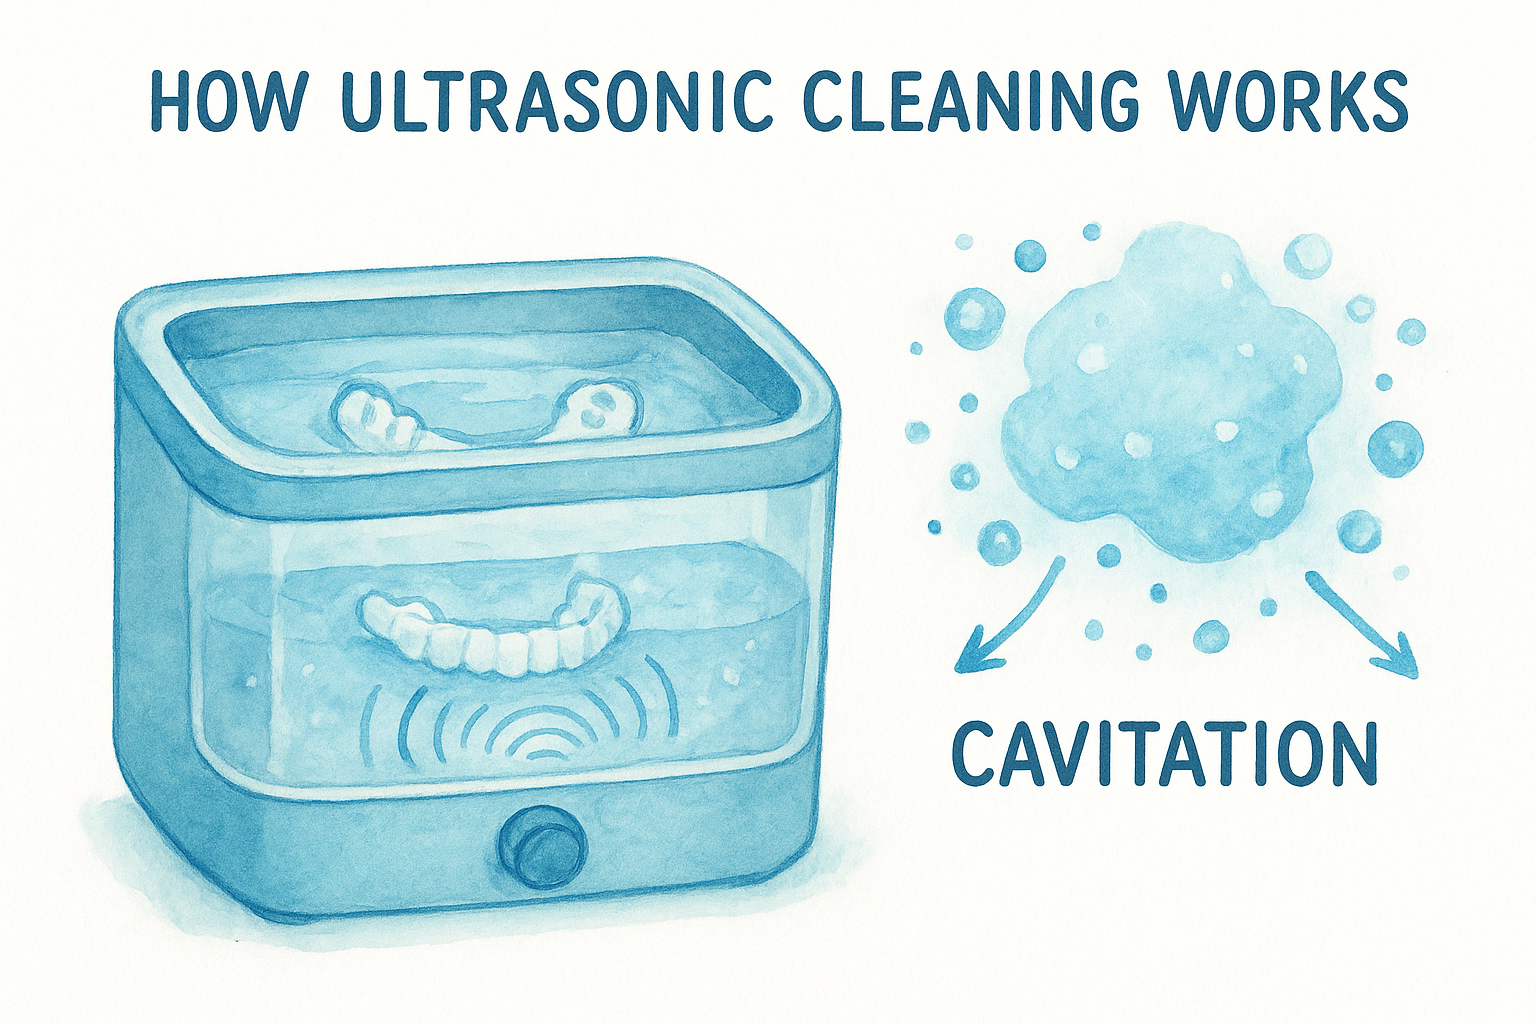
How ultrasonic cleaning works
Ultrasonic cleaning relies on a process called cavitation, which sounds technical but operates on a straightforward principle. Your ultrasonic cleaner generates high-frequency sound waves (typically between 20,000 and 40,000 Hz) through a transducer at the bottom of the tank. These waves travel through water or cleaning solution, creating alternating cycles of high and low pressure that form millions of microscopic bubbles. When these bubbles collapse against the surface of your night guard or retainer, they produce tiny but powerful jets of liquid that dislodge contaminants from every angle, including areas you could never reach with a brush.
The science behind ultrasonic waves
When you fill an ultrasonic cleaner with water and turn it on, the transducer converts electrical energy into mechanical vibrations that create pressure waves in the liquid. These waves move through the solution at speeds that generate regions of compression and rarefaction (low pressure). In the low-pressure zones, cavitation bubbles form and grow rapidly until the pressure wave reverses, causing them to implode with considerable force against any solid surface in the tank.
This implosion happens on a microscopic scale but occurs millions of times per second across the entire surface of your dental appliance. The benefits of ultrasonic cleaning become apparent when you understand that these collapsing bubbles reach into microscopic pits, crevices, and textured surfaces where bacteria and biofilm hide, physically breaking them apart and washing them away without requiring any manual scrubbing or abrasive contact.
What happens during a cleaning cycle
You place your night guard or retainer in the tank, add water or specialized cleaning solution, and activate the device for a typical cycle of three to five minutes. The ultrasonic waves immediately begin generating cavitation bubbles that attack debris from all directions simultaneously. Unlike brushing, which only cleans the surfaces you can reach with bristles, ultrasonic action works on every exposed surface at once, including the inside curves, grooves, and attachment points where bacteria accumulate.
During the cycle, you might notice the liquid appearing cloudy or see particles floating away from your appliance. That's the physical evidence of contaminants being removed. The process works gently enough to preserve the integrity of your dental appliance while being aggressive enough to eliminate stubborn buildup that resists manual cleaning methods.
Cavitation bubbles collapse millions of times per second, creating microscopic jets that blast away bacteria and debris from every surface without scratching or damaging your appliance.
Why cavitation works better than scrubbing
Manual cleaning applies force to limited contact points where your brush touches the surface. Cavitation applies force everywhere simultaneously, reaching into spaces too small for bristles and cleaning with a consistency that human effort cannot match. The collapsing bubbles generate localized temperatures and pressures that help break down organic materials like proteins and fats without requiring [harsh chemicals](https://shopremi.com/blogs/night-mouth-guard-blog/how-to-clean-your-mouth-guard-with-a-remi-ultrasonic-sanitizing-device-safe-practices) or abrasive scrubbing that damages your appliance over time.
The core benefits of ultrasonic cleaning
Ultrasonic cleaning delivers results that manual methods simply cannot match, targeting the microscopic contaminants that cause odor, discoloration, and health issues in your dental appliances. The benefits of ultrasonic cleaning extend beyond surface cleanliness to fundamentally improve how well your night guard or retainer performs its protective role while lasting significantly longer than devices cleaned with traditional methods.
Complete removal of bacteria and biofilm
Ultrasonic cleaning eliminates 99.9% of bacteria from your dental appliances, reaching into every groove and crevice where biofilm accumulates. The cavitation process physically breaks apart the protective layers that bacteria create, exposing them to the cleaning solution and washing them away completely. You get a level of cleanliness that matches professional dental equipment standards, the same level of hygiene that dentists use to sterilize their instruments.
Standard brushing leaves behind bacterial colonies in textured surfaces and attachment points, but ultrasonic action attacks these hidden areas without requiring you to identify or access them manually. Your appliance emerges genuinely clean, not just visibly cleaner, which means you're introducing fewer pathogens back into your mouth each night and reducing your risk of gum inflammation, bad breath, and tooth decay that dirty appliances cause.
Gentle preservation of appliance materials
Unlike abrasive scrubbing that creates scratches and weakens plastic over time, ultrasonic cleaning treats your custom-fitted appliance with remarkable gentleness. The cavitation bubbles clean without physical contact that degrades materials, preserving the smooth surface finish that prevents bacterial adhesion and maintaining the structural integrity that keeps your appliance fitting properly for years rather than months.
Ultrasonic cleaning extends the lifespan of your dental appliances by removing contaminants without causing the surface damage that accelerates material breakdown and bacterial growth.
You avoid the clouding and brittleness that comes from repeated brushing with toothpaste, and your appliance maintains its clarity and flexibility through hundreds of cleaning cycles. This preservation translates directly into cost savings, as you replace expensive custom devices far less frequently when you clean them properly from the start.
Significant time and effort reduction
A complete ultrasonic cleaning cycle takes three to five minutes of machine time while you do something else entirely. You drop your appliance in the tank, press a button, and walk away, returning to a thoroughly cleaned device without spending time scrubbing, rinsing, and hoping you reached all the contaminated areas. The process removes the daily frustration of manual cleaning that never feels quite good enough no matter how much effort you invest.
This efficiency compounds over weeks and months, saving you hours of tedious work while delivering superior results that protect your oral health and extend your appliance's useful life.
When ultrasonic cleaning beats other methods
Ultrasonic cleaning outperforms traditional methods in specific situations where manual effort fails or where the risk of damage makes aggressive scrubbing impossible. Understanding when to choose ultrasonic over brushing, soaking, or professional cleaning helps you make informed decisions about maintaining your dental appliances and protecting your investment in oral health.
For daily maintenance of dental appliances
Your night guard or retainer needs cleaning after every use, and manual brushing takes valuable time while creating microscopic scratches that harbor bacteria. Ultrasonic cleaning delivers consistently thorough results in less time than it takes to properly brush and rinse by hand, making it the practical choice for people who wear their appliances nightly and want reliable hygiene without the daily hassle.
Soaking tablets require you to wait eight hours or overnight for incomplete results that still leave biofilm in crevices. An ultrasonic cleaner finishes the job in five minutes or less, eliminating the need to plan ahead or leave your appliance sitting in solution while you sleep or work. You get superior cleanliness on your schedule, not the schedule dictated by slow-acting chemical solutions.
For removing stubborn buildup and stains
When your dental appliance develops yellowing or white calcium deposits that resist brushing, ultrasonic cleaning removes these contaminants without harsh chemicals or abrasive scrubbing that damages the material. The benefits of ultrasonic cleaning become most obvious when you compare the results on a heavily stained appliance to what even aggressive manual cleaning can achieve. The cavitation action breaks down mineral deposits and organic stains that have bonded to the surface, restoring clarity without compromising structural integrity.
Ultrasonic cleaning removes stubborn stains and mineral buildup that manual methods cannot touch without risking damage to your expensive custom appliances.
Professional dental cleaning services charge significant fees and require appointments, while ultrasonic cleaning at home delivers comparable results for the one-time cost of the device. You avoid the inconvenience and expense of office visits while maintaining professional-grade hygiene standards.
For items with complex shapes and crevices
Dental appliances feature textured surfaces, attachment points, and curved areas that trap debris in spaces too small for bristles to reach. Manual cleaning relies on your ability to identify and access these problem areas, while ultrasonic cleaning attacks contamination from all directions simultaneously without requiring you to visualize or target specific spots. The cavitation bubbles reach into microscopic pits and grooves that brushing simply cannot access, delivering complete cleaning regardless of the appliance's complexity.
Items like retainers with wire components or night guards with textured bite surfaces benefit dramatically from ultrasonic action that cleans every surface equally well. You eliminate the guesswork and frustration of trying to manually clean complicated shapes that hide bacteria in places you cannot see or reach.
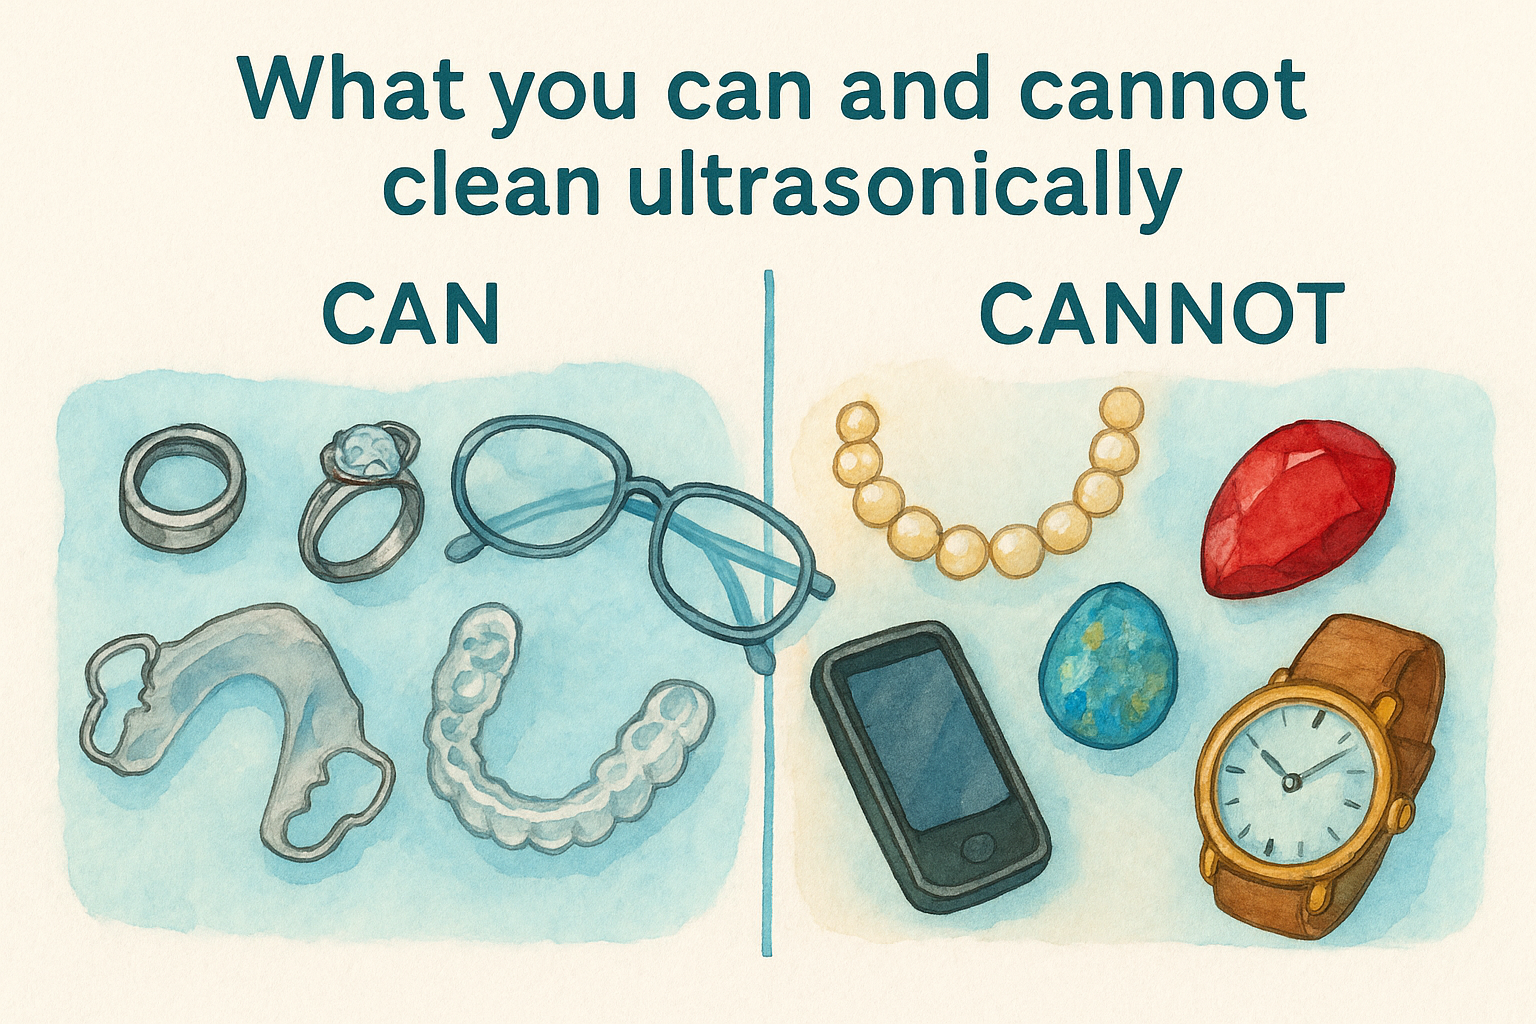
What you can and cannot clean ultrasonically
Ultrasonic cleaners work remarkably well on certain materials while potentially damaging others, and knowing the difference prevents costly mistakes with your dental appliances and other valuables. The benefits of ultrasonic cleaning only apply when you use the technology on appropriate items, as the cavitation process that removes contaminants so effectively can also harm delicate or unsuitable materials if you place them in the tank without understanding their compatibility.
Safe materials for ultrasonic cleaning
Your dental appliances made from hard acrylic, medical-grade plastics, and stainless steel handle ultrasonic cleaning perfectly. These materials resist the cavitation forces while allowing the cleaning action to remove bacteria and debris from every surface. Night guards, retainers, clear aligners, and mouthguards fall into this category, making them ideal candidates for regular ultrasonic maintenance that extends their lifespan and maintains hygiene standards.
Metal items like jewelry, eyeglasses with metal frames, and dental tools also clean safely in ultrasonic devices. The cavitation bubbles remove tarnish, oils, and buildup from intricate designs and tight spaces without scratching or weakening the metal. Glass items withstand the process equally well, provided they have no cracks or chips that might worsen under the vibration.
What ultrasonic cleaners damage
Soft metals like pearls, emeralds, opals, and porous gemstones absorb water and cleaning solution during ultrasonic cycles, potentially causing discoloration or structural damage. The vibrations can loosen stones set in jewelry or crack delicate materials that cannot handle the repeated pressure changes. You should avoid placing these items in your ultrasonic cleaner regardless of how dirty they appear.
Electronics, even waterproof ones, risk internal component damage from the intense vibrations that ultrasonic cleaning generates. Battery-powered items, watches with mechanical movements, and hearing aids should never go into an ultrasonic tank, as the cavitation process can compromise seals and disrupt delicate mechanisms designed for different types of stress.
Ultrasonic cleaning excels at maintaining dental appliances and metal items but damages soft gemstones, electronics, and anything with loose components or water-sensitive materials.
Special considerations for dental appliances
Your custom night guards and retainers tolerate daily ultrasonic cleaning cycles without degradation, but you should check for existing cracks or damage before each use. Pre-existing structural weaknesses might worsen under cavitation forces, though the process itself will not create new damage in properly maintained appliances. Inspect your device regularly to catch wear before it becomes a problem during cleaning.
Avoid using harsh chemical solutions in your ultrasonic cleaner when cleaning dental appliances. Plain water or specialized dental appliance cleaning solutions work effectively without leaving residues that irritate your mouth. The mechanical cleaning action handles most contamination, making aggressive chemicals unnecessary and potentially harmful to both the appliance and your oral tissues.
How to use an ultrasonic cleaner safely
Using an ultrasonic cleaner correctly protects both your dental appliances and the device itself while maximizing the benefits of ultrasonic cleaning you've invested in. The process requires minimal effort but following specific steps ensures you avoid common mistakes that reduce effectiveness or cause damage. Your safety and the longevity of your equipment depend on proper handling, appropriate cleaning solutions, and understanding how the technology works in practical application.
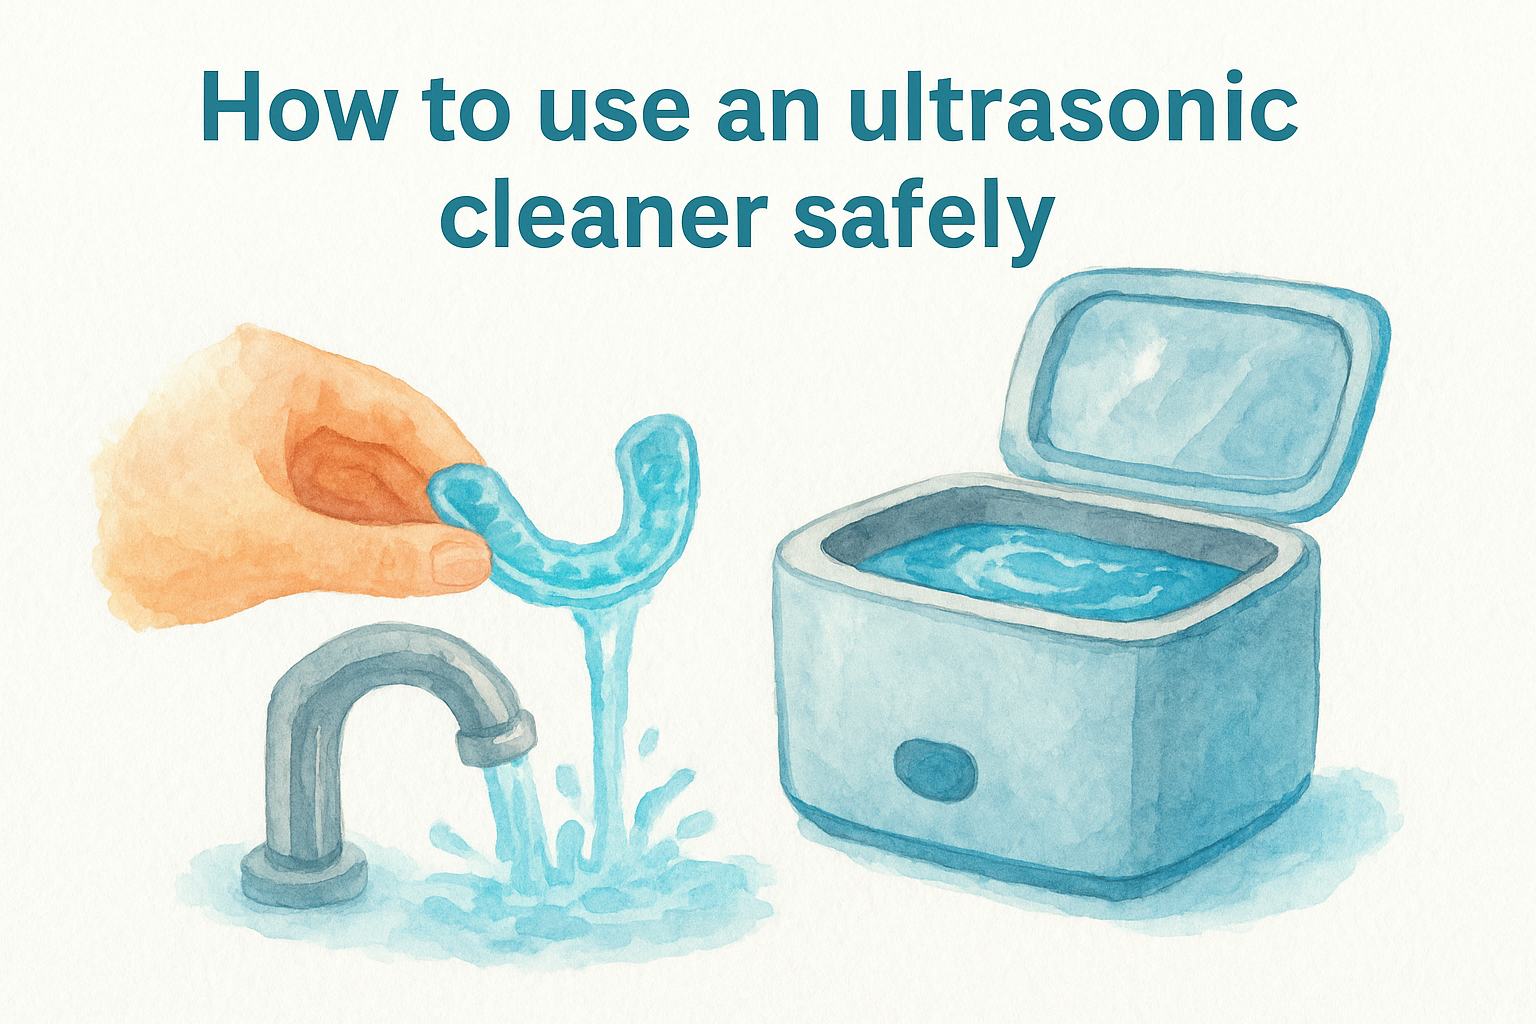
Preparing your appliance and solution
You need to rinse your night guard or retainer under running water before placing it in the ultrasonic tank to remove loose debris that could interfere with the cleaning process. Large particles floating in the solution reduce cavitation efficiency and can redeposit onto your appliance during the cycle. A quick thirty-second rinse under the tap eliminates surface contaminants and prepares the device for thorough ultrasonic action.
Fill the tank with room temperature water or specialized dental appliance cleaning solution to the manufacturer's recommended level, typically marked inside the tank. Never run the cleaner empty, as this damages the transducer and voids your warranty. The liquid must completely cover your appliance but should not exceed the maximum fill line, which prevents overflow during operation and ensures proper cavitation throughout the cycle.
Running a safe cleaning cycle
Place your dental appliance in the basket or holder that came with your ultrasonic cleaner rather than setting it directly on the tank bottom. The basket suspends your item in the cleaning solution where cavitation action works most effectively, while direct contact with the bottom can cause vibration damage or interfere with the transducer's operation. Position the appliance so water can reach all surfaces without items touching each other if you're cleaning multiple pieces.
Running your ultrasonic cleaner for the recommended cycle time (typically 3-5 minutes) delivers complete cleaning without unnecessary wear on the device or your dental appliance.
Start the cleaning cycle and allow it to complete without opening the lid or removing items prematurely. The cavitation process needs uninterrupted time to break down biofilm and remove embedded contaminants. Most cleaners shut off automatically when the cycle finishes, though some require manual operation where you monitor the timer yourself.
Post-cleaning care and inspection
Remove your appliance immediately after the cycle completes and rinse it thoroughly under running water to wash away dislodged debris and any cleaning solution residue. The ultrasonic action loosens contaminants but doesn't remove them from the tank, so prompt rinsing prevents particles from reattaching to your clean appliance. Pat dry with a clean towel or allow it to air dry completely before storage or use.
Inspect your night guard or retainer for cracks, warping, or discoloration after each cleaning session. While ultrasonic cleaning is gentle, existing damage might become more visible once debris is removed, helping you identify problems before they worsen. Replace the water in your ultrasonic tank after each use to maintain hygiene and prevent bacterial growth in the device itself.
Choosing the right cleaner and solution
Selecting the right ultrasonic cleaner and cleaning solution determines how well you maintain your dental appliances and whether you actually experience the benefits of ultrasonic cleaning you've read about. The market offers dozens of options ranging from inexpensive jewelry cleaners to professional-grade devices, and making the wrong choice wastes money on equipment that underperforms or uses solutions that damage your night guards and retainers. Your decision should balance tank capacity, power output, and ease of use with your specific cleaning needs and budget constraints.
Tank size and frequency requirements
You need a tank large enough to accommodate your dental appliances without cramping but not so oversized that you waste water and cleaning solution on unnecessary volume. Most night guards and retainers fit comfortably in tanks ranging from 400ml to 600ml, which provides adequate coverage while keeping the device compact enough for bathroom or bedroom storage. Measure your largest appliance before purchasing to confirm it fits in the basket with room for proper water circulation.
Consider how often you plan to clean your items when choosing capacity. Daily users benefit from smaller tanks that require less solution and heat up quickly, while people cleaning multiple appliances or sharing the device with family members might prefer larger models that handle several items simultaneously without overcrowding.
Water vs specialized cleaning solutions
Plain tap water delivers surprisingly effective results for routine cleaning of dental appliances, as the cavitation action itself performs most of the contamination removal. You eliminate bacteria and debris without chemical additives that might leave residues or cause irritation to sensitive oral tissues. Fill your tank with room temperature water and run a standard cycle for maintenance cleaning that costs nothing beyond electricity.
Specialized dental appliance cleaning solutions enhance results when dealing with heavy staining, mineral deposits, or particularly stubborn biofilm that plain water struggles to remove completely. These formulations work with ultrasonic action to break down proteins and calcium buildup more aggressively while remaining safe for the materials in your night guard or retainer.
Choose cleaning solutions specifically designed for dental appliances rather than generic jewelry cleaners, which may contain chemicals that degrade plastics or leave harmful residues.
Avoid using harsh chemicals, bleach, or alcohol-based solutions in your ultrasonic cleaner, as these substances can damage both your dental appliances and the tank itself while providing no additional cleaning benefit over proper ultrasonic action with appropriate solutions.
Features that matter for dental appliances
Your ultrasonic cleaner should include an automatic shutoff timer that prevents over-cleaning and protects both the device and your appliances from unnecessary wear. Standard cycles of three to five minutes handle typical contamination levels, while adjustable timers let you extend cleaning for heavily soiled items without constant monitoring.
Look for models with easy-to-clean stainless steel tanks rather than plastic, as steel resists staining and bacterial growth better while maintaining consistent performance over years of daily use. Removable baskets simplify the process of loading and unloading your dental appliances while preventing them from contacting the tank bottom where vibrations concentrate most intensely.
Troubleshooting and FAQs
Your ultrasonic cleaner should deliver consistent results with minimal intervention, but occasional issues arise that reduce effectiveness or create confusion about proper operation. Understanding common problems and their solutions helps you maintain the benefits of ultrasonic cleaning without frustration or wasted time. Most difficulties stem from simple mistakes in setup, solution choice, or maintenance rather than equipment failure, and you can resolve them quickly once you identify the underlying cause.
Why your ultrasonic cleaner isn't cleaning properly
Your device might run without producing visible cleaning action if you've filled the tank below the minimum level or placed your appliance directly on the tank bottom instead of in the basket. Insufficient water prevents proper cavitation formation, while direct contact with the transducer creates vibration interference that blocks the cleaning process. Add water to the correct fill line and suspend your dental appliance in the basket to restore full functionality.
Weak or absent cavitation also occurs when you use water that's too hot or too cold. Extreme temperatures disrupt bubble formation and reduce cleaning effectiveness significantly. Room temperature water (60-80°F) provides optimal conditions for cavitation, so avoid pre-heating or adding ice cold water to your tank before starting a cycle.
How to fix cloudy water or residue
Cloudy water after cleaning indicates successful contamination removal, as the dislodged debris floats freely in the solution rather than remaining on your appliance. You should empty and rinse your tank after each use to prevent bacterial growth and maintain hygiene standards. Fresh water for every cleaning session ensures consistent results without recontamination from previous cycles.
Empty your ultrasonic tank immediately after each cleaning cycle and rinse it thoroughly to prevent bacterial buildup and maintain peak performance for your next use.
White residue on your appliance after ultrasonic cleaning usually comes from hard water mineral deposits rather than incomplete cleaning. Switch to distilled or filtered water to eliminate this problem, or add a small amount of white vinegar (one part vinegar to ten parts water) to help dissolve minerals during the cleaning process.
What to do when your appliance still smells
Persistent odor despite regular ultrasonic cleaning suggests your dental appliance has deep bacterial colonization in microscopic cracks or surface damage that cavitation cannot reach. Inspect your night guard or retainer carefully for visible wear, and consider replacement if the material shows significant degradation. Even proper cleaning cannot restore an appliance that has reached the end of its useful life due to structural breakdown.
Extend your cleaning cycle to five or six minutes and use a specialized dental appliance solution instead of plain water when dealing with stubborn odors. Some contamination requires additional time for complete removal, particularly if you've previously used only manual cleaning methods that allowed biofilm to accumulate over weeks or months.
Next steps for a cleaner oral routine
You now understand how the benefits of ultrasonic cleaning transform the maintenance of your dental appliances from a daily chore into a simple, effective routine that actually works. The technology removes bacteria and buildup that manual methods miss, protects your investment in custom-fitted devices, and saves you time while delivering professional-grade results at home.
Your night guard or retainer deserves care that matches the precision that went into creating it. Remi's Ultrasonic Cleaner Pro was designed specifically for people who refuse to compromise on oral hygiene, offering the same cleaning power that dental professionals trust for their own equipment. Explore our ultrasonic cleaning devices to find the right solution for your needs.
Start treating your dental appliances with the thorough, gentle cleaning they require. Your mouth, your health, and your wallet will thank you when your custom devices stay cleaner, last longer, and continue protecting your smile for years instead of months.

