

You bought a DenTek dental guard to protect your teeth from grinding, and now you're staring at the box wondering how to actually make it fit. You're not alone, DenTek dental guard instructions can feel confusing at first glance, and getting the molding process wrong means starting over with a new guard.
This guide walks you through the complete process: heating the guard to the right temperature, molding it to your teeth, trimming for comfort, and wearing it correctly. We'll cover the most popular DenTek models so you can get a proper fit on your first attempt.
At Remi, we specialize in custom-fitted night guards that skip the boil-and-bite process entirely. But we also know that over-the-counter options like DenTek serve a purpose, especially when you need protection right away. Whether you stick with your DenTek guard or eventually upgrade to a professional-grade custom fit, protecting your teeth from grinding starts with proper use.
What to know before you start
DenTek makes several guard models, and each one follows slightly different heating and molding instructions. The Comfort-Fit Night Guard uses a boil-and-bite approach, while the Professional-Fit Dental Guard requires precise water temperature control. You need to identify which model you have before you start because using the wrong temperature ruins the guard material and wastes your money.
Different DenTek models and their heat requirements
The DenTek Comfort-Fit requires boiling water (212°F), while the Professional-Fit model needs water between 140°F and 160°F. Using boiling water on a Professional-Fit guard melts the material beyond repair. Check your packaging for the specific model name printed on the front, and verify the temperature instructions on the back panel before you heat anything.
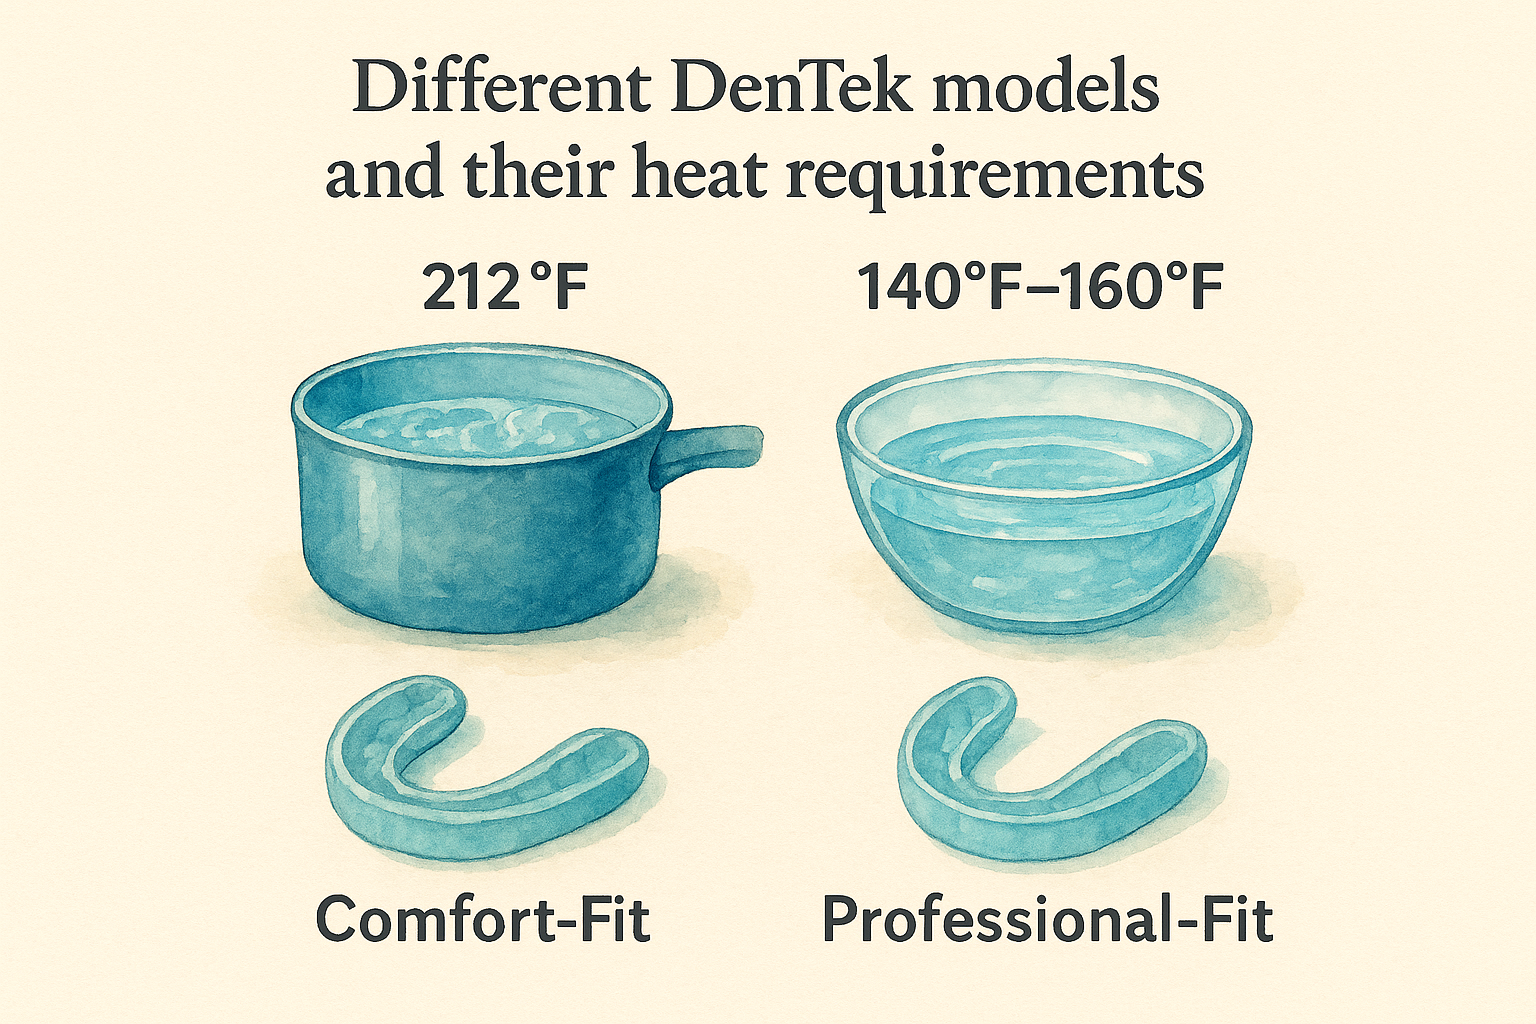
Always read the temperature specifications on your specific DenTek model before heating, because using the wrong temperature destroys the guard permanently.
What you need on hand
Gather these items before you start the dentek dental guard instructions process:
- Your DenTek guard (still in packaging)
- Pot or heat-safe bowl for hot water
- Slotted spoon or tongs
- Kitchen timer
- Cold water in a separate bowl
- Clean towel
- Small scissors (for trimming later)
- Mirror
Having everything ready prevents you from scrambling mid-process when the guard cools down. You get 60 to 90 seconds to mold the guard after removing it from the water, so preparation matters.
Plan for two attempts
Most people need two tries to get a comfortable fit. Buy a backup guard if this is your first time using a boil-and-bite product. The process becomes easier after you understand how the material responds to heat and pressure.
Step 1. Prep and practice the fit
Take your DenTek guard out of the packaging and rinse it under cool water to remove any manufacturing residue. Hold the guard up to your mouth to check which way it sits, most DenTek models have a visible front and back marked on the tray. You need to understand the correct orientation before you heat the material because once it softens, you have less than two minutes to position it properly.
Try the guard cold first
Place the unheated guard in your mouth and bite down gently. This cold test shows you how the guard sits on your teeth, where it presses against your gums, and whether the tray length matches your dental arch. Pay attention to spots where the plastic edges dig into your gums, these areas need trimming after the molding process finishes.
Check these fit points during your cold trial:
- The guard covers your molars completely
- No sharp edges press into your cheeks or tongue
- You can close your lips without forcing them
- The front section doesn't extend past your front teeth
Practice positioning the guard in your mouth several times before heating, because muscle memory helps you place it correctly when the material is hot and pliable.
Most dentek dental guard instructions skip this cold fit step, but testing the position first prevents mistakes during the actual molding process.
Step 2. Heat the guard the right way
Fill a heat-safe bowl or pot with enough water to fully submerge the guard, and bring it to the temperature your specific model requires. DenTek Comfort-Fit guards need boiling water at 212°F, while Professional-Fit models work best between 140°F and 160°F. Use a kitchen thermometer to verify the temperature before you drop the guard in, because guessing leads to either insufficient softening or complete material failure.
Heat timing and temperature control
Place your guard into the hot water using tongs or a slotted spoon, and set your timer immediately. Standard dentek dental guard instructions call for 30 to 45 seconds of heating time, but some models require up to 60 seconds. The guard should feel soft and pliable when you remove it, not melted or sticky. If the material looks distorted or starts separating from the base, you overheated it and need to start over with a new guard.
Remove the guard the moment your timer goes off, because even 10 extra seconds in hot water can ruin the material's ability to hold a custom shape.
Cool it just enough to handle
Shake off the excess water and wait 3 to 5 seconds before placing the guard in your mouth. The material needs to cool slightly so it doesn't burn your gums, but it must stay warm enough to mold. Test the temperature by touching it to your wrist first.
Step 3. Mold and set the bite
Center the heated guard on your upper or lower teeth (depending on your model) and press it firmly against your dental arch using your thumbs. Push the softened material up into the spaces between your teeth and along your gumline. You have 60 to 90 seconds before the material hardens, so work quickly but deliberately.
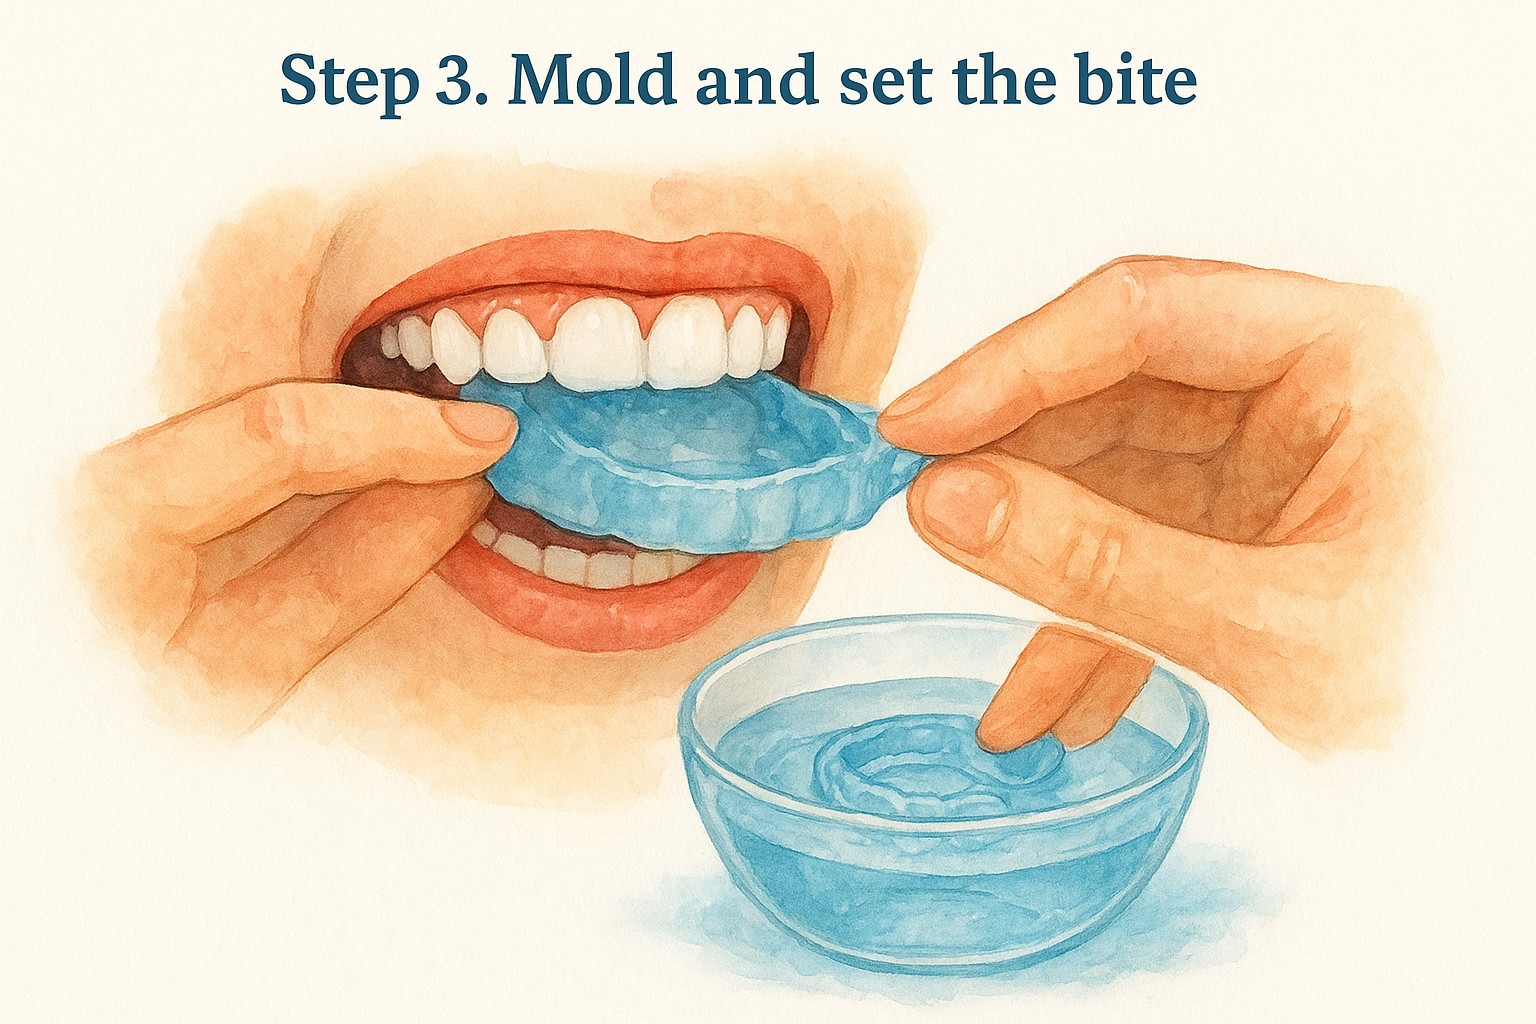
Bite down with controlled pressure
Close your mouth and bite down firmly for 20 seconds, maintaining steady pressure throughout. Use your fingers and tongue to press the guard against the front, back, and sides of your teeth simultaneously. This creates a complete impression of your bite pattern. The material should feel like it's wrapping around each tooth individually.
Apply consistent pressure during the entire 20-second bite period, because releasing too early results in a loose fit that falls out during sleep.
Lock in the shape with cold water
After the bite hold, remove the guard and immediately submerge it in cold water for at least 60 seconds. This cold shock locks the custom shape permanently into the material. Following these dentek dental guard instructions for the cooling step prevents the guard from warping when you wear it later.
Fix common fit and comfort issues
Your DenTek guard might not feel perfect after the first molding attempt, and that's completely normal. Most people experience minor fit problems that take simple adjustments to correct. The good news is that you can fix most issues without wasting your guard or starting completely over.
The guard feels loose or falls out
A loose guard means the material didn't capture enough detail during the molding process. You can remold most DenTek guards one additional time by reheating the guard for 15 to 20 seconds (not the full initial heating time). Press the softened guard more firmly into the spaces between your teeth this time, and hold your bite for the full 20 seconds without releasing pressure early.
If your guard consistently falls out after two molding attempts, the problem is usually insufficient pressure during the bite phase, not the heating process.
Sharp edges irritate your gums or cheeks
Use small scissors or nail clippers to trim any plastic edges that press into your soft tissue. Cut small amounts at a time, test the fit, then trim more if needed. Focus on the areas where the guard extends past your last molar and the front edges near your lips. Standard dentek dental guard instructions suggest leaving at least 2mm of material beyond your teeth for proper protection.
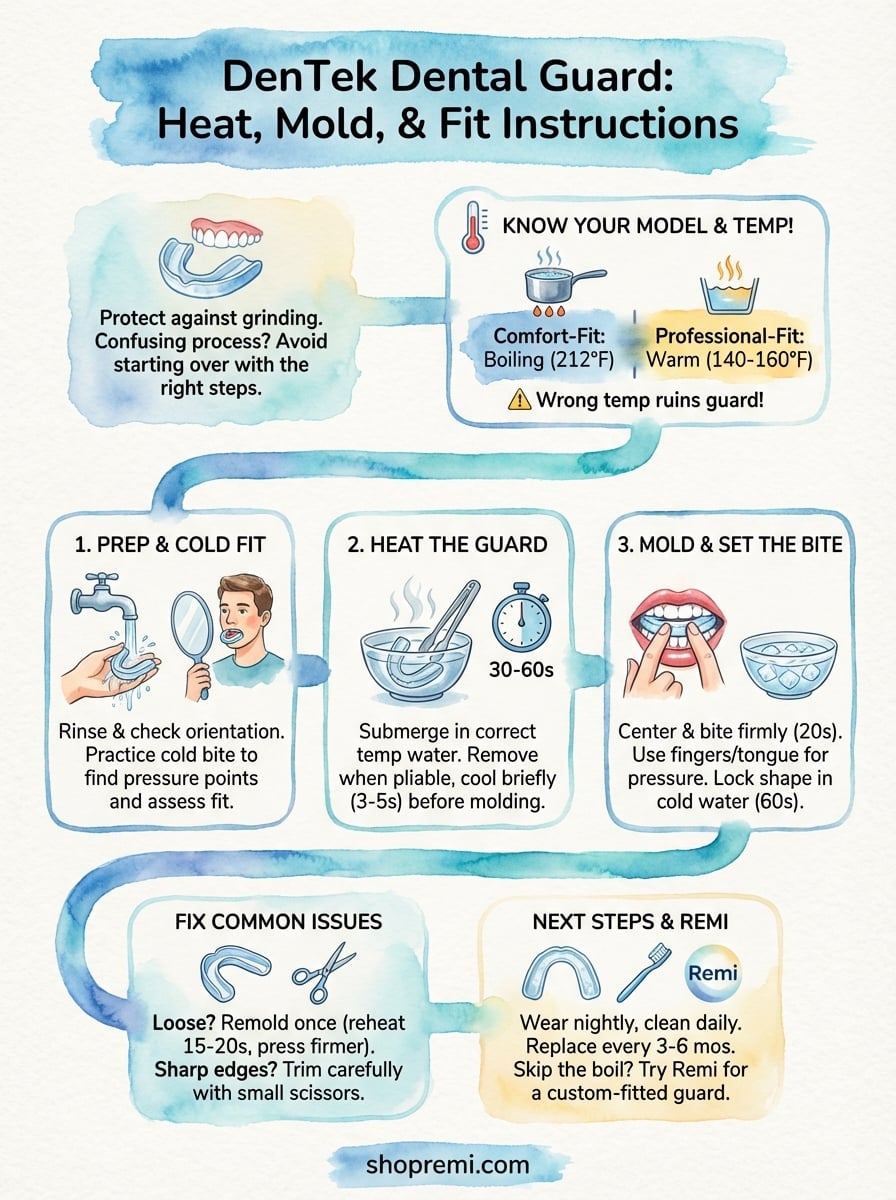
Next steps
Your DenTek guard should now fit comfortably and provide basic protection against teeth grinding and jaw clenching. Wear it every night and clean it each morning with cool water and a soft toothbrush. Replace the guard every three to six months or whenever you notice cracks, tears, or a loose fit. Following proper dentek dental guard instructions helps the guard last longer, but boil-and-bite materials break down faster than professional-grade alternatives.
If you find yourself constantly adjusting your guard, reheating it multiple times, or waking up with jaw soreness despite wearing it, consider upgrading to a solution that fits without the guesswork. Remi's custom night guard uses dental-grade materials and creates a precise impression of your teeth, so you skip the boil-and-bite process completely. You get professional protection at 80% less than dental office prices, with the same quality standards dentists use for their in-office guards.

